JavaScript is disabled
Our website requires JavaScript to function properly. For a better experience, please enable JavaScript in your browser settings before proceeding.
Messages
3,580
Reactions
12,100
I am reforming .357 Maximum brass to .257 caliber. First step is a .30 Luger die, then the .257 die. The first lot I did I didn't anneal the brass. What I had read online suggested that it may or may not be necessary for that amount of working of the brass. Having shot my first batch and suffered 80% failure through split shoulders. obviously annealing is necessary. My question is, where in the process is annealing most beneficial and where might it be harmful?? My first thought is to anneal after the .30 Luger sizing and again after the .257 sizing, but don't know if doing it twice is necessary. What are your thoughts?? Thanks!!
 
I am not an annealer but you probably are right at both stages of you want to make sure it's soft for the next stage.

Wouldn't hurt especially if you are going to use it more than once.
 
Splitting and brittleness is a result of the brass being worked. Annealing removes the hardening from working it.

If you are able to work it all the way through the reforming process without any signs of brittleness/cracking/splitting, you could do it last. But don't be surprised if it needs another pass through the .257 die afterwards. There may be considerable stress that will cause the brass to move during the annealing process.

Since the .357 brass is probably pretty thin where the shoulder is being formed, I would do it twice on a number of casings and keep them separate, just to see if it makes a difference.
Once after the .30 die, and once after the final sizing.

BTW, that sounds like a neat little round ya got there. I hope you can make it work!
 
So an annealing step after all of your forming operations are complete would essentially be a stress-relief operation. Unless you're actually having issues with dimensions going from .30 to .257 an anneal probably isn't necessary in this step, but certainly would be afterwards to prevent age cracking (if you just leave some worked brass sitting, you'll probably find it cracked within a few months).

So yea, you need to anneal. This is kinda've an odd-duck in terms of what you're trying to anneal, so an easy way to do it would be to set your cases in a pie tin full of water with just the shoulders and necks sticking out, and then carefully heat each one with a torch. I'm guessing you don't have a DPH tester, so it's going to take some trial and error.

The easiest thing to do is go find yourself some tempilaq, this is available as markers, but honestly the liquid stuff seems to work best, I would grossly estimate you're going to want a temp about 550F, with no dwell or soak time. (you can also do lower temp, but longer dwell to achieve the same hardness)

Personally, I would start at 450F, on a few cases, you can test how hard the case is with a pair of pliers, simply applying some pressure, and seeing how much spring-back you get. Super-hard and it returns immediately to original shape, dead soft, slight pressure deforms it. You kinda want something that leans towards dead soft, but still has some spring back, otherwise the case won't hold the bullet.

Anyways, once you get the case up to temp, just immediately flick it over into the water, this will quench it and stop the heat treating process, brass unlike steel is simply a hardness->time/temp plot, you cannot make brass harder by heating it, only by cold working.

So to answer all of the questions:

* Anneal after final size unless you're having problems with cracking or folding during final size
* Check your process time/temps and try to be consistent, a lot of people thing buying a case annealer is necessary, depending on your quantities it likely isn't.
 
Thanks @AMProducts,I will try that!! No problems during forming, only after firing. I will source some Tempilac. I have used Tempilstiks for other things but they are cumbersome for this type of operation. Presuming the brass will survive several firings I won't have to do too many.
@Jamie6.5 I will also try two annealing steps on a few and see if they act any differently.
Thanks all for replying!!
 
And please, a picture of the loaded round and a range report !
Will do. If the weather cooperates I'll take it out Saturday. I have annealed the remaining 20% and loaded them for the next test. If I get a chance I will form a few new ones and anneal them also to test.
 
I'm glad you posted this and also for @AMProducts reply. I've been re-forming brass from a .375 neck to a .284 - and some of them are folding. I wish I had annealed half way through the process. I'm going to pull-down all the ones I have loaded so far and anneal them before loading again. At $1 apiece, I don't want any split necks.
 
Hopefully you have kept the ones you ruined for test purposes. I have tried the pan of water method but find it difficult to get even heat on the neck and shoulder. Most annealing is done just to the neck but I need to anneal the shoulder as well.
What do you mean by "folding?? I would be afraid that annealing (softening) the brass may make this worse instead of better.
What I am currently trying, and have been happy with the results so far, is to put a 7/16" socket (that's what happens to fit my brass) on an adapter in a drill motor. Set the torch with a small flame on a stand with a pan of water underneath it, and keep a 700 degree Tempilstik in hand. Put the brass in the socket, spin it in the flame until it "looks" right, touch it with the Tempilstik to make sure it is 700 degrees, and then dump it in the water. Next!! Since I have 80 of them to practice on I have gotten pretty good at it without sacrificing any good brass. This seems to soften them nicely without affecting the body much below the neck and the base not at all.
I didn't have any luck finding Tempilac, short of a month delivery time, and had the Tempilstik available.
From the online research I have done, brass isn't affected until it reaches 482 degrees. At that point it takes about an hour to anneal it. The hotter it gets, the less time is necessary, until you reach about 850 degrees, at which point the brass anneals instantly, but starts to deteriorate. I figure 700 degrees for three-to-five seconds is hot enough to do the job and not risk overheating. I am using a MAPP torch instead of propane so the flame is quite a bit hotter so I turn it down to an idle. If I get ambitious I'll try my hand at posting a video.
 
Got to work on this a little bit tonight so here are some pics;

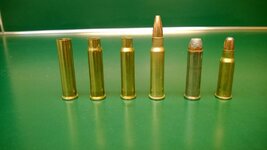
WP_20161019_001.jpg
First pic L-to-R; Virgin .357 Rem. Max. brass, First sizing step in .30 Luger die, Second sizing step in .256 Win. Mag. die spaced up from shell plate, Loaded round (annealed) with 75 gr. Sierra HP, .357 Magnum for comparison, and original .256 Win. Mag. with 60 gr. Soft point.

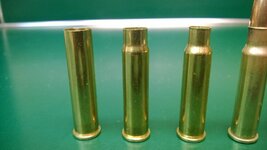
WP_20161019_002.jpg

Second pic; close-up of the three stages of sizing. I have twenty six in each of the first and second stages. No damage to any of them during sizing. Next step will be to anneal all of them and then second-size the second half and re-anneal them per Jamie6.5's suggestion.

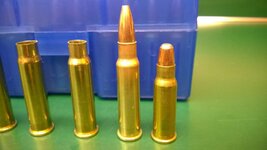
WP_20161019_003.jpg

Third pic; A comparison of my .257 Win. Max. and the original 256 Win. Mag.

As far as a range report, I expect to take them out Saturday. Previous outings have been very satisfying. Originally I home-rechambered a factory Contender 10" .256 Win. Mag. barrel. That proved good enough to warrant further exploration so I had Bulberry make me a 14" Bull barrel. If I do my part I can get 1" groups at 100 yds. with it. I haven't experimented too much with loads since the one I'm using has worked so well. Loading 25.5 grs. of H-335 with the Sierra 75gr. HP. Performance is 2400 fps. I have loaded the 60 gr. bullet and gotten 3000 fps, but it's not much for accuracy. Learned that pistol powders don't like bottle-necked cartridges. Moved to rifle powders and was pleased with the improvement. Still as much to do as I care to for development.

Thanks all for your interest and help with my project.:)
 
Schweeeet!
That looks like a close range deer killer if there ever was one.
Looking forward to the range report!

BTW,... How much is the case growing in length through this process? In the close-up shot it looks like the final sized case is a little longer and the mouth might be slightly out of square. (or maybe it's just an optical illusion)
Have you checked them?
 
The first one I did myself. I bought a .256 Win. Mag. reamer and ground off the part that cuts the relief for the rim with a tool-post grinder in the lathe. With that part gone I was able to use it to deepen the chamber the ~.300". The body taper at the base of the cartridge is so slight that it works okay. Once I determined that I wanted to pursue it I had Bulberry make me a 14" barrel. I sent them a few dummy reloads and they cut the chamber to fit.
Edited to add; the case grows .005" in the first sizing and another .010" in the second step. The mouth is true, just looks crooked.
 
Lessons from this evening's efforts;

Brass needs to be CLEAN!! Any case lube or other contamination, even tarnish on old brass, limits the color change when annealing. Contrary to what I have read online, color change, although more subtle than with steel, is a very good indicator of temperature.

Thermomelt crayons are better than Tempilstiks for this. Tempilstiks for 750 degrees are yellow and leave yellow marks on brass. Thermomelts are orange, but leave a black mark that is easy to see. The black mark mostly comes off in the water and the rest comes off in the tumbler.
After some tests on the split brass I went to a 700 degree Thermomelt. The "squeeze test" showed that the brass was significantly annealed at that point. The Thermomelt was used to establish an understanding of the color changes. Once I was comfortable with the colors I quit using the Thermomelt.

I was concerned that annealing after the first step would leave the brass too soft and it would collapse during the second sizing. this was not an issue. it did make the second sizing operation MUCH easier!

What was an issue is that when you are annealing for the second time you don't have nearly as good of a color reference as the first time. Unless there is a marked improvement between once-annealed and twice-annealed I will forgo the first annealing step.

Case elongation was the same with the annealed, twice annealed, and not annealed cases, .015" total.

I haven't tried a propane torch, mainly because I don't have one, but the MAPP torch works really well. It is enough hotter to keep the time shorter so less heat conducts towards the base.

I have a video of annealing a case but cannot upload MP4 files. I have a question posted to see how to make it work. If I can I would like to share it. Most people watching the video may think I am over-annealing the brass. Remember, most annealing is done merely to soften the neck, but I am actually trying to anneal the shoulder. For annealing the neck I would move the case out of the flame until just the neck was being heated. The color change of the brass within the flame is slightly different than that which is exposed to the air. There will be a learning curve for that eventually.

All of this is applicable to making .256 Win. Mag. brass from .357 Magnum brass.

I now have 25 once-fired, annealed cases from the first lot, 25 new cases annealed at the end of sizing, and 25 new cases annealed twice during sizing. all will be loaded with 25.5 grs. of H-335 and a Sierra 75 gr. HP.

I am not a purist reloader. The cases come out within a few thousandths of the same length every time and I consider that close enough. I intended the round to be that long and the case mouths are square so I don't see any point in trimming new brass. I will chamfer them for ease of starting the bullet, monitor case length as they are reloaded, and establish a trim schedule from that if necessary.

The process for this evening's experiment;
Take new .357 Max. brass and lube it.
Size in .30 Luger die
Tumble, Anneal, Dry and Relube. (Only @Jamie6.5s half of the lot:D)
Size in .256 die
Tumble, Anneal and Dry.

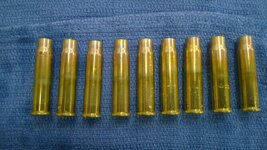
Here is a pic of some of the cases that were annealed after the first sizing step. The splotches on some of them are water drops as they were still wet.
I have actually considered making a .30 caliber round too. Maybe later.
WP_20161020_005.jpg
 
++ Like this thread.
I anneal in the dark where the light of the torch is all I need to do my job. I use a piece of all thread in a cordless drill so I'm spinning the case in the sweet spot of the flame.
In the dark, you can see the color change around 900°F, where it moves from black to a very dull brown/red (don't know how to describe it, but you can see that transition in black where it's not emitting any light to when it starts emitting). When I started doing it, i used one of those $20 laser IR scanners from Harbor Freight to double-check my temperature.
As soon as it reaches the color, I just drop the brass into a tray, no water quench needed, slip on another case and repeat. I found going over 1200°F (red, looks like orange) didn't hurt the magnum rifle brass.
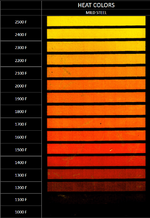
Stuff you put on the brass won't affect the color. Here's a scale from a website for blacksmiths that lists the color temperature range (it is the same regardless of material). Note, this is for normal lighting. Doing it in the dark shifts the color down almost 300° (the difference between looking up at the stars from Ephrata vs Portland.)
I rarely used to trim my brass, but because of the reforming, I upgraded my trimmer and use it often.

I'm curious - why do you tumble between annealing/forming stages? Is your mapp gas burning dirty and leaving soot? I've always annealed before doing any case prep, then deprime / size, THEN tumble. Since going to a stainless pin tumbling, I deprime, tumble and then resize. I do need to anneal some 338 Edge cases....

SteelTemperature.PNG
 
Last Edited:
Hopefully I can get the video posted.
I tried the temp gun, but getting it aimed correctly seemed troublesome. Maybe I'll try it again.
I chose to quench mine since I am heating them more than you normally would for neck annealing, and since they are fairly short heat propagation too close to the base was a consideration.
I would modify your statement to say "It is the same regardless of type of steel." Obviously aluminum, lead, tin, titanium, etc. don't go through those same colors. Likewise brass is a puddle by the time you are halfway up the chart.
Oils and contaminants will affect the colors as I am using them. remember I am not talking about incandescent colors as your chart above is, and wouldn't be affected by oils, I am talking about the colors as one would see when heat-treating or drawing back steel, i.e. straw, purple, light blue, dark blue, etc. Obviously the colors are different for brass but the type of progression is the same.
 
Wow, I didn't realize you were going to have to wash and tumble after each annealing. All I ever did was wipe them off and run them through the resizer. I made sure the towel I wiped them off with had a little lube on it.
Most of the working of the brass is occurring during the formation of the shoulder, so the final/second anneal may not even be necessary.
I'm curious to see what they look like after fireforming and the shoulder is nice and sharp.
At least with a rimmed cartridge you don't have to worry about headspace for fireforming!

How thick is the neck after the final resize, and have you checked it to make sure it's consistent all the way around?
 

Upcoming Events

Centralia Gun Show
Centralia, WA
Klamath Falls gun show
Klamath Falls, OR
Oregon Arms Collectors April 2024 Gun Show
Portland, OR
Albany Gun Show
Albany, OR

New Resource Reviews

New Classified Ads

Back Top