JavaScript is disabled
Our website requires JavaScript to function properly. For a better experience, please enable JavaScript in your browser settings before proceeding.
Not sure I HAVE to, I'm just relating what I have chosen to do so far. Being naturally lazy I will probably simplify things along the way. In practice on the split cases I noticed the case lube interfered with the color changes when annealing so I tumbled them as an easy way to make sure they were clean.
The finished round in Post #12 has been fired and reloaded. There should be negligible fire-forming as the dies I'm using are a match to the chamber. The chamber was cut by Bulberry based on dummy loads I sent them that were formed in these dies.
Neck thickness varies from.011"-.015", though not more than .002" variation per case. In other words the case with the .011" thickness is no more than .013" at its thickest and the one that is .015" is no less than .013" at its thinnest.
Currently loading them for tomorrow!!
 
Here they are!! 25 annealed soldiers. These are the once-annealed ones. The twice-annealed are in the tumbler. WP_20161021_007.jpg
 
Range report.
Of the 25 cases that had been fired previously and now annealed, I had four of them split in the shoulder. Definitely a better survival rate than before, but there may be something different about those cases that kept them from splitting the first time around so that is not conclusive.
Of the remaining 50 cases there were no failures at all. This is much more telling. I could find no performance difference in any of them. I will keep them segregated throughout their lives to see if the double-annealing is of any benefit for lifespan. At this time I see no reason for it.
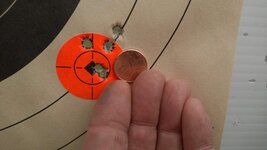
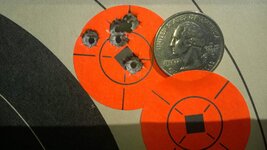
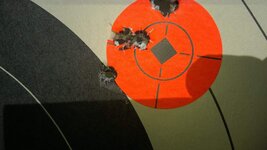
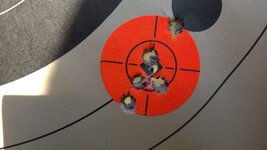
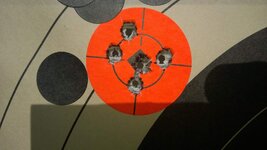
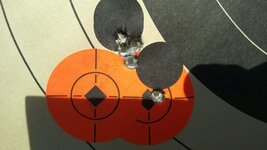
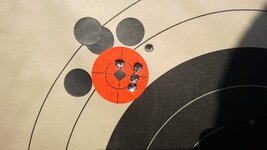
The pictures below are some of the better groups (of course:D). The groups not as nice as these I'm sure were my fault. I saw nothing to indicate any problems with the round or the gun. The target spots are 1 1/2" diameter. I fired 15 5-shot groups and none of them were over 2 1/2". All shots are 100 yards off of sandbags. T/C Contender with Bullberry 14" .257 Win. Max. barrel, Bushnell 2-6X scope. Load is 25.5 gr H335, CCI 400 primer, Sierra 75gr. HP bullet. All loaded on a Dillon 550B.
To say I am pleased would be a gross understatement!!
WP_20161022_001.jpg WP_20161022_002.jpg WP_20161022_004.jpg WP_20161022_005.jpg WP_20161022_006.jpg WP_20161022_008.jpg WP_20161022_009.jpg
 
I had chronoed this same load when I was having trouble with the brass splitting. They are right at 2400fps. If I go to the 60gr. bullets it goes to 3000fps but accuracy is poor.
 
If all goes well there will be a video below of annealing a case. The haze that appears as the brass approaches the flame is condensation of water vapor out of the flame, which disappears as soon as the brass warms up. As the brass continues to heat up the neck turns a darker yellow/gold, then a reddish shade, then a pastel blue. Once the blue reaches the shoulder, into the water it goes. At that point the brass is ~700 degrees about 1/8" below the shoulder.
I don't know that the quenching is necessary, but it makes a definite end to the annealing, that way there is no further softening of the body of the case.
A note on Thermomelts and Tempilstiks. I just received a new Thermomelt and it is made of the same chalky material as Tempilstiks instead of the softer crayon-like material of old. Not sure if it will work as well as the old style if used in the same manner. Time will tell.

Todays range report; fired 60 rounds total, some first time, some second time. No splits in any of them. Apparently the annealing is the cure. Twelve five-shot groups, none over 1 1/2" until my hands got cold.

 
Very cool, sorry I've been absent, been busy as hell getting ready for a few things. I should be back up in WA for at least a few weeks in november. (looking to land a full-time gig while I'm up)

Anyways, you are correct, quenching stops the annealing process. This was kinda the reason I suggested putting the cases in a pan of water. What you might try is a longer time, so set the cases in the water, heat them to temp, and then just let natural cooling take effect. Setting them in say 3/8" of water will keep the excessive heat away from the head. Really what you want is a hardness gradient, if you quench them too quick the transition between the hard and soft part can become essentially a stress riser.

If you want to be super scientific about your annealing process there's this:
1000W ZVS Low voltage induction heating board module/Tesla coil 12-48V voltage | eBay

There are also plans, and other sources, I think there's someone out there who sells a 100W unit for much less. I'm using a derivative design of the 1000W unit for a small batch heating/annealing in my shop, it's essentially a small inert induction furnace (I use nitrogen as the purge gas).
 
Interesting @AMProducts, thanks for the info. For now I will see how the brass survives as I have annealed it. If its lifespan seems too short I will definitely try something else. Perhaps induction heating will be it. Do you have a video of your induction heating process??
 
Interesting @AMProducts, thanks for the info. For now I will see how the brass survives as I have annealed it. If its lifespan seems too short I will definitely try something else. Perhaps induction heating will be it. Do you have a video of your induction heating process??

At the moment I don't, and I'm out of office, so I can't really record any. I'm horrible about putting vids together, but if you search for ammomfg on youtube that's me.
 
Here are those photos of me reforming 375 Ruger to 7MM Long Range Magnum cartridges. Truly fugly.
I finally got out today and shot off a bunch. None ruptured.
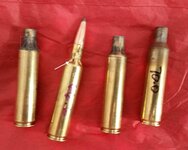
Shown are 1 unshot, 2 shot (notice the powder blowback going as far as the shoulder), and one LRM custom cartridge that I bought from Gunwerks (rightmost case). Reforming the 375 Ruger is such a PITA, I'm not going to do it any more. It was nice in theory.
Converting the 375 to 7mm LRM took necking it down to .284 as well as shortening the shoulder by ~.180. The necking down isn't a problem, After about 60mils, shortening the shoulder is ugly and starts to fold the brass like shown in the pictures. Annealing, turning the brass, nothing changes that effect. It made no difference whether I tried shortening the shoulder while the neck ID was at 375, 338, 308 or 284. I read one man's advice (supposedly he was successful), and followed his recipe, but I was not able to replicate smooth brass. I'll just buy more from gunwerks and use the converted ones I have, inspecting them closely on reload.

The dies Gunwerks sells are designed for neck bump only. I found that out on the first case, where I set it as you normally would a full length die, and crushed the case. Oops.

Link to the build: Wildcat Build #2, 7mm LRM
7mmLRM.jpg
 
Last Edited:
Update; I took two batches to the range Wednesday.
The first batch is 24 that are left from my initial forming process that were not annealed before firing. In the first firing almost half of them split the shoulder. I then annealed these that hadn't split and reloaded them. This time out three of the 24 split at the shoulder.

The second batch, also of 24, are ones that were annealed once at the end of the forming process. none of these split.

I haven't shot any of the ones that were annealed twice during forming yet.

Obviously shooting them before annealing is a bad idea. The summer will tell whether the twice-annealed ones will outlive the once-annealed ones or not.

Performance was the same as before. ~2400 fps. Group size opened up a little bit, but I have no trouble blaming myself for that. I haven't shot it in months.
 

Upcoming Events

Centralia Gun Show
Centralia, WA
Klamath Falls gun show
Klamath Falls, OR
Oregon Arms Collectors April 2024 Gun Show
Portland, OR
Albany Gun Show
Albany, OR

New Resource Reviews

Back Top