JavaScript is disabled
Our website requires JavaScript to function properly. For a better experience, please enable JavaScript in your browser settings before proceeding.
Nice job, Bionic!
part of the old cover.

burning today 001.JPG
 
I'm in the middle of a bathroom remodel.....full gut and build back. Removed the fiberglass shower stall and dropped the floor down for a tiled in place handicapped shower. It will be a straight walk in with no lip to step over.

I'm going back together right now and after stripping wall paper off the walls I tried painting one large wall and it was a mess. I just finished floating mud over the wall and will sand it back flat once dry. Whom ever thinks wall paper in a bathroom was or is a good idea needs their head examined. I'll get photos when there is something to see....
I do not envy you! I've done a couple myself, however, I've never had to deal with the wallpaper issue. I don't think I'll be doing any more bathroom remodels (although, they were fun at the time).

That's quite the undertaking. Looking forward to seeing your progress.
Bill
 
I do not envy you! I've done a couple myself, however, I've never had to deal with the wallpaper issue. I don't think I'll be doing any more bathroom remodels (although, they were fun at the time).

That's quite the undertaking. Looking forward to seeing your progress.
Bill
My wall floating is coming out pretty good but will have to wait until morning to finish as some is not dry yet. I am tackling the small bathroom first and will get it done before I start on the wife's bathroom complex.....hers has a shower and toilet room that is the same size as the bath I'm doing now, another room with vanity and cupboards, and a third room that is a walk in closet.

I spent 2k on tile and will spend 4k for the guy to install it. Plumbing, cabinet, mirror, lighting, paint...I'm going to be 10k into it and I did all the tear out, floor drop, and prep work. At least the wife does not want a tile shower in her bathroom. She wants a tub and surround that I should be able to install myself. We will tile the floors so there will be some expense there. Two things I won't do are soldering plumbing and laying tile. I suck at both. I can set valves, run drains, and prep all the pipe but I hire someone to solder now as I have not done enough of it to feel 100% about my work.....and yes, I know how easy it is to solder but the wife insists I stay hands off even though I have never had a leak in any of my own plumbing jobs. I learned I do not have patience for laying out tile either so I leave that to the pros.

About that wallpaper....the removal process was a chore as the walls were not primed heavy enough before they applied the paper. Getting the glue off seemed straight forward but it caused lines in the paper finish on the sheetrock that were not detectable until I painted it. Subtle lines that could be seen at the right angle.....drove me nuts.
 
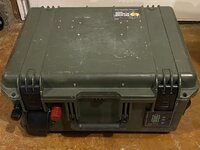
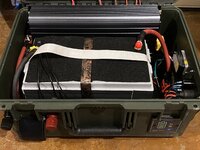
I was looking at Jackery and Bluetti solar battery generators and realized "Hey, it can't be that hard to build my own", so I set out to do it. I bought a used Pelican Case from eBay since I didn't care what it looked like, but wanted it to be waterproof. The other components are as follows:

12.8V 100Ah LiFePo4 Battery w/tie downs and strap
1500W Pure Sine Wave Inverter
20A Charge Controller
(2) Temperature Controllers
12V 35W Silicone Heater Pad (self-made)
Control/Output Panel
15A 120V GFCI Receptacle and Cover
Solar Panel Input
Charging/Expansion Terminals
Main Battery Disconnect
Battery Insulation Wrap

There are a number of features which I believe make mine better than the factory-built models that I looked at including:
  • It's in a rolling case instead of always having to be carried
  • The case is completely waterproof
  • Mine can be serviced in the field instead of having to be shipped back to the mfg. I even installed a 12V LED service light in the lid, and have spare parts, fuses, and tools that I keep in the case
  • Using the Charging/Expansion Terminals, I can connect a second equivalent battery and double my capacity to 2560Wh (2x12.8Vx100Ah)
  • The battery is insulated and can be heated in order to allow charging in temperatures at or below freezing. The factory models shut down at those temperatures in order to protect the battery from damage which completely prevents charging
  • Building it myself saved me about $500
I have used this to run my 1500W coffer maker to brew a full pot of coffee, run my 1100W microwave, and I used a 750W space heater to do a battery draw-down test and it ran for a little over an hour. On a clear summer day with full sun, my 2x120W Acopower solar panel sets can charge the battery from 0 to full in about 8 hours.

IMG_1139.jpg
IMG_1140.jpg
IMG_1142.jpg

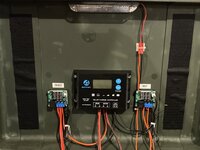
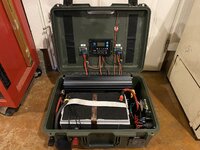
Here is a close up of the charge controller and temperature controllers. The Charge temp controller is set to open the charging circuit at 34F in order to protect the battery from damage due to low-temp charging, and re-close it when it warms up to 35F. But, if I have the heater circuit turned on, the Heat temp controller will start the heater at 34.5F before the charging circuit opens, and will warm the battery to 36F before it shuts off. I added this feature so that I can charge outside on cold days that also happen to be bright and sunny!
IMG_1141.jpg

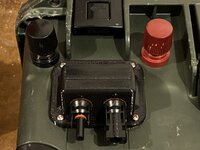
The photo below shows the Charging/Expansion Terminals. These are used for connecting an external charger that operates on 120VAC, or connecting a second 12.8V 100Ah battery. Below those are the inputs for the solar panel(s).
IMG_1143.jpg

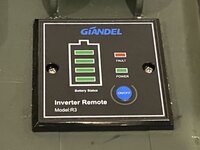
This is the remote ON/OFF for the inverter and was included with it. I mounted it on the outside so that I could operate the inverter without having to open the case.
IMG_1144.jpg

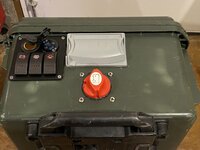
This photo shows the Control/Output Panel, 120V receptacle, and Main Battery Disconnect.
IMG_1145.jpg

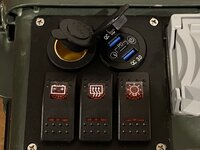
This is the Control/Output Panel. It includes a 12V cigarette lighter socket, USB/USB-C charging ports, and switches to enable/disable the charging circuit and related control components, heater and Heat temp controller, and light.
IMG_1146.jpg
 
Last Edited:
Excellent!
How long will the battery last before it needs recharging?
In other words, lets assume its night, so no sun to charge the system.
Will the battery make it through the night?
 
I was looking at Jackery and Bluetti solar battery generators and realized "Hey, it can't be that hard to build my own", so I set out to do it. I bought a used Pelican Case from eBay since I didn't care what it looked like, but wanted it to be waterproof. The other components are as follows:

12.8V 100Ah LiFePo4 Battery w/tie downs and strap
1500W Pure Sine Wave Inverter
20A Charge Controller
(2) Temperature Controllers
12V 35W Silicone Heater Pad (self made)
Control/Output Panel
15A 120V GFCI Receptacle and Cover
Solar Panel Input
Charging/Expansion Terminals
Main Battery Disconnect

There are a number of features which I believe make mine better than the factory-built models that I looked at including:
  • It's in a rolling case instead of always having to be carried
  • The case is completely waterproof
  • Mine can be serviced in the field instead of having to be shipped back to the mfg. I even installed a 12V LED service light in the lid, and have spare parts, fuses, and tools that I keep in the case
  • Using the Charging/Expansion Terminals, I can connect a second equivalent battery and double my Ah capacity
  • The battery can be heated in order to allow charging in temperatures at or below freezing. The factory models shut down at those temperatures in order to protect the battery from damage which completely prevents charging
  • Building it myself saved me about $500
I have used this to run my 1500W coffer maker to brew a full pot of coffee, run my 1100W microwave, and I used a 750W space heater to do a battery draw-down test and it ran for a little over an hour. On a clear summer day with full sun, my 2x120W Acopower solar panel sets can charge the battery from 0 to full in about 8 hours.

View attachment 1134137
View attachment 1134138
View attachment 1134140

Here is a close up of the charge controller and temperature controllers. The Charge temp controller is set to open the charging circuit at 34F in order to protect the batteries from damage due to low-temp charging, and re-close it when it warms up to 35F. But, if I have the heater circuit turned on, the Heat temp controller will start the heater at 34.5F before the charging circuit opens, and will warm the battery to 36F before it shuts off. I added this feature so that I can charge on cold days that also happen to be bright and sunny!
View attachment 1134139

The photo below shows the Charging/Expansion Terminals. These are used for connecting an external charger that operates on 120VAC, or connecting a second 12.8V 100Ah battery. Below those is the inputs for the solar panel(s).
View attachment 1134141

This is the remote ON/OFF for the inverter and was included with it. I mounted it on the outside so that I could operate the inverter without having to open the case.
View attachment 1134142

This photo shows the Control/Output Panel, 120V receptacle, and Main Battery Disconnect.
View attachment 1134143

This is the Control/Output Panel. It includes a 12V cigarette lighter socket, USB/USB c charging ports, and switches to enable/disable the charging circuit and related control components, heater and Heat temp controller, and light.
View attachment 1134144
Genius!

There are two things I have come to realize are complete mysteries to the average person; Electrical Systems and The Refrigeration Cycle.

Are you an Electrician?
How did you figure out how to assemble all the bits and pieces?
 
Are you an Electrician?
How did you figure out how to assemble all the bits and pieces?
Yes. While I haven't worked in the trade since 2011, I did so for 11 years and still hold my license.

Conversely, I'm impressed with all the custom woodwork posted here. I can get by in that arena, but most of what I see here is WAY out of my league. The collective talent of NWFA members is nothing short of amazing!
 
Excellent!
How long will the battery last before it needs recharging?
In other words, lets assume its night, so no sun to charge the system.
Will the battery make it through the night?
It all depends on the load, of course, and at night everything will be shut down other than exterior motion-sensor lights. In the event of a long-term outage, I would unplug all unnecessary loads including unscrewing half the light bulbs in the house.

As an example, using it to brew coffee in my 1500W coffee maker which is the MAX load for this, I will get 8-9 pots of coffee before the battery is dead. But, I only brew one pot a day so if I only used it for that and got one sunny day in a week, I'd recharge the battery to full and start over.

If I was running the blower fan for my gas fireplace on low speed continuously, and it consumes 100w of power including that required to operate the 90% efficient inverter, it would run for about 13 hours. Of course I wouldn't have to run it continuously, and would charge the battery at every available opportunity.

It should be noted that the examples above assume I am using only the battery installed in the case and do not include use of an expansion battery, and that if every day was sunny this could run select items indefinitely with judicious use. Two batteries would, of course, take twice as long to charge.
 

Upcoming Events

Teen Rifle 1 Class
Springfield, OR
Kids Firearm Safety 2 Class
Springfield, OR
Arms Collectors of Southwest Washington (ACSWW) gun show
Battle Ground, WA

New Resource Reviews

New Classified Ads

Back Top