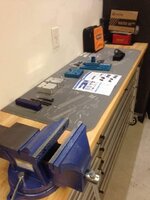
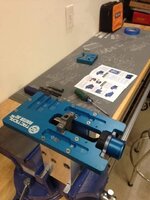
I'd like a finished aluminum one for less than $40 if they're around. Brownell's super deal was $35 and free shipping, but of course when they cancel it and tell me I can't have the sale price when back in stock I'm not apt to try them again.......
Navigation
Install the NWFA app
How to install the app on iOS
Follow along with the video below to see how to install our site as a web app on your home screen.
Note: This feature may not be available in some browsers.
More Options
You are using an outdated browser
The browser you are using is likely incompatible with our website. We recommend upgrading your current browser or installing an alternative.
JavaScript is disabled
Our website requires JavaScript to function properly. For a better experience, please enable JavaScript in your browser settings before proceeding.
-
Join the #1 community for gun owners of the Northwest
We believe the 2nd Amendment is best defended through grass-roots organization, education, and advocacy centered around individual gun owners. It is our mission to encourage, organize, and support these efforts throughout Oregon, Washington, Idaho, Montana, and Wyoming.Free Membership Benefits
- Fewer banner ads
- Buy, sell, and trade in our classified section
- Discuss firearms and all aspects of firearm ownership
- Join others in organizing against anti-gun legislation
- Find nearby gun shops, ranges, training, and other resources
- Discover free outdoor shooting areas
- Stay up to date on firearm-related events
- Share photos and video with other members
- ...and much more!
80% build tips
- Thread Starter The Heretic
- Start date
- Messages
- 11,081
- Reactions
- 50,429
LOL perfect!
Actually I'm hoping to see my Vortex in the next week or so, and then we need to range test IT! And my AR wearing a shiny new Leupold!
I'm in for almost any weekend except Christmas.
Silver Lifetime
- Messages
- 42,776
- Reactions
- 111,086
- Thread Starter
- #143
I have been looking for a bench vise. I'm thinking that I am going to just go buy a new one. As for my shop I came to the conclusion last night that I need to rearange a few things and get set up a little better before I mill my first lower.
@The Heretic do we need to have a machinists vise? I know Iron mentioned having the reamers which makes sense.
No - I just want a large regular vise and a halfway decent machinists vise to hold things I want to drill with a drill press (and later with a mill).
My workbench is a woodworking bench and it has a wood vise on it - so not sure that is adequate. I need a metal working/welding bench too and I want to put a large metal vise on that.
This is just me trying to get more stuff setup in my shop. I won't get a mill and a lathe until I retire and move because I don't have the time to work with them and it is better to only move them once. But a drill press, that I could use now and it isn't hard to move.
- Messages
- 3,018
- Reactions
- 10,611
My recommendation to anyone who doesn't have a drill press is to be patient and buy the biggest, oldest one you can get. Mine came from an auction. It's a Jet floor model from the '60s probably and IIRC I paid $60 for it. Older tools are usually well built and this one will still be running long after I'm dead and gone.
Silver Lifetime
- Messages
- 42,776
- Reactions
- 111,086
- Thread Starter
- #145
My recommendation to anyone who doesn't have a drill press is to be patient and buy the biggest, oldest one you can get. Mine came from an auction. It's a Jet floor model from the '60s probably and IIRC I paid $60 for it. Older tools are usually well built and this one will still be running long after I'm dead and gone.
Yeah - when I shop for such tools I spend half my time looking on CL or FB Marketplace (recently discovered) finding a likely candidate for a good price somewhere I don't need to drive an hour or into some bad PDX neighborhood, then googling to find out whether the make is good, then googling for pics to match it up with a model, and reading reviews to make sure I don't get a clunker.
Silver Lifetime
- Messages
- 42,776
- Reactions
- 111,086
- Thread Starter
- #146
So I noticed the upper bought, the gas block on the barrel does not seem to be quite aligned such that it is cocked a little to one side. At first I was thinking maybe it isn't aligned with the gas port, then this morning it occurred to that when they torqued the barrel the gas port is maybe to one side a little, enough to notice it.
I assume that when the full upper (mine came with everything except the lower) is assembled, that the barrel/bolt is headspaced?
Should I get a set of go/no-go gauges?
I assume that when the full upper (mine came with everything except the lower) is assembled, that the barrel/bolt is headspaced?
Should I get a set of go/no-go gauges?
- Messages
- 11,081
- Reactions
- 50,429
I bought a upper like that. couldn't get it fixed so I took it to jon over at NW custom firearms. He couldn't get it fixed so it went back to anderson. Still waiting on the damn thing. 
Silver Lifetime
- Messages
- 42,776
- Reactions
- 111,086
- Thread Starter
- #148
I bought a upper like that. couldn't get it fixed so I took it to jon over at NW custom firearms. He couldn't get it fixed so it went back to anderson. Still waiting on the damn thing.
I will put it together and see how it works. I am not concerned about the looks as the gas block is hidden underneath the fore-end. I am just concerned about whether the block and the port are aligned such that the gas system works correctly.
If it works then I will probably get another upper from Ceratec, if it doesn't then send it back to them - but their return policy is 30 days. I sent them an email. They do have a warranty, but they do not say how long it lasts. We'll see what they say.
Last Edited:
it is nice to have a laser and a CNC mill at homeHome laser engraver??
Silver Lifetime
- Messages
- 42,776
- Reactions
- 111,086
- Thread Starter
- #150
@The Heretic - have you started on a lower yet?
Silver Lifetime
- Messages
- 42,776
- Reactions
- 111,086
- Thread Starter
- #152
@The Heretic - have you started on a lower yet?
Not yet. I need to get the shop organized and get a drill press.
Excuses, excuses.
Here is an off handed tip. The hard anodised coating is hard and adds to the life of the pin holes plus the anodising tightens them up quite a bit. The KNS OVERSIZED anti rotate pins tighten up the trigger and hammer pin holes tight and eliminate the wobble you will get from the looser non anodised pin holes. Another hint is the oversized pins whether anti rotate or not will improve the trigger operation greatly in even the best quality factory ARs. Ask Gisele they use over sized pins.
Not yet. I need to get the shop organized and get a drill press.
Excuses, excuses.
Is a drill press a necessity with the 5D jig? Looking over their video, I got the impression a regular handheld drill would work fine. I do have a drill press already, but was just curious.
Silver Lifetime
- Messages
- 42,776
- Reactions
- 111,086
- Thread Starter
- #155
Is a drill press a necessity with the 5D jig? Looking over their video, I got the impression a regular handheld drill would work fine. I do have a drill press already, but was just curious.
Not necessary, but it is better and I want/need one anyway.
- Messages
- 11,081
- Reactions
- 50,429
- Messages
- 11,081
- Reactions
- 50,429
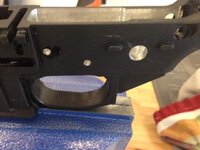
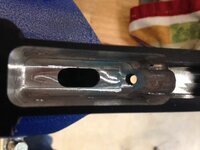
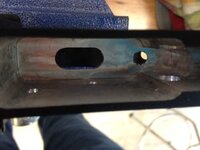
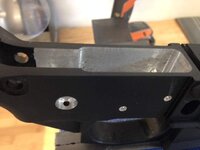
Well the first one is complete. There are some things that I want to clean up but I am pleasantly surprised how dang easy that was. I would recommend a few things to those who are about to do this.
- make sure your shop vac fits the pro adapter it will make clean up easier. Although it was nice to be able to vacuum out everything after each pass. So maybe two shop vacs or easy detach from the jig.
- take your time because I think mine got a little warm and made one spot on the inside a little rough.
-When taking the cap off the bit for the first time BE CAREFUL! The damn thing is sharp as hell and I barely touched it with my thumb and slit it open.
But all in all I am really happy with the first one and it was a pile of fun.
Bronze Supporter
- Messages
- 20,333
- Reactions
- 77,095
Nice! See, not much to it, especially with such a nice jig and the right mill bits and a good router! My advice, Slow down just a little bit, and if you have an air compressor, set it up with a blow nozzle so that you can get a constant stream of air around the work. Will help cool and clean out the chips! I Gorilla taped a blow nozzle to my router with a pin nozzle pointed right at the mill bit, and set the "trigger" of the blow gun to just a little air, enough to supply constant pressure around the tool! And your right, having a shop vac close is a really nice addition. I am going to look at making some sort of attachment to place the intake hose close to the work!
- Messages
- 14,037
- Reactions
- 42,938
Right on man .
.
Someday you'll have to share all your Pro tips when I eventually get to the point you are .
.
Careful getting that metal too hot, it can compromise its strength if it's like knife making.
Someday you'll have to share all your Pro tips when I eventually get to the point you are
Careful getting that metal too hot, it can compromise its strength if it's like knife making.
- Messages
- 11,081
- Reactions
- 50,429
It really didn't get the lower warm. It was more the router plate. 
If you look close you can see on the inside where the aluminum kinda gummed up in one spot. I wasn't even taking full passes on the jig markings. Was doing them in smaller increments like suggested by 5D.
If you look close you can see on the inside where the aluminum kinda gummed up in one spot. I wasn't even taking full passes on the jig markings. Was doing them in smaller increments like suggested by 5D.
Share This Discussion
Similar threads
- Replies
- 65
- Views
- 3K
- Locked
-
- For Sale
- $50
- Longview
- Washington
- Replies
- 1
- Views
- 230
Upcoming Events
New Classified Ads
-
SOLGW EXO3 13.7" Upper w/BCG & CH, Surefire 3 Prong
- Started by clanhanson
- Replies: 0
-
-
-
-
-
-
New-ish Aero m5 bolt and M5 charging handle
- Started by spacecowboy5
- Replies: 1
-
-
-
Support Our Community
If our Supporting Vendors don't have what you're looking for, use these links before making a purchase and we will receive a small percentage of the sale


