JavaScript is disabled
Our website requires JavaScript to function properly. For a better experience, please enable JavaScript in your browser settings before proceeding.
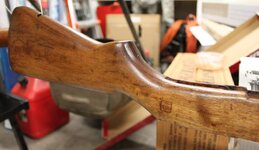
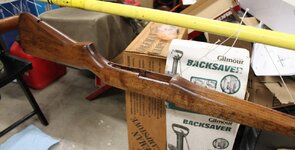
Used up the remaining 50/50 thinners/Linseed mix, used my fingers to apply it and layered it on much more thickly.

This is after an hour and then being wiped down with a cloth, tomorrow i will use neat Linseed oil and apply it a little thicker still.

IMG_4177.jpg IMG_4178.jpg IMG_4180.jpg IMG_4179.jpg
 
I like the direction it's heading, it has literally had just two light coats of 50/50 mixed linseed and mineral spirits, the very dry/open wood is really sucking it up, i couldn't get enough on last night to sit atop the surface, it sucked it right up.

Tonight will be a much thicker application of neat linseed oil, so it should darken up considerably.
 
I would have stained it much darker to start with. When the wood was good and dry.
The way your going. It just won't look any darker is all.
And without a blend of walnut stain with some burgundy stain added. It won't have the red tint replicating old oil . The look of your wood before.

Usually after staining. You will loose some stain/darkness when applying the BLO. I see it come of in the cotton rags I use. [Old cut up T-shirts]. So it will end up lighter in color.

You could use denatured alcohol and remove the oil and start over again. But any oil left in the stock will not accept stain. So clean it well.

Or you could keep going and see what you get?
It can always be changed later. I have refinished some stocks three or more times before I finally liked the way it turned out.
The important thing is your learning. And hopefully having fun.

There are many, many ways to get a certain look. And you will find yours.
Just keep dicking with it. ;)
 
Last Edited:
I have taken an old can of red mahogany stain and used the solids found at the bottom to fill in the stocks pores (kinda like using wood putty) and then stained the stock to the color I wanted.
 
That is a beautiful '03 there, maybe mine will look at least similar to that one day :)

As for the colourisation, it's heading the right direction, it is fairly light right now, but the darkness will come, i know from when i had the stock wet that it has a little more darkness to go.

As for the red patina, i'm not using BLO, i'm using raw unfiltered linseed oil, so whilst it could take up to a year for the fatty acids to oxidise, it will happen :)


At the end of the day, you could be 100% on with your concerns here, and i thank, and welcome your input, i am indeed learning, and i'm absolutely having fun doing this.
@Velzey just re-parked the rest of the metal and it looks great, so this should look like a pretty reasonable rifle when done, despite the well used woodwork.
 
I gotta agree with Medic! and say it needs stain to look right in my eye. The stock and hand guards came from three different trees and stain helps make them a uniform color as well as making the dings a bit less noticeable. Your stock....your call. :D


.
Before

After

Loadup.jpg M1s4.jpg SA6.jpg SA6a.jpg Big4.jpg
 
Last Edited:
Yeah, you can see from the pics that my set is pretty close, but by no means matching, the forestock being the "worst" of the matches, including condition.

So, i hadn't really read anything in my investigations regarding staining walnut, with the exception of those looking to instantly get the "old" look instantly, and mainly those using BLO instead of the raw oil that was originally used.

Indeed, i think some of that is when they move to Tung oil for the late war wood, stain was probably more important for the right look.
I really am hoping that i get the colouring right over time, ie. from the oxidation.
 
Waited an hour and wiped down the wood, i'm wondering if/when i should start using some 600 grit before i apply the next coat (tomorrow night)

I changed the light sampling on the camera for the last shot, just to give a more 'balanced' view on the actual darkness. The previous setting is good to objects, but can make things appear lighter than they are.

IMG_4191.jpg IMG_4186.jpg IMG_4192.jpg
 
Now she is really starting to shape up, still needs a bit more red to my eyes, but looking good none the less! Use Steel Wool with a touch of thinner OR denatured and rub down gently to level out your coats and to remove any un wanted inclusions! You can also chase each coat with a heat gun set to LOW or the wifes old abandoned hair dryer! Just enough heat to draw the coat in and to help it even out! Try this on some scrap to see how it works!
 
Yeah, the red will come, even at this stage, it seems to be getting it, along with darker.

You're saying use steel wool, 0000 gauge i'm assuming? or wet sand with 600 grit?
Level out the coats? as in, remove anything sat on the surface that hasn't soaked in?

Good news is i shouldn't need to use the heat, it's a solid 80+ where it is right now.
 
I use 000 Steel Wool as it's not so abrasive to dig in to the finish and it blends a little better! Sand paper is better if you have un even areas as you can "Cut" in to the finish a little more but still not dig it out, just work wet and keep your paper clean. I mention the heat gun as it helps re liquefy the finish to help work out any thicker spots as well as help "set" the finish off. Sanding, I would do with nothing finer then 350 grit until you get to your final coat, then work it down with finer grits until you get your desired final finish. chase each sanding with thinner or water to clean it and use a tack cloth to dry it.
 
I've not seen people sanding with thinner, only with the oil itself, in fact one finisher i watched, lightly sanded the finish, then went straight to apply the next coat of oil, using the sanding dust to help fill the pores (that's very common from what i've seen actually)

Uneven areas, do you mean the darker areas, where it's starting to go a little patchy? Just sand them more?
 
There is no real right or wrong to what you are doing, I like to clean and dry between sanding or the wool so I can see my progress. I have found some times the oil finishes tend to build up in areas more then others and some times you can get "fish eye" I am just offering a few tricks to maybe help you along. I think maybe I miss worded my self on the sanding, I sand, then clean with thinner ( or water) and a tack cloth until dry. You can also use denatured so as to dry things off faster! I have used the oil stain's directly with steel wool to help work it in to the wood and smooth it in one step, and this works really well! Looks really nice, cant wait to see her all finished and re assembled!
 
I too have refinished many old stocks. Lots of good info here. I like the CMP
article. Medic and Oryguner WOW nice job. I am very impressed by your level
of expertise. I have used BLO sanding in with 400 wet/dry sand paper.
Allowing to completely dry between coats.
P1000055.JPG
 

Upcoming Events

Centralia Gun Show
Centralia, WA
Klamath Falls gun show
Klamath Falls, OR
Oregon Arms Collectors April 2024 Gun Show
Portland, OR
Albany Gun Show
Albany, OR

New Resource Reviews

New Classified Ads

Back Top