Gold Supporter
Bronze Supporter
- Messages
- 12,947
- Reactions
- 47,253
A summary of scope leveling techniques I have run across including a few I have done. Feel free to add your thoughts especially any I have missed. I just got an Arisaka wedge and damn, it can't get any easier if your rifle and scope can use this method.
Eyeball
Bubble Levels
Flashlight And String
Scope Wedge
Scope Jack
Feeler Gauge Stack
Laser Level

 www.youtube.com
Have It Done For You By A Competent Gunsmith
Have It Done For You At The Sporting Goods Store
Eyeball
- How it works: Adjust by looking through the scope as close as you can get it
- Pros: Quick and no expense
- Cons: Human error
- Cost: Your patience
Bubble Levels
- How it works: Place the rifle in a stand or a padded vice. Place one level on a flat horizontal surface such as a picatinny rail and carefully level the rifle cant (side to side motion). Keeping the rifle level place a second level on the top scope cap and adjust the cant of the scope.
- Pros: Cost can be low
- Cons: Bubble levels are not always parallel to their base, even those designed for this purpose. Place the levels side by side to see if they measure the same or results will be off. Can take a bit of time to get both level at the same time while carefully adjusting the cap screws.
- Cost: $8 to $60
Flashlight And String
- How it works: Hang a plum bob to use as a verticle reference in front of a wall. A long construction level can be used in place of the plum bob. Place the rifle in a stand or a padded vice. Place one level on a flat horizontal surface such as a picatinny rail and carefully level the rifle cant (side to side motion) centering the scope on the plum bob. Shine a flashlight through the scope in reverse projecting the reticle against the string/level wall. Adjust the cant of the scope carefully tightening the cap screws to prevent changing the scope cant.
- Pros: Cheap, even the plum bob can be made from string and a bolt.
- Cons: Can be fiddley. Any wind or vibration can cause the plum bob to swing.
- Cost: Pocket lint
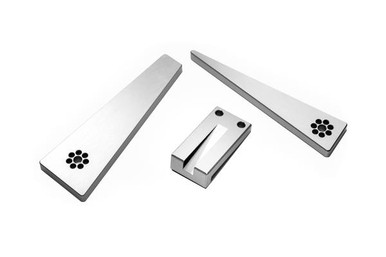
Scope Wedge
- How it works: Place base on a horizontal surface, such as a picatinny rail below a flat surface on the bottom of the scope, such as the bottom of the turret base. Slide the wedge through the base slot until it makes contact with the scope and then continue until the scope levels.
- Pros: Easy, fast, and accurate. Can do it on your lap.
- Cons: Requires a flat surface on the turret base and on the rifle directly underneath the base. Won't work with all mounts such as cantilevers. There also needs to be enough clearance for the wedge to fit.
- Cost: $20 to $35
Scope Jack
- How it works: Similar to scope wedge. Place the scope jack on a pic rail and raise jack to level the scope.
- Pros: Easy, fast, and accurate. Can do it on your lap.
- Cons: Expensive. Requires a flat surface on the turret base and on the rifle directly underneath the base. Won't work with all mounts such as cantilevers. There also needs to be enough clearance for the wedge to fit.
- Cost: $45
Feeler Gauge Stack
- How it works: Similar to scope wedge. Use a stack of feeler gauge blades between the flat at the base of the scope turret and a flat spot directly underneath it.
- Pros: Especially useful for situations where there is little clearance between the scope and a picatinny or weaver rail. Easy, fast, and accurate. Can do it on your lap.
- Cons: Requires a flat surface on the turret base and on the rifle directly underneath the base. Won't work with all mounts such as cantilevers. Best where clearance is too tight for other methods. You may need to fiddle with several combinations to get an accurate fit.
- Cost: As low as $4
Laser Level
- How it works: Using a laser level "paint" a line across the top center line of the rifle. Rifle must be in a vise or other device to keep it from moving. The laser source must be directly above, With the laser line established rotate the laser so the laser passes through the center pf the elevation turret.
- Pros: Works on any rifle and does not rely on a flat area under a scope turret. Accommodates any style of scope mount,
- Cons: Potential for eye injury. Setup can be tedious. Potential for your cat to explode trying to catch it.
- Cost: Sixty bux and up
scope mounting
scope mounting and leveling scope onto a Remington 700. This video reveals a new technique for mounting and leveling your scope using a laser to ensure your ...
www.youtube.com
Have It Done For You By A Competent Gunsmith
- How it works: You were bringing the rifle in the get the barrel threaded for that new suppressor anyway, so just have him level the scope while he is at it
- Pros: You get to talk guns and rummage through what he has on sale
- Cons: Explaining to your wife why you bought that 257 Roberts you didn't realize you needed while you were there.
- Cost: It's worth it, man! Plus he removed the mounts, cleaned them up and properly torqued them. Plus he put a fresh crown on the barrel after he was done threading it.
Have It Done For You At The Sporting Goods Store
- How it works: Admit you don't have basic mechanical skills and have the teenager at the gun counter do it for you.
- Pros: No effort
- Cons: Children point at you and laugh while their mothers try to shush them and contain their own giggles. People at work tomorrow will somehow know your man card has vanished. The teenager doing the work doesn't care if he scratches your scope or rifle nor does he particularly care if your reticle is lined up right or not. It's been like five minutes since he checked social media on his smart phone so he rushes the job. Too bad about that cap screw he stripped and did you know that in a pinch you can use an Allen wrench or Phillips screwdriver on a Torx screw if you press real, real hard?
- Cost: Your man card, your pride and about sixty bux. Later you notice the scope has a ding it never had before. When you turn the rifle over to see if you can buff out that scratch the stripped cap screw falls out. You realize it's time to take up knitting.
Last Edited: