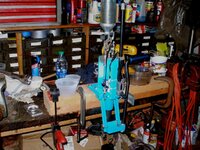
Today I spent the morning looking over the outfit, familiarizing myself with individual parts and how they might fit together as a whole. This afternoon, I set the press up on one of my work benches. Not my usual reloading bench. I have it set up on a bench I formerly used for automotive work which I don't do much of anymore. These days, when I get additional reloading equipment, I attach it to a platform of some kind (wood) that I can clamp down and move around if necessary. That way I don't have benches cluttered up with stationary stuff. The bench I used is 40 inches tall for working while standing. The Dillon 550 wasn't comfortable at that height so I jacked it up about 3-1/2 inches with a couple of two by sixes. The first two pieces of lumber I used weren't long enough by the time I installed the finished cartridge bin because there wasn't room for the clamp on the right side. So I went out to my storage building and got two longer planks of two by six and mounted the Dillon on those.
Next I addressed the tool head for a .223 Rem. configuration. I decided I wanted to use the powder measure. There is only one position where the powder measure may go, #2. So I decided to omit the powder checker, and put the bullet seater in #3 and a taper crimp die in #4. I'm not priming or sizing on the #1 because I have so much sized brass ready to go.
Some of my ready brass is primed. But I'm thinking, I may not want to prime rifle brass on the Dillon. I may just keep using the Lee hand or bench priming tools, which are pretty fast. I don't think I want to spend the time loading those priming tubes on the Dillon. I saw in the user's manual how it's done; I may change my mind about that later after I try it loading pistol cartridges.
I determined that the bullet seating die that came with the outfit is a Hornady Product, what they call a Custom Grade New Dimension design. Which has a sliding sleeve inside that is supposed to give optimal alignment of the bullet with the case mouth at the time of seating. I thought I had this adjusted properly; when I went to do a final check on it, I telescoped a case a bit but that was the only one I ruined .
It took me a while to get the powder measure attached and adjusted but it won't take any time at all next time I have to do it. When being done for your first time, a lot of this set-up work takes a bit of fiddling.
I was ready to start loading, so I poured some CFE223 into the powder measure. I have a little tub on the left side for bullets, and a tub on the right side for primed brass. I'm not using #1 position/station, but the primed case goes in there anyway so it can advance to the powder drop. I think it will be important to use a powder that meters easily.
Being a beginner on a progressive press, I find that I have to concentrate closely on what I'm doing to get into the rhythm of it. In doing my first five rounds, I got discombobulated a bit; a couple got through with my wondering if they got charged with powder. I put those five off to the side to go back and check weigh them.
I completed forty rounds without further errors. Now here's a good one. I did a check weigh on all of the cartridges I loaded, not the just first five that I suspected. I found several that were about 40 grains light. My first thought was, "Something is going on with my powder drop." But then I figured that wasn't likely because I was only loading 25.5 grounds of powder. So next, I got out my Hornady collet bullet puller. I pulled the "light" rounds, they all had a proper powder charge. Then I weighed the bullets. They weighted 15 grains. You read that right, they were copper jackets with no lead cores in them.
This is the kind of aggravation you don't need when you're first setting up a press. The bullets in question are Sierra 55 gr. #1455, a polymer tip boat tail. Fancy bullet, yes. But factory seconds from Midway that were supposedly "cosmetic blems." However, there is nothing cosmetic about a missing lead core. Rate of defect: About 10%. Not sure why by chance I picked these particular bullets to start out on the progressive. I've bought many factory second/cosmetic blem bullets from Midway in the past; never had anything like this before.
Pictures. First, one of my test set-up. Little digital dope scale on the left, vernier caliper nearby. Plastic bullet tub on left side.
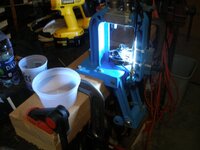
Plastic primed case tub on the right. I don't have any stability issues with using clamps to keep the press stationary. I'm not sizing cases; not much leverage is necessary to do the rest of the process.

I've got one of those little LED strip lights rigged on the inside of the front strut of the press, affixed in place with zip ties.

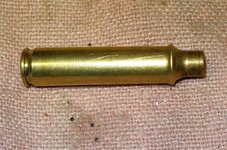
This is the case I crushed while getting the fancy Hornady sizing die adjusted:

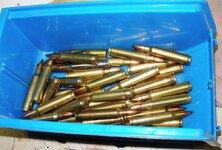
My first finished product on the Dillon 550:

Because of the case lube issue and the trimming sequence issue, I'll probably continue to do my sizing as a separate process. Whatever method I select to do the initial case cleaning, when I size, I use water based lube which I remove with a water rinse, then dry. Then I trim the cases, as necessary.
Next I addressed the tool head for a .223 Rem. configuration. I decided I wanted to use the powder measure. There is only one position where the powder measure may go, #2. So I decided to omit the powder checker, and put the bullet seater in #3 and a taper crimp die in #4. I'm not priming or sizing on the #1 because I have so much sized brass ready to go.
Some of my ready brass is primed. But I'm thinking, I may not want to prime rifle brass on the Dillon. I may just keep using the Lee hand or bench priming tools, which are pretty fast. I don't think I want to spend the time loading those priming tubes on the Dillon. I saw in the user's manual how it's done; I may change my mind about that later after I try it loading pistol cartridges.
I determined that the bullet seating die that came with the outfit is a Hornady Product, what they call a Custom Grade New Dimension design. Which has a sliding sleeve inside that is supposed to give optimal alignment of the bullet with the case mouth at the time of seating. I thought I had this adjusted properly; when I went to do a final check on it, I telescoped a case a bit but that was the only one I ruined .
It took me a while to get the powder measure attached and adjusted but it won't take any time at all next time I have to do it. When being done for your first time, a lot of this set-up work takes a bit of fiddling.
I was ready to start loading, so I poured some CFE223 into the powder measure. I have a little tub on the left side for bullets, and a tub on the right side for primed brass. I'm not using #1 position/station, but the primed case goes in there anyway so it can advance to the powder drop. I think it will be important to use a powder that meters easily.
Being a beginner on a progressive press, I find that I have to concentrate closely on what I'm doing to get into the rhythm of it. In doing my first five rounds, I got discombobulated a bit; a couple got through with my wondering if they got charged with powder. I put those five off to the side to go back and check weigh them.
I completed forty rounds without further errors. Now here's a good one. I did a check weigh on all of the cartridges I loaded, not the just first five that I suspected. I found several that were about 40 grains light. My first thought was, "Something is going on with my powder drop." But then I figured that wasn't likely because I was only loading 25.5 grounds of powder. So next, I got out my Hornady collet bullet puller. I pulled the "light" rounds, they all had a proper powder charge. Then I weighed the bullets. They weighted 15 grains. You read that right, they were copper jackets with no lead cores in them.
This is the kind of aggravation you don't need when you're first setting up a press. The bullets in question are Sierra 55 gr. #1455, a polymer tip boat tail. Fancy bullet, yes. But factory seconds from Midway that were supposedly "cosmetic blems." However, there is nothing cosmetic about a missing lead core. Rate of defect: About 10%. Not sure why by chance I picked these particular bullets to start out on the progressive. I've bought many factory second/cosmetic blem bullets from Midway in the past; never had anything like this before.
Pictures. First, one of my test set-up. Little digital dope scale on the left, vernier caliper nearby. Plastic bullet tub on left side.
Plastic primed case tub on the right. I don't have any stability issues with using clamps to keep the press stationary. I'm not sizing cases; not much leverage is necessary to do the rest of the process.

I've got one of those little LED strip lights rigged on the inside of the front strut of the press, affixed in place with zip ties.

This is the case I crushed while getting the fancy Hornady sizing die adjusted:

My first finished product on the Dillon 550:

Because of the case lube issue and the trimming sequence issue, I'll probably continue to do my sizing as a separate process. Whatever method I select to do the initial case cleaning, when I size, I use water based lube which I remove with a water rinse, then dry. Then I trim the cases, as necessary.
Last Edited:


 looks like you have that dillon under control. Those sierra bullets are not what I would consider blems either. My take on priming, pistol.. size and prime on press, rifle.. size, trim, and prime off press. Everybody finds their own system. Following this thread I'm sure good stuff to come.


