JavaScript is disabled
Our website requires JavaScript to function properly. For a better experience, please enable JavaScript in your browser settings before proceeding.
Anyone get a shipping notice yet? I hear they have been slowly shipping out since last thursday but I have not got a notice yet. I got all my lower parts, just need the receiver.
 
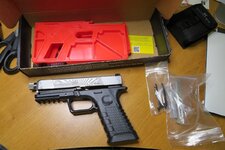
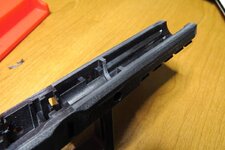
Kit is here. The rear rail cut looks to be the only challenge since the jig is plastic. Just going slow should do the trick though. The additional fill on the front could be taken off with a file and some time if the milling looked intimidating. so for looks pretty simple and straight forward. The locking block is heat treated metal. the slide primarily rides on this

kAiOaRZ.jpg
 
Having just done my third Polymer80 AR lower with a cheap Harbor Freight x-y vise, I can vouch for the "no slow is ever too slow" method. My first one was just a mess. And I screwed up that one and the third one by letting the retainers on the shaft of the X-Y cranks get loose, which makes the vise heads move around and kills the accuracy of your milling. The allen head screws just don't hold.

The other thing that happened is my milling bit loosened up and dropped down w/o my noticing it, ruining my depth control. I should have checked it during the several times that I stopped to vacuum out milling debris.

The very last thing is never never ever use any solvents or any Loctite on the polymer. It will react and eat the entire project up. This happened to the first rcvr when I used the bit provided for trigger pins and it was .002" too large for the standard trigger pin diameter. The standard pins fell right out. So I bought the AR trigger pins with the screw retainers and Loctited them on. The next morning the lower just fell apart in my hands. :( I highly recommend to measure any bits against the size of the pins and use your best judgement. Too tight can be opened up, but it us real hard to put material back. I asked Polymer80 about this and they said nobody else had ever complained. Seems like I hear that a lot. :rolleyes: They were nice enough to provide me with another lower kit free of charge tho. :)
 
Having just done my third Polymer80 AR lower with a cheap Harbor Freight x-y vise, I can vouch for the "no slow is ever too slow" method. My first one was just a mess. And I screwed up that one and the third one by letting the retainers on the shaft of the X-Y cranks get loose, which makes the vise heads move around and kills the accuracy of your milling. The allen head screws just don't hold.

The other thing that happened is my milling bit loosened up and dropped down w/o my noticing it, ruining my depth control. I should have checked it during the several times that I stopped to vacuum out milling debris.

The very last thing is never never ever use any solvents or any Loctite on the polymer. It will react and eat the entire project up. This happened to the first rcvr when I used the bit provided for trigger pins and it was .002" too large for the standard trigger pin diameter. I bought the AR trigger pins with the screw retainers and Loctited them on. The next morning the lower just fell apart in my hands. :( Measure any bits against the size of the pins and use your best judgement. Too tight can be opened up, but it us real hard to put material back. I asked Polymer80 about this and they said nobody else had ever complained. Seems like I hear that a lot. :rolleyes: They were nice enough to provide me with another lower kit free of charge tho. :)
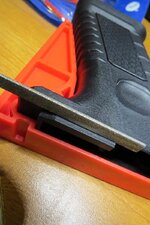
Yeah, I might just work with hand files on it. Hard to mess up that way. the rear slide cuts are easily accessible by a small file
mDI2BKA.jpg
 
started to try to mill the front section which should be the easiest. my cross vice is crap so I did it with the 1 in belt sander instead (plus dremel on the center section). probably 1 minute of work and so much easier

eCDHu07.jpg

holes are drilled. Just need to make the rear rail cuts which I will do by hand. No way would I trust my crappy cross vise to cut a straight line
 
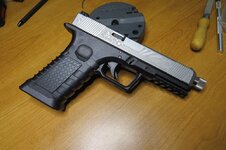
receiver is done. about 90 min of work with most of that hand filing the rear rail grooves. I didnt mill anything in the end. Both happy it was easy and a little disappointed it did not take more time. Now I have to figure out how to put the lower parts in. Off to youtube
DrC2UuJ.jpg
 
All done except for I ordered the wrong mag release spring. Trigger is pretty terrible and I think it is binding on something. 7.5 lbs but I have not oiled it. It seems to be doing a little better with repeated tries so I think something just needs to be sanded smooth. I just winged it on installing the receiver parts. Really kind of hard to put them in wrong.

H6UDW63.jpg
 
All done except for I ordered the wrong mag release spring. Trigger is pretty terrible and I think it is binding on something. 7.5 lbs but I have not oiled it. It seems to be doing a little better with repeated tries so I think something just needs to be sanded smooth. I just winged it on installing the receiver parts. Really kind of hard to put them in wrong.

View attachment 289549

Operation aside, it looks really nice! Man, you knocked that out in no time flat. Next step, once you are comfortable that it's ready, is to give us a range report.

So, based on what you know now, is the lower/kit worth it?
 
I think I figured out the trigger. I think I cut the rails grooves too good on the back and the slide is too tight on the receiver. It needs a little more play. Which makes sense given that the reason the glock works so well is the flexibility of the receiver. the slots I cut were about a thousands smaller than the milling tool they sent.
 
Operation aside, it looks really nice! Man, you knocked that out in no time flat. Next step, once you are comfortable that it's ready, is to give us a range report.

So, based on what you know now, is the lower/kit worth it?

yeah for an 80% kit there is really nothing too it for finishing one up.
 
Damn you!!! Now I wanna get a few. I would really like to do one for those neat little pistol carbines I see all the time.

FYI. I use the El cheepo Harbor Freight Drill press but i use a nice Kurt vice to handle all my manual milling needs. Yes its expensive, but so worth it when you consider how many times you are using it and how many kits you will end up building! I like to hook up ether a vaccume or low pressure air to keep my work clean of chips. The drill press works out really well if you change out the cheep chuck and install a good Jackobs key less chuck. I like having two, one in 1/2 in and one in 1 in. These drill presses can be set to turn quite slow and that helps a lot.


They sure made it easy to get into one. I used a hand drill, a 1" belt sander and a small file to finish mine

follow up on the trigger. I think I just spoiled myself with making 1911's. Because I got out the glock 19 and the trigger feels exactly the same and is 7.5 lbs as well. so what I though was a crap trigger in the poly80 build was just a standard glock trigger LOL. oh well.
 
Because I got out the glock 19 and the trigger feels exactly the same and is 7.5 lbs as well. so what I though was a crap trigger in the poly80 build was just a standard glock trigger LOL. oh well.

Yeah, I wondered when you said you hadn't oiled it yet. Lot's of fixes for Glock triggers on YouTube. First thing I did was put in a 3.5lb disconnect. Then, I filed, stoned, and polished the critical surfaces. Next to last I dremeled out a bit of rough area of the polymer where the trigger bar was rubbing when pulled. Last I put just a dab of synthetic gun grease at the disconnect/triggerbar junction. Now it is really pleasant to shoot and not too light for carry. :)

 
Yeah, I wondered when you said you hadn't oiled it yet. Lot's of fixes for Glock triggers on YouTube. First thing I did was put in a 3.5lb disconnect. Then, I filed, stoned, and polished the critical surfaces. Next to last I dremeled out a bit of rough area of the polymer where the trigger bar was rubbing when pulled. Last I put just a dab of synthetic gun grease at the disconnect/triggerbar junction. Now it is really pleasant to shoot and not too light for carry. :)


I stoned a few surfaces and it is down to 5.5 lbs. much nicer. Though Im sure a glock armorer would be rolling their eyes at my work. But this wont be a carry gun anyway.
 
I stoned a few surfaces and it is down to 5.5 lbs. much nicer. Though Im sure a glock armorer would be rolling their eyes at my work. But this wont be a carry gun anyway.

Great news on the trigger improvement. :D

Since it's not going to be a carry gun, what would you think about putting a 3.5lb disconnect in? Twould get you down to about 4lb pull. I have a Ghost in one pistol and a race gun disconnect in another (I forget the brand). I looked at the Rocket unit but decided I didn't have the patience to work on it long enough to get the desired short reset without messing it up.
 

Upcoming Events

Centralia Gun Show
Centralia, WA
Klamath Falls gun show
Klamath Falls, OR
Oregon Arms Collectors April 2024 Gun Show
Portland, OR
Albany Gun Show
Albany, OR

New Resource Reviews

New Classified Ads

Back Top