JavaScript is disabled
Our website requires JavaScript to function properly. For a better experience, please enable JavaScript in your browser settings before proceeding.
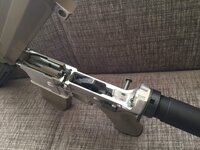
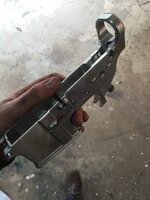
If you haven't been convinced yet, I'd agree with doing an 80%. This was done with the 80% arms jig, first time it took about half an hour to do and was a lot of fun. I don't think 5dtactical was around when I built mine...

29E6BEC1-793F-4FFB-A510-5296F0E50F9B.jpeg

D4B7406C-108A-4095-BD7B-79D1F5FD6F17.jpeg
 
If you haven't been convinced yet, I'd agree with doing an 80%. This was done with the 80% arms jig, first time it took about half an hour to do and was a lot of fun. I don't think 5dtactical was around when I built mine...

View attachment 496340

View attachment 496339
Those look amazing! Is that one raw aluminum? If so, what do you recommend to finish it with? I think cerakote looks nice.
 
Alright! So, do you think instead of doing one notch for every pass or a half notch every pass is better? Maybe a little easier on the router?
half notch. less chance for deflection on the end mill. constant doward pressure. i grab the base of the 5d router attachment(not on the router itself)with my thumbs, index and middle fingers with my elbows pointed down to avoid tilting the router. i mill in a circular motion as seen in the video i posted in earlier post yesterday or day before. the most likely spot to break a bit is right from the beginning
 
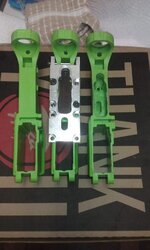
And here's a Ridgid cordless, in the EP Armory jig, without vise--I blame all the crudeness here on the freehanding without proper support, but it DID all fit together and the lower assembly passed function-check without upper.
20170516_213823.jpg
Left is bare poly EPL, center is EPL in jig (note damage from end-mill that I should have picked up a 5/16 drill to make a pilot hole for, right is my first completed lower.

HEY F***FACE FERG, LOTS MORE WHERE THESE CAME FROM! MOLON F***IN' LABE!
 
also, once i drill my selector and trigger holes, i remove the lower from the jig and use my reloading deburr/chamfer tool to chamfer the outside of the holes a little. looks cleaner that way
 
And here's a Ridgid cordless, in the EP Armory jig, without vise--I blame all the crudeness here on the freehanding without proper support, but it DID all fit together and the lower assembly passed function-check without upper.
View attachment 496341
Left is bare poly EPL, center is EPL in jig (note damage from end-mill that I should have picked up a 5/16 drill to make a pilot hole for, right is my first completed lower.

HEY F***FACE FERG, LOTS MORE WHERE THESE CAME FROM! MOLON F***IN' LABE!
who cares as long as it works!!
 
Lad, read 1984 sometime. That's what the puppetmasters at the top intend to do to us--gun control movements are just one tentacle of the whole malevolent octopus.
I'm more of a fan of Brave New World...
If you haven't been convinced yet, I'd agree with doing an 80%. This was done with the 80% arms jig, first time it took about half an hour to do and was a lot of fun. I don't think 5dtactical was around when I built mine...

View attachment 496340

View attachment 496339
I like the looks of that... is it easier to get bare 80% receivers? Ya know, incase I want to play around with parkerizing and rust blueing?

Edit: some online research says that "raw" 80% lowers are a little more common, if you wanted to do that.
Can anyone help me figure out how i keep ending up on the color case hardened AR thread from 2012? ;)
 
Last Edited:
I'm more of a fan of Brave New World...

I like the looks of that... is it easier to get bare 80% receivers? Ya know, incase I want to play around with parkerizing and rust blueing?
They certainly are around, I found a bare aluminum one on sale. So many people make them that there's a definate availability of pretty much any 80% lower you can want, with every finish or lack of out there.
 
They certainly are around, I found a bare aluminum one on sale. So many people make them that there's a definate availability of pretty much any 80% lower you can want, with every finish or lack of out there.
What has always has me curious is if the conpleted 80lower is typically left raw where milled out or finished in some way.
 
What has always has me curious is if the conpleted 80lower is typically left raw where milled out or finished in some way.
I would imagine finished. Not much of a point in leaving the inside of your gun to oxidize and potentially rust through if you have a steel lower. I think at least a layer of cerakote on the inside if you make one that's already anodized. I know I'm going to just cerakote the whole thing since mine is raw aluminum.
 
What has always has me curious is if the conpleted 80lower is typically left raw where milled out or finished in some way.
Most people can't do a correct Type III Hard Anodize at home... if you leave it bare, as the surface oxidizes that will protect the metal underneath--aluminum ages a bit differently than steel.
 
I would not be comfortable with steel pins in raw aluminum pin holes. Even though a lot of people run them without a complete finish, for an extra $30-50, why not make it worry free?
 
The lower needs a complete upper attached to it in order to be considered a rifle, from what I've been reading. A complete lower still has the ability to be turned into an sbr by attaching a pistol upper, I think is the reasoning. So until its a complete rifle the lower is treated as a other or a pistol. I wouldn't have had to make this thread if I could just buy a complete lower and then drop the parts I want into it.
I was informed by 4 different FFLs that a if a lower has a butt stock, upper and 16in or longer barrel attached it has to be transferred as a rifle. You don't need any other parts that's aren't necessary to attach those parts. So min parts required is stripped lower receiver, stripped upper receiver, 16in+ barrel, barrel nut, buffer tube, butt stock and pins to attach lower to upper.
 

Upcoming Events

Teen Rifle 1 Class
Springfield, OR
Kids Firearm Safety 2 Class
Springfield, OR

New Resource Reviews

New Classified Ads

Back Top