JavaScript is disabled
Our website requires JavaScript to function properly. For a better experience, please enable JavaScript in your browser settings before proceeding.
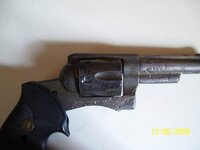
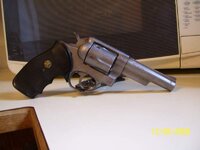
Im looking for help in the best, safe and maybe easy way to refinish my late dad's "throw it in the truck and go" gun.

The pistol is a Ruger Police Service-Six .357 mag. I'm looking for the best method to restore the bright finish I remember it had when I was growing up. Couple of questions, Can the barrels and cylinders be replace on older Rugers? Yes the front sight is broke, and will be replaced once the finish is restored.

I'm looking for insight, methods, and knowledge (i.e. HELP) on how to do this. For it will be my first restoration job.

Thanks
Terrylf72
 
I am not seeing anything too difficult here but without seeing it in person it is hard to tell. It would require an entire body sanding (320 and 600 grit emory cloth) and probably a bit of bead blasting. The biggest issue with a Ruger is that they do not come apart as easily as a Smith and therefore it is harder to get all the grit removed from the insides after sandblasting. It also appears that the barrel has been shortened.
 
Yes, at one point it was a 6" barrel. All I remember was coming home from 4th grade and dad was cutting it off. I dad had taken some Gun smithing correspondence course and worked a little with the one in town a little. This was the only weapon that he worked on that he kept..
 
What kind of finish are you looking to end up with? Duracoat may be the answer for this gun, it looks like there maybe a little pitting Durafill can take care of that and then paint it with possibly Matte Black or there are alot of other colors.
 
Sand it lightly and then blast it with some sort of media. I wouldn't duracoat a stainless or nickel gun if I were you, unless you want it to look like there is no pitting. But sanding, blasting then maybe some polishing/buffing will definitely bring the shine back.
 
Dremel, felt pad and jeweler's rouge.
Only use sandpaper or emery on the gouges or scratches you want to mimimize.


I agree, Dremel, Felt Pad, Flintz Polish compound, its green and runny, works perfect but will take time, maybe 3 days, or get the whole thing nickel plated at southridge arms, their link is in the sponsor pool up top.
 
I agree, Dremel, Felt Pad, Flintz Polish compound, its green and runny, works perfect but will take time, maybe 3 days, or get the whole thing nickel plated at southridge arms, their link is in the sponsor pool up top.

I will actually have to be the lone voice of dissent on the dremel. It is way to easy to really screw the surface up with a dremel. It is too easy to guoge the surface or remove too much which leave flat spots. It also is a good way to mess up the texture of the finish and end up with that wavey look.
 
It is way to easy to really screw the surface up with a dremel. It is too easy to guoge the surface or remove too much which leave flat spots. It also is a good way to mess up the texture of the finish and end up with that wavey look.
Not if you stay with the felt pad and jeweler's rouge. The shaft spins out of the pad if you lean on it too hard, and the rouge isn't that abrasive. It is strictly a surface finisher. even on something as soft as aluminum.
I have used them for years and they work really well if you don't have a bench mounted polisher.

I would agree with staying away from the drum sanders and grinder wheels though.
Still going to disagree. I will stand by my refinishing experience and the small high speed wheels in unison with any polishing compound can mar a finish and cause damage to the surface texture. Just because you or I are proficient with them does not mean they are not a potential disaster in the wrong hands.
 
Do your work by hand. Power tools take a pro's touch. It takes longer to irreversibly screw something up when doing things by hand. Dremels can dish flat surfaces, and they can also break sharp corners and warp screw holes. Flat blocks, hand sanding pads, and sandpaper. I would start with 320 or so, then move on to 400, 600, and then cheesecloth and flitz metal polish if you really want a mirror. It will take time, so be patient. If you doubt your abilities at all, take it to a gunsmith who can polish it for you quicker and easier.
 
Well after a few hours of working on the pistol with some 400 grit equivilent scotch brite and 600 grit wet/dry sand paper. I have gotten most of the discoloration and the blemishes off. Was'nt as bad as I thought. The hardest areas (around the barrel where is meets the frame, cylinder stop grooves and around the front and rear sights.(really tight areas)).

Thanks to you all for the information. Keep it coming.

Thanks
 
Terry: If you ever get down this way, I can get your gun up to speed. I have been doing a bit of glass bead blasting on stainless rifles and pistols and the results are remarkable. I am using a precision blaster, that is made to etch glass. The pattern can be adjusted to most any level. You can use it to blend pitting and remove most surface defects. Any defect that you think you could have sanded out, can be removed with this blaster. The trick is a uniform blasting pattern. No waves, valleys, or high spots. Afterwards, any damage you may do to the gun, can be cleaned up again, with a quick re-blast. A blasted gun will hold oil better too. As you have learned, stainless steel will rust. Thanks, John
 
Terry: If you ever get down this way, I can get your gun up to speed. I have been doing a bit of glass bead blasting on stainless rifles and pistols and the results are remarkable. I am using a precision blaster, that is made to etch glass. The pattern can be adjusted to most any level. You can use it to blend pitting and remove most surface defects. Any defect that you think you could have sanded out, can be removed with this blaster. The trick is a uniform blasting pattern. No waves, valleys, or high spots. Afterwards, any damage you may do to the gun, can be cleaned up again, with a quick re-blast. A blasted gun will hold oil better too. As you have learned, stainless steel will rust. Thanks, John

Hmm, I use to have a friend that lived in Sutherlin.. Im sure his parents are still there. But anyway, I bought a bead blasting kit with glass and plastic beads.. Have been practicing before I move on to the gun.. Thanks for the offer though.
 
Well after a few hours of working on the pistol with some 400 grit equivilent scotch brite and 600 grit wet/dry sand paper. I have gotten most of the discoloration and the blemishes off. Was'nt as bad as I thought. The hardest areas (around the barrel where is meets the frame, cylinder stop grooves and around the front and rear sights.(really tight areas)).

Thanks to you all for the information. Keep it coming.

Thanks

One thing that works well to plug the barrel is the yellow foam ear plugs. Helps keep the media out of places that you don't want it, but is easy to remove.
 
I will actually have to be the lone voice of dissent on the dremel. It is way to easy to really screw the surface up with a dremel. It is too easy to guoge the surface or remove too much which leave flat spots. It also is a good way to mess up the texture of the finish and end up with that wavey look.

+1
If you want a polished finish you well need to sand some of the carters and canons out of it first. A 3hp 10" grinder with a good cotton wheel to finish the job. It's a fairly easy job with the correct tools.
This was the nastiest stainless guns I have ever seen when I got it. I screwed up when I didn't get before photos. I didn't think I could save the side plate, but it looks pretty good, still a few very tiny pits if you look very close. If you hold it just right you can see it's wavie on the side plate. That Ruger looks 98% compared to this Smith when I got my hands on it.
68631.jpg
Nice looking gun. :)

I always do that too. When I get home with a project I end up starting it right away and forgetting to get some before pics. :(
 
One option no one has mentioned is that you could send it off to Ruger and have them do it. Their fees are minimal and sometimes they don't even charge! So unless you really WANT to do it yourself, just for experience or whatever, you could let Ruger fix it all back up for you.
 
One option no one has mentioned is that you could send it off to Ruger and have them do it. Their fees are minimal and sometimes they don't even charge! So unless you really WANT to do it yourself, just for experience or whatever, you could let Ruger fix it all back up for you.

hmm, I can not send it to Ruger. I had called them to find out info about doing such and when I was asked about the condition of the pistol. I told them that the barrle had been cut down and a new rear sight was put in.. I was promptly told that "I would be better off to keep it as a keep sake, cause they couldnt responsably work on it and send it back if they were to find anyplace on the frame where heat damage might have happened".. And of course back near the rear sight down near the hammer channle is a little heat discoloration. so I desided to not risk losing it and doing the work myself.
 
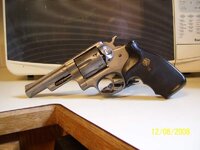
This is a stainless Ruger Police Service 6 .357 I resurrected. I did a complete teardown and glass bead blast.

Ruger004.jpg

Here's the finished product. It was too far gone to even attempt any major smoothing, I concentrated on corrosion removal and preserving any remaining structural integrity.

Ruger007.jpg


Ruger008.jpg

It now resides in SOCAL with my son. He only shoots .38 Special out of it to be safe.
 

Upcoming Events

Centralia Gun Show
Centralia, WA
Klamath Falls gun show
Klamath Falls, OR
Oregon Arms Collectors April 2024 Gun Show
Portland, OR
Albany Gun Show
Albany, OR

New Resource Reviews

New Classified Ads

Back Top