JavaScript is disabled
Our website requires JavaScript to function properly. For a better experience, please enable JavaScript in your browser settings before proceeding.
Messages
19
Reactions
37
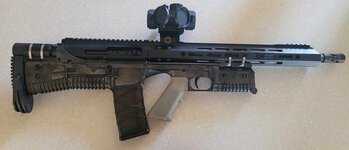
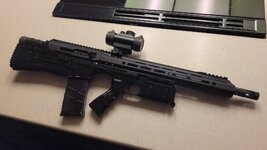
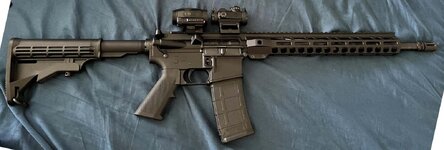
this is my un-named homemade ar15 based bullpup with a side charging 300 backout 16" upper.

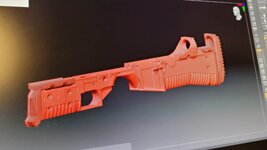
the lower took a few days to design using measurements from a lower I had sitting around, and then a few more days to redesign-
it as a bullpup lower in a tight physical footprint, and then assemble all the keyed sections as I made this from my resin printer.

it has all metal fcg's connected with a rod based linkage for space considerations, and a working safety

this has been fun but a lot of work.

thanks for peeking.

bullpup.jpg 3bullpup2n.jpg
 
Very cool!
Are those just hose clamps holding the forearm and buffer tube to the bullpup chassis?

It would be sweet if the chassis could bolt on to the underside of the Mlok rail of the forearm, could have holes through the bottom of chassis allowing the use of an Allen wrench to pass through to tighten.

If you get this up and running for a plug and play, I'd love to buy one one day.
 
No the buffer tube has a traditional thread and is reinforced. The foregrip has an aluminum section going down the neck. The body has a front and rear riser that is adjustable so it can be mated as close to the upper as possible.

The front riser has a rubber section between itself and the upper to mitigate vibration as resin tends to not like impacts although I did use a pretty tough resin.

Thanks, I will give that a thought.
 
What a cool project! The only thing that's (seemingly) glaringly awkward is the mag-release location, but I realize there will probably be further iterations as you think through further innovations…. Which I'm sure you will be laying in bed in the middle of many, many nights thinking about… LOL!
 
What a cool project! The only thing that's (seemingly) glaringly awkward is the mag-release location,...
And the grip which is almost touching the mag. Shorten and or change angle of grip is needed. Fortunately there are a gazillion grips to choose from.

To me the stacked coin look of the stock and foregrip area scream "nerf gun", but personal preference. I like how the buffer area is so compact.
 
And the grip which is almost touching the mag. Shorten and or change angle of grip is needed. Fortunately there are a gazillion grips to choose from.

To me the stacked coin look of the stock and foregrip area scream "nerf gun", but personal preference. I like how the buffer area is so compact.
Haha the paint on the grip I printed for some reason didn't want to dry so I gave it another go and it's drying in the sun currently. I will repost photos with that in as well.

I made 3 other different types. In order to get the upper installed and handle this thing I used the grip that came with a lower hardware kit.
 
What a cool project! The only thing that's (seemingly) glaringly awkward is the mag-release location, but I realize there will probably be further iterations as you think through further innovations…. Which I'm sure you will be laying in bed in the middle of many, many nights thinking about… LOL!
It is awkward. This is my first and only attempt so far at a custom rifle. So I will probably need to make a different release setup.

The bolt catch lever is also weird now so that's a thing too lol
 
And the grip which is almost touching the mag. Shorten and or change angle of grip is needed. Fortunately there are a gazillion grips to choose from.

To me the stacked coin look of the stock and foregrip area scream "nerf gun", but personal preference. I like how the buffer area is so compact.
This is the grip I designed that is drying forgot I had a photo

20230627_212450.jpg
 
No the buffer tube has a traditional thread and is reinforced. The foregrip has an aluminum section going down the neck. The body has a front and rear riser that is adjustable so it can be mated as close to the upper as possible.

The front riser has a rubber section between itself and the upper to mitigate vibration as resin tends to not like impacts although I did use a pretty tough resin.

Thanks, I will give that a thought.
Either way, this is really cool. When you get it all worked out, I'll buy a chassis! Would love to see video of it up and running whenever it's ready!
Again, very cool project man.
 
Either way, this is really cool. When you get it all worked out, I'll buy a chassis! Would love to see video of it up and running whenever it's ready!
Again, very cool project man.
No problem, I appreciate the ideas, if I could get the files I made machined out of billet I would absolutely go the route of hardmounting the foregrip.

I think that hearing people's opinions is important especially when something may be dangerous. Not sure about visually because sure everyone likes different things. But functionally it's all fair game.

Thanks for the input you guys (and gals just to be sure) haha
 
Update:

Took it out to a local shooting area and gave it hell. No failures. The only issue I feel is that the buffer system seemed weak.

I think it may have been 1 of two things.
The upper I chose has a carbine length gas system and I was shooting 300 blackout.

The other issue is that I may have needed the extra buffer spring installed with the kentri arms 3.5 buffer tube.

Either way it did work but would only cycle about 3 rounds before it wouldn't fire again.

So considering the printed lower did great I'm pretty happy. Just have to make some changes. And then go out again.

I also fired another lower I made that's just your standard ar15 lower.

It did really great and the buffer tube held and didn't fail. This didn't require hose clamps or any craziness like that.

Anyhow just an update. It did well. I even designed a cheekplate that is now mounted.
 
Hi there,
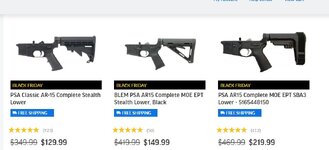
I have the itch to build an AR-15 so I have a backup. PSA sent me this. The picture below the ad is the first one I have. What are the difference between these 3? Any takes would be great!
BTW: My very first one fires really nice. I grew up in the base for my father was a naval officer. I had the chance to mess around with different stuffs at that time. This one is not super heavy duty com[paring to the carbine rifles that I fired before. But when it comes top accuracy and and consistency, it can be on par or more. But that was back in the early 80's. Anyways. Any takes? Thanks.
Link:
1700412071364.jpeg

1700412266818.jpeg
 
The lowers are basically all the same. The only difference you would be paying for is the stock. Fyi, generally you won't be able to find any issues with a blem lower compared to a non blem.
 
Hi there,
I have the itch to build an AR-15 so I have a backup. PSA sent me this. The picture below the ad is the first one I have. What are the difference between these 3? Any takes would be great!
BTW: My very first one fires really nice. I grew up in the base for my father was a naval officer. I had the chance to mess around with different stuffs at that time. This one is not super heavy duty com[paring to the carbine rifles that I fired before. But when it comes top accuracy and and consistency, it can be on par or more. But that was back in the early 80's. Anyways. Any takes? Thanks.
Link:
View attachment 1765708

View attachment 1765714
Far right has a pistol brace, different trigger, and different grip. Middle has different stock, different trigger, and different grip.
 

Upcoming Events

Oregon Arms Collectors April 2024 Gun Show
Portland, OR
Centralia Gun Show
Centralia, WA
Albany Gun Show
Albany, OR
Falcon Gun Show - Classic Gun & Knife Show
Stanwood, WA
Wes Knodel Gun & Knife Show - Albany
Albany, OR

New Resource Reviews

New Classified Ads

Back Top