JavaScript is disabled
Our website requires JavaScript to function properly. For a better experience, please enable JavaScript in your browser settings before proceeding.
Messages
12,587
Reactions
28,719
Just finished the FCG pocket on EPL#1 five minutes ago, and find that the Anderson disconnector WILL NOT let go of the hammer even with a trigger pull, or even a tool reaching in to PUSH it down. Pinholes are in jig position, though I have noticed that the half-cock notch seems to be about 1/16" from the top-front trigger corner.

Does something need to be filed or stoned down, or is it a botched lower (admittedly this one has several blemishes including a non-critical spot where I put a hole in the side)? I've tested it both in and outside using Allen wrenches as temporary FCG pins.
 
ive had to CAREFULLY polish an anderson hammer and disconnector where they engage to get it to work reliably. there was a burr on the hammer and also some inconsistencies in the coating they use on the disconnector that caused it to hang up.

just my experience
 
Out of spec something. Try a cut down M16 disconnecter which is the AR15 disconnecter they use nowadays in nearly all lower build kits. See if the different one works.

If that fails, try a different combination of hammers, triggers and such. Curious? With the selector on "SAFE" is there zero play in the trigger? Or is there a little bit of play?

Are you using compatible parts? Sometimes this happens. At the last resort it might be the entire lower that is slightly out of spec. It does not take much of a mis alignment.

hundreds of build

Edited by HB. Long shot here. Are you using a M16 disconnecter spring? It must be used with the cut down M16 now AR15 disconnecter. Using an early AR15 SP-1 disconnecter spring MIGHT be causing your problems. The SP-1 AR15 spring looks the same but is double strength.

But very unlikely here.
 
There was no selector installed, and all parts came out of the same LPK. Hammer and trigger both have unrestricted free

Will have to round up my other LPK's and see if any of the others fit better... and there are some known out-of-spec things with this lower.

UPDATE: Just tried with the lower out of the jig and the Allen wrenches only in the pinholes, and it all works as designed--hammer falls when supposed to, does not when not. False Alarm, but some good points to watch on the next one. Wish my KNS pins would go on sale again so I could get a set on the way and get this thing assembled...

Thanks, guys!
 
Sometimes the disconnector needs to be fitted a little. Don't go grinding on anything just yet. I can take some pics in just a bit and show u where they like to hang up..
 
@HB of CJ Yep, this was my first try at an 80%. @Velzey that might be helpful to have for reference--though for right now, this one goes on hold until my pins are in hand, and I don't start #2 until I have an old-school "lots-of-little-holes" jig and a vice.

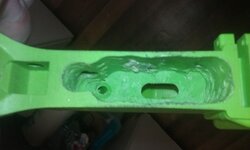
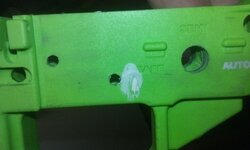
Here's some pics. Yeah, I know it's a POS and most here would almost certainly do better drilling on a bender, but it's a first baby step--and one taken with only a cordless drill and no vise, freehand. Hell *I'm* not proud to call this my work, but considering this is a first-time blank done freehand with a cordless drill and not even a vise, it came out less junk than I expected. Not something I'd ever bet anyone's life on, but just might be OK for Range Use only rather than the Crunch-and-Can I was expecting.

20170516_145311_zpsg3qeigvh.jpg
20170516_145316_zpspp3lehlm.jpg

What say the experts? Build It, or smash-and-trash and on to Round 2?
 
who cares if it looks like crap. no one is a pro 1st time... with anything. as long as it functions youre good...is it not possible to clean up the FCG pocket at this point? i could see a guy using a really slow dremel or even by hand sanding/filing it to gain some uniformity for sure
 
Out of alignment trigger pin locations, or not deep enough in the pocket to allow the disconnect to move correctly. If you have a one piece drop in trigger available you can figure out extremely quickly your problem. I'm betting on trigger pins not centered correctly.
 
@KeepnitReel I think that's what happened somehow with the Allen wrenches while it was in the jig. Once the lower was out and the "pins" were only in the pinholes, it worked like a champ reliably.

Using wrenches the same diameter as the actual pins or close to it helped too--I'd been trying to get around fighting with the stupid J-spring in the hammer.
 
Also from your picture the pocket area below the safety needs to be depth of 1.250 . Looks like it's got 3 steps in that area where the trigger disconnect area needs the depth to move freely.

Did you use a Swiss Army knife to whittle that lower :confused:

I remember my first 80% lower :rolleyes:
 
It happen to me on the first lower I did with the cheap Anderson jig. Triggers pins where off by thousands of a inch. Ended up having to get the colt large pin trigger assembly and recut the trigger holes to the correct size. Good luck buddy , you'll figure it out.

@KeepnitReel I think that's what happened somehow with the Allen wrenches while it was in the jig. Once the lower was out and the "pins" were only in the pinholes, it worked like a champ reliably.

Using wrenches the same diameter as the actual pins or close to it helped too--I'd been trying to get around fighting with the stupid J-spring in the hammer.
 
Actually, amigo, it's already figured out and put to bed... damn hammer gave me a case of M1 Thumb once it was all assembled in the de-jigged lower... the only reason I didn't drive pins and leave it assembled other than my reservations about its safety to fire is that I won't build a poly without KNS-style "endplate-connected" pins and I don't have any that aren't in use.
 
@rick benjamin That's exactly what I used, and I have three more blanks still in the box. Should see if they can send me a replacement top plate... they're not big ones, but the mill took a couple bites out of it.

@KeepnitReel Ridgid 18v cordless drill--since the 7/16 endmill didn't work freehand I started it the Old Days Way with lots of little 5/32 holes around the edge of the FCG pocket (one went off on an angle, hence the hole) using the 1/4, 5/16 and 3/8 bits progressively to make bigger holes, and finally the endmill for sticky spots and trying to smooth it out with the occasional bit of pocket-knife hackery to break up some of the more resistant "webs" between the holes. Next time, definitely at least a small drill-press vise to provide torque resistance and more consistent drilling-angle control... and next time I get one of the old-style jigs to guide the top holes, along with using the 3/8 bit for most of the heavy lifting and only bringing in the end-mill for finishing touches and smoothing out sides and bottom. And next time I bore out the corners first, then start on the smaller ones in between to play "connect the dots"--also, the root of the "tail" gets done first, THEN the end. (Sticky, because the EP jig only has a 3/8 safety slot and the 3/8 bit is rather tapered so you can't get a smooth flat bottom.)

Measurement on the blueprint I had for well depth was 1.249... since my available tools only measure in 1/16" increments I rounded it to 31mm figuring if needed it's easier to take material off than put it back on, it happensand the floor of that stepping is an area where it's *below* target thickness, so lucky thing there's the grip mount there providing a little extra structure.
 

Upcoming Events

Centralia Gun Show
Centralia, WA
Klamath Falls gun show
Klamath Falls, OR
Oregon Arms Collectors April 2024 Gun Show
Portland, OR
Albany Gun Show
Albany, OR

New Resource Reviews

New Classified Ads

Back Top