JavaScript is disabled
Our website requires JavaScript to function properly. For a better experience, please enable JavaScript in your browser settings before proceeding.
Messages
6,700
Reactions
15,021
I'm curious if anyone has used this jig and would have any tips or tricks for us.

This is a new project for us (my son and I) after completing several Glock 80% builds. The lowers we have are 7075-T6 anodized.

Some questions that would welcome some insight:
1. I don't own a drill press (or rather... one that I would trust for precision drilling) and were planning on doing the start hole with a hand drill. Every tutorial we've seen (even from 80percentarms) have been done with a drill press and no mention of any tips on using a hand drill... even though one of the main selling points of this jig is that no drill press is needed.

They highly stress using the included level to ensure all surfaces and equipment are level and aligned. I don't know if that's simply because a drill press may be more likely to damage the drill hole guide or because the exit hole alignment is absolutely critical. It doesn't seem like it should matter while milling since the router simply needs a start position as the depths increase. How critical the lower exit hole is though... I dunno.

I don't know how much the hole guide helps with alignment when using a hand drill... or even if the concern has any merit if reasonable care it taken to keep the drill in an upright position. ;-)

*Note: I did opt to get the drill stablizers for the side holes.

2. We're thinking of using a single layer of painters tape to protect the lowers finish. Is that likley to interfer with alignments? Good/bad idea?

3. We have aluma hyde (spray) and planning on sealing the raw aluminum with it after milling. I don't know if we should bake them after application or simply let them cure for the 2 week period. Thought on that... or using aluma hyde in general would be welcome. Again.. these are anodized lowers. I didn't plan on spraying the outsides too, but also don't know what issues we run into baking pre-anodized aluminum

I'm sure the "safest" would be to just let them cure... but that's TWO whole friggin weeks to wait.

4. The router I have is a double hander so I had to purchase (seperately) the large router plate. The day after it arrived I ran into a thread that was saying it's better to use a smaller router controllable with one hand. I guess they found a large router was more difficult to control on the jib plate(?). Just supposition on my part. Maybe the guy just wasn't familar with more powerful hand tools.

My thought being... well... I admit I'm a bit predisposed to, "more power is more better" when it comes to tools, trucks and firearms. After all... it "is" 7075-T6 so I'm thinking low speed, more torque would be preferrable (?)

Any other thoughts or experiences are welcome... or simply on the builds in general. This is the first time doing any kind of AR build for both of us.

Appreciate your time and combined learned thoughts or advice for us noob builders.

(I've read the sticky 80% thread but was looking for more easy jig 2 specific info and our planned approach.)
 
Last Edited:
I've not used the EZ jig 2 but used the original several times. I used a hand drill and I also used a drill press. The drill press is 5x faster and leaves a cleaner end product. The main reason is that it has no side load. Your jig holes will last waaaay longer with a drill press. Not sure what you mean by exit hole. Hand drill for the trigger hole.
Painters tape probably isn't necessary if it's a forging in white and you plan to coat later.
I have a large router and a small Rigid router. The small router is my preferred tool. I ran into some interference with the large base on the larger one. Again, this was with the 1st gen EZ jig so it might not be an issue on the EZ jig 2.
Take your time. I know that people say that you can bust one out in an hour, and maybe you could if you have some practice and its a poly lower. My experience is that its @ a 3hr process with aluminum as you'llneed to take little bites with the router.
Have fun.
 
The drill press is 5x faster and leaves a cleaner end product. The main reason is that it has no side load. Your jig holes will last waaaay longer with a drill press. Not sure what you mean by exit hole. Hand drill for the trigger hole.
Painters tape probably isn't necessary if it's a forging in white and you plan to coat later.

Take your time. ... My experience is that its @ a 3hr process

Thanks for the reply. With the Gen2 it's just one drill hole all the way through as a starter hole for all the router work... including the trigger hole. I'm just not sure how "forgiving" it is when the trigger hole is milled... and if the drill hole guide is going to support the hand drill sufficiently for a precise enough hole out the bottom.

Our lowers are anodized so I was thinking we might want to do something to protect the outter finish or if the jig surfaces are tight enough (not to allow shards of aluminum) so nothing "vibrates" light scratches into the surfaces.

We don't get much father/son time so I "might" have a tendancy to like to drag out the build times. ;-) IOW, I'm not looking to bang anything out in a hurry.
 
On the 1st gen the starter holes don't go all the way through, just the trigger hole. The pin and selector holes go in from each side toward the center. Side note; I frequently need to use a drill bit, held by hand, to lightly ream the selector holes. I also use a slightly larger bit and spin it with my fingers to debur (and ever so slightly chamfer) all the side holes. Then I go back over the visible raw surface with a black Sharpie. I know it may sound kinda cheezy but it gives a clean end result.

I've never had a problem with scratching. I just made sure the surfaces were clean when I bolted sandwiched everything together and blew it out periodically. Any light mark that may have shown up were easily cleared up with some Rem oil.
 
I used an 8" drill press for the starter hole and the trigger/safety holes. I would think you would be ok using a hand drill with the stabilizer, by the way you only need one stabilizer. Drilling the starter hole might be a bit much on a cordless drill motor.
As far as checking levels with the drill press the only thing I worried about was making sure the drill was 90 degrees to the jig with a 90 degree square. Drilling the starter hole is critical where it exits the would be trigger hole, not a lot of room for error. I never used painters tape on the lower itself, only used it to tape the gaps closed between the lower and the jig for better vacuum with my shop vac.
I used the small Dewalt 611 router with both hands to keep it from rocking and gouging the sides, it has 6 settings and I used setting #5 (guessing 20,000 rpm.
I really like my 80% arms gen2 and believe it is as good as anything out there, just go slow and only rout a half of a hashmark at a time and fully understand the directions before going on to the next step and your lower will look as good as factory.
 
...by the way you only need one stabilizer.

Drilling the starter hole is critical where it exits the would be trigger hole, not a lot of room for error.

...believe it is as good as anything out there

Thanks, HuckFin. That's the kind of infomation I was hoping for. I know you can only drill one side at a time (so only one stablizer is required), but another fellow suggested we get the set as the other stabilizer acts as a jig stabilizer (laying it on it's side to do the drilling).

I "do' have a drill press... sort of. It's a shopsmith and a PITA to drag the whole thing out (rearranging the garage), convert the headstock, then level and square the thing just for 2 holes... which is really what you have to do each time it's converted if you want any kind of precision drilling done. I'm reconsidering now though. ;-)

I might be the guinea pig though and still try a hand drill on one of them and report back. Our hand drills are commercial grade, and worst case... I'm out $40. I was hoping someone would chime in with a, "no worries... go for it" or a, "did it.. regret it.. don't try it."

I have no frame of reference to compare this jig, but from what I've heard from others it's quite the bee's knee's and nearly monkey proof. I liked the universal application (without exlusions) and the ability to do 10/15's or 308's in one package.
 
When I drilled the three holes on each side with a drill press I just laid the jig sideways on the table with the top plate hanging over the edge of the table and slide the table over a few inches. With an 8" drill press I also had to slide the table over to install the drill bits because not enough clearance when using the drill bit stabilizer.
Be careful when drilling that the drill bit does not go through and hit the other side of the lower, ask me how I know:(
Yes I read all the different jig reviews before buying and went with 80% Arms Gen2 and happy I did.
 
I chickened out. Reading the directions specifically stated, in bold, not to use a cordless drill as they produced insufficient torque. Still didn't want to drag out the shopsmith so I hit the 4 day Harbor Freight sale, used my 20% off coupon and picked up their 8" 5-speed drill press for 50 bucks... and damn glad I did. It wasn't possible to use the press table, and didn't have the travel necessary without starting the drill bit "in" the drill block... but did some work arounds and got'er done.

I "did" try using a hand drill on the side holes but gave that up in a hurry and went back to the drill press. The drill stabilizers did their job, but also added enough friction on the bit that my hand drill couldn't handle the job.

IMHO, their "no drill press required" claim is a massive stretch... as is their "30-min" timetable.

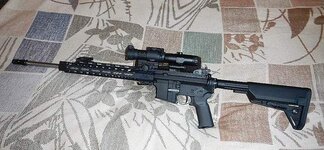
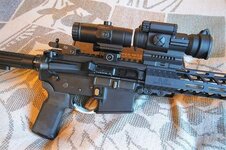
It was my first 80 AR receiver so I don't have anything to compare it with, but I was "extremely" pleased with the end product. Lower assembly was a snap and everything fit like a glove right out of the gate.

I used a Matrix Arms 7075-T6.

My only complaint would be... what a mess! ;-) I most definately need to upgrade my shop-vac on the next one.

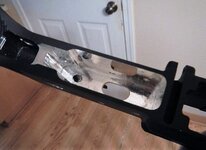
End Product:
DSCN0427.jpg
 
Looks good. Are you going to color black the trigger pocket? I bought a bottle of Birchwood Casey aluminum black I'm going to try on the next one.
As far as the drill stabilizer for the trigger pins and safety selector hole I hand tightened the stabilizer to the jig then aligned the two trigger pin holes (3/16) and the safety hole (3/8) with drill bits then once I could easily turn the drill bits with my fingers I tightened the stabilizer down...Took a few tries to get it right.
You said it wasn't possible to use the press table. Did you swing the table over then slide the drill bit up into the chuck far enough so you could swing the table back into position then lower the bit into the hole?
 
Are you going to color black the trigger pocket? I bought a bottle of Birchwood Casey aluminum black I'm going to try on the next one.

As far as the drill stabilizer for the trigger pins and safety selector hole I hand tightened the stabilizer to the jig then aligned the two trigger pin holes (3/16) and the safety hole (3/8) with drill bits then once I could easily turn the drill bits with my fingers I tightened the stabilizer down...Took a few tries to get it right.

You said it wasn't possible to use the press table. Did you swing the table over then slide the drill bit up into the chuck far enough so you could swing the table back into position then lower the bit into the hole?

I used Brownell's Aluma Hyde II for the bare alum. sections and baked it. Not that appearance is critical in the pocket, but turned out really nice. I should have taken a photo before I assembled the lower, but... that's like asking small children not to open their presents yet Christmas morning. ;-)

That's what I did too with the stabilizers but it only took a couple of shavings coming up the hole to start jamming up my bit so I stuck it back under the drill press. It was probably doable but the drill was working hard... and "why?" when I had a perfectly good drill press sitting right there. I "just" rebuilt those battery packs (18v) and doubled the capacity. They needed to be rebuilt anyway but did it now, in large part, to have maximum juice on the lowers.

No. The table wouldn't go down far enough for that and I didn't want to chuck the bit any further than it was (nearly to the flutes). I just swung it to the rear and used different thickness of wood planking and slipped those under the vise block after raising it up to seat the bit. If I had ditched the vice block I'm sure the table would have fit with just the jig, but wanted maximum stability.

I also noted that the press table leaves a lot to be desired. A straight edge across the table shows level but the center section of the table sagged. Can't expect perfection for 50 bones... and the quill was rock solid (the important part)... so wasn't too excited about dealing with a multi level surface from the get-go.

Might have been overkill with the vice block but being my first lower I wasn't sure what to expect and choose to err on the side of caution.
 
I didn't see any need for using a vice block for drilling the side jig holes. It was easier to just lay the jig on the table plus I could feel if the drill bit was binding. Although I did have to remember to hold the jig tight to the table when the drill punched through to keep the drill bit from pulling up on the jig. Next time I might use a c-clamp to keep that from happening.
 
I didn't see any need for using a vice block for drilling the side jig holes.

Agreed. I didn't either. Just on the starting hole. Out of curiosity what RPM did you set yours?

All in all it did a "very" decent job for a $50 press. Can't beat the size and weight for convenience.
 
Earlier I guessed it was 20,000 rpm but now looking at the variable speed specs I would say it was around 24000 RPM.
Router has 6 speeds (16000 to 27000 RPM) and I used number 5 speed.
 
I chickened out. Reading the directions specifically stated, in bold, not to use a cordless drill as they produced insufficient torque. Still didn't want to drag out the shopsmith so I hit the 4 day Harbor Freight sale, used my 20% off coupon and picked up their 8" 5-speed drill press for 50 bucks... and damn glad I did. It wasn't possible to use the press table, and didn't have the travel necessary without starting the drill bit "in" the drill block... but did some work arounds and got'er done.

I "did" try using a hand drill on the side holes but gave that up in a hurry and went back to the drill press. The drill stabilizers did their job, but also added enough friction on the bit that my hand drill couldn't handle the job.

IMHO, their "no drill press required" claim is a massive stretch... as is their "30-min" timetable.

It was my first 80 AR receiver so I don't have anything to compare it with, but I was "extremely" pleased with the end product. Lower assembly was a snap and everything fit like a glove right out of the gate.

I used a Matrix Arms 7075-T6.

My only complaint would be... what a mess! ;-) I most definately need to upgrade my shop-vac on the next one.

End Product:
View attachment 507705

VERY nice job! As I was reading the thread I was going to mention Harbor Freight for a press and then saw you did. Stuff like that is where they really shine. I have a few power tools sold by them like a drill press. NOT something I would buy when I was working in a shop but for home? They are great. I seldom need mine but when I do they just work.
 

Upcoming Events

Redmond Gun Show
Redmond, OR
Klamath Falls gun show
Klamath Falls, OR
Centralia Gun Show
Centralia, WA

New Resource Reviews

New Classified Ads

Back Top