JavaScript is disabled
Our website requires JavaScript to function properly. For a better experience, please enable JavaScript in your browser settings before proceeding.
Messages
578
Reactions
881
Hey NWFS ,

Houston we have a problem !!!!!! So I've been having a trigger issue with my first 80% lower build. The first jig I got was the Anderson's jig , don't waste your time on this jig, it's cheap and not even close to spec. I only purchased it because I have a mill and figured the reference points where good enough for me... Wrong !!!! The trigger pins are off and not getting a solid connection from the disconnect to the sear. If I release the trigger very slowly it fires the trigger and missing the sear completely. Mil-spec this Mil-spec that, lots of junk out their in mil-spec.... So after hours of drinking and hair pulling I bought the nicest jig on the market. The top pin location is good but the front pin is off.

My question is are the large pins .169 in the exact same location as the small pins .154 ?

I really don't want to weld or jb weld or slop a bushing in my lower.

My second 80% lower came out perfect and ended up going with the #23 bit and a .155 reamer. Any of you guys out there using the 5/32 drill bit and don't plan on any coatings or anodized I high recommend the #23 bit and hand ream the finish. Cheaper the anti-walk pins.....
 
The colt size trigger and hammer pins ( large pins ) are .169-.174 and the standard mil spec ar pins are .154. That's just enough of a diiferernce to fix my alignment issues from the cheap bubblegum Anderson jig. I'm trying to figure out if "center" of the small pin vs large pin location is the same. The .015 difference is really close to my offset drill hole. I guess I'll just have to order the large pin timney drop in trigger and get this problem fixed.

I though the pins were the same size for the trigger and hammer
 
Ah I see, I did not know about the pin size differences.

I was going to suggest the timney one since it has small screws that extend from the bottom to lock it in place and put pressure to hold the pins in place.
 
Ya the timney is the plan because of the set screws and they make a drop in for the large pin groups.

Just hoping someone can chime in on the locations of the pins. Or grab a caliper to measure the distance.

Ah I see, I did not know about the pin size differences.

I was going to suggest the timney one since it has small screws that extend from the bottom to lock it in place and put pressure to hold the pins in place.
 
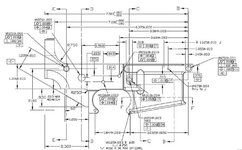
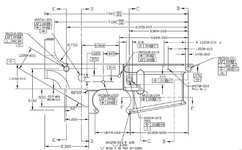
Capture.JPG small pin receiver drawing
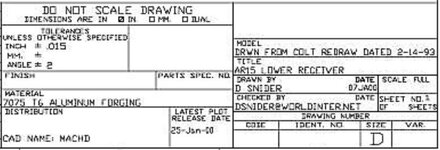
Capture a.JPG
 
Center to center should be the same. But there not.

Use your jig. Or you can you make a template with a small flat of steal and a drill press. With one large pin hole and one small.

If one hole is correctly in place. Use that hole and a small pin to index the template you made.
Use the large hole in the steel template as a guide to drill the large hole over the badly located hole.

Hopefully the new larger hole will encompass the entire smaller hole. And be on center.

If you use steel as a guide to drill aluminum. It should not matter if the poorly placed receiver hole is centered. Just so long as the new larger hole will encompass the old hole.
With care. The bit will cut the aluminum long before it cuts steel and walks on you.

Then drill out the hammer or trigger to fit. And use just one large pin.

Center to center between pins. Or back edge of hole to back edge of hole. Is right at .9'' on my small pin colt. With my dial micrometer.

How far are you off with your holes?
 
Last Edited:
Ya got the mill to center the correct .156 holes off the jig, then change to a .175 end mill. Same 5/32 collet so I know it will stay true on center. The end mill will cut/drill the center hole of exact location of the pins. Finish ream with a .176 should be good to go with a drop end self contained trigger. The lower right side front pin hole is off by almost .025. So I'll have a .005 difference after changing to a large pin on the front pin only. The Timney large pin trigger with the base set screws should take care of that slop.
Thanks for the info Medic.

Center to center should be the same. But there not.

Use your jig. Or you can you make a template with a small flat of steal and a drill press. With one large pin hole and one small.

If one hole is correctly in place. Use that hole and a small pin to index the template you made.
Use the large hole in the steel template as a guide to drill the large hole over the badly located hole.

Hopefully the new larger hole will encompass the entire smaller hole. And be on center.

If you use steel as a guide to drill aluminum. It should not matter if the poorly placed receiver hole is centered. Just so long as the new larger hole will encompass the old hole.
With care. The bit will cut the aluminum long before it cuts steel and walks on you.

Then drill out the hammer or trigger to fit. And use just one large pin.

Center to center between pins. Or back edge of hole to back edge of hole. Is right at .9'' on my small pin colt. With my dial micrometer.

How far are you off with your holes?
 
I just bought an Anderson jig and a couple of 80% lowers from a member here and after reading this thread, I stripped a factory Anderson lower that I own and fitted the jig to it.
Everything lined up perfectly when I inserted the 5/32" drill bit through the pin holes.
After torquing the jig like they recommend, I did notice that the assembled jig rocked a bit when placed upright on a flat surface.
I plan on having a machinist friend help me with the milling on his CNC machine.
 
The main problem is not having the holes on both sides of the jig for trigger pins and safety selector. That means you need to use a really long 5/32 drill bit and at that small of a bit it's impossible to get it true on the other side. I would not use that jig. The tollerences are crap on the bolts in relation to the lower.

I just bought an Anderson jig and a couple of 80% lowers from a member here and after reading this thread, I stripped a factory Anderson lower that I own and fitted the jig to it.
Everything lined up perfectly when I inserted the 5/32" drill bit through the pin holes.
After torquing the jig like they recommend, I did notice that the assembled jig rocked a bit when placed upright on a flat surface.
I plan on having a machinist friend help me with the milling on his CNC machine.
 
I guess I'm just not seeing how the trigger group pin location has anything to do with the upper to the lower. But I'm a total rookie in the AR world. So maybe your right, beers on me if you are. Thanks tits!!
 

Upcoming Events

Centralia Gun Show
Centralia, WA
Klamath Falls gun show
Klamath Falls, OR
Oregon Arms Collectors April 2024 Gun Show
Portland, OR
Albany Gun Show
Albany, OR

New Resource Reviews

New Classified Ads

Back Top