- Messages
- 83
- Reactions
- 34
Hey all. Below is my experience with completing an 80% lower from 80percentarms.com. Hope you find it helpful in some way.
I started out by purchasing their Universal 80% AR-15 EASY JIG and
Anodized Billet 80% AR15 Lower Receiver. I also purchased their tool kit for the necessary drill bits, bit stop, and custom end mill for the jig. It was $214.93 shipped for the jig and the tool kit with magpul fde grip. Then $107.98 shipped for the 6061 Billet 80%. Something to note, shipping is free on orders over $200. So plan ahead if you are going to do this in a short time frame, save money on shipping. I think I received my easy jig, tool kit and handguard in two days. My lower was delayed a week because of the massive amount of orders they have coming in. I sent an email asking about it and was refunded 5%. Which, was unexpected and in my opinion, top notch customer service.
The instructions were very easy to understand. However, it was also easy to make mistakes as I've learned. So be sure to follow the instructions as best as you can. I recommend reading them all the way through first.
You start out with putting the lower into the jig walls. It will be locked in here during the entire process. Then you place the pocket drilling template onto the jig walls and secure with the bolts.
Ideally you buy the tool kit and get all the needed bits and the 3/8 bit stop. If you don't have a bit stop for this part, you can set your drill press full depth of the template marked main. It is important here to check the depth of the stop for every hole. Or double check your drill press setup for every hole. Make sure it is tight as my first and second holes were .02" too deep because the stop moved. I used a drill press but you could easily use a hand drill as the hole template will keep the bit fairly straight and inside the pocket.
This is what it looks like after you drill the holes. Note the rear pocket is mostly complete on the newer lowers.

Then you bolt on the spacer and the main pocket milling template. I used the 1/4 end mill from the tool kit. It warns you in the instructions that you shouldn't touch the jig walls until you go low enough in the pocket so the mill end doesn't touch the template. This is not a problem if you buy the tool kit as it is a custom bit with inch long threads is already lower than the template. I was able to do rough and finish passes all in one go so I think I saved a lot of time with that bit.

Here is a shot of after 1 pass with the end mill in my compact porter cable router. That black stuff is wd40 I was spraying on the bit.
Once I made all my main pocket passes, I measured with my calipers and noticed my depth was not the advised 1.249" in the main pocket. So I just kept adjusting the end mill out slightly until I reached that depth. This is something I think the instructions could have better detailed, but to me it was common sense to go until you reach the correct pocket size.
After that you swap on the rear pocket jig. The newer 80% lowers come with the rear pocket nearly milled out so you really don't need to remove the bolt of the jig wall anymore. Just make sure you don't hit it. I removed it anyway just to be safe. But all you are really doing here is connecting the rear pocket to the the main. Not much left to do at this point.
Next, drill out the trigger hole by lining up the template. This is probably the most confusing part as the template is attached slightly offset and upside down from what you would think with two bolts. But if you think about where the trigger hole should be, it makes complete sense when you line it up. Drill that hole with the 19/64 bit and then flip the template over, island up as they say and put on the router surface to mill out that trigger slot.
Take the templates off and drill the 3/8 hole and 5/32 hammer and trigger pins from each side and you're done. Spray it off with brake cleaner. Here are some more pics.

You can see where I drilled the first two holes slightly deeper. Lesson learned. Make sure you have that drill stop tight and lined up correctly on the bit so it secures nicely.


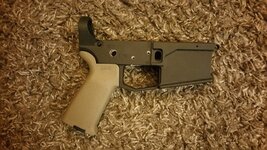
This was my first attempt at completing a lower and I have to say it was quite easy with the 80percentarms kit. Even though I made mistakes, I'm quite happy with the way it turned out. I wanted to share my experience with these tools and what issues I had. I think the next one I do will turn out much better. Thanks for checking out my post.
I started out by purchasing their Universal 80% AR-15 EASY JIG and
Anodized Billet 80% AR15 Lower Receiver. I also purchased their tool kit for the necessary drill bits, bit stop, and custom end mill for the jig. It was $214.93 shipped for the jig and the tool kit with magpul fde grip. Then $107.98 shipped for the 6061 Billet 80%. Something to note, shipping is free on orders over $200. So plan ahead if you are going to do this in a short time frame, save money on shipping. I think I received my easy jig, tool kit and handguard in two days. My lower was delayed a week because of the massive amount of orders they have coming in. I sent an email asking about it and was refunded 5%. Which, was unexpected and in my opinion, top notch customer service.
The instructions were very easy to understand. However, it was also easy to make mistakes as I've learned. So be sure to follow the instructions as best as you can. I recommend reading them all the way through first.
You start out with putting the lower into the jig walls. It will be locked in here during the entire process. Then you place the pocket drilling template onto the jig walls and secure with the bolts.
Ideally you buy the tool kit and get all the needed bits and the 3/8 bit stop. If you don't have a bit stop for this part, you can set your drill press full depth of the template marked main. It is important here to check the depth of the stop for every hole. Or double check your drill press setup for every hole. Make sure it is tight as my first and second holes were .02" too deep because the stop moved. I used a drill press but you could easily use a hand drill as the hole template will keep the bit fairly straight and inside the pocket.
This is what it looks like after you drill the holes. Note the rear pocket is mostly complete on the newer lowers.
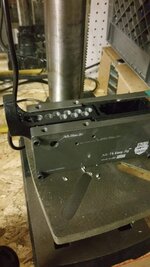
Then you bolt on the spacer and the main pocket milling template. I used the 1/4 end mill from the tool kit. It warns you in the instructions that you shouldn't touch the jig walls until you go low enough in the pocket so the mill end doesn't touch the template. This is not a problem if you buy the tool kit as it is a custom bit with inch long threads is already lower than the template. I was able to do rough and finish passes all in one go so I think I saved a lot of time with that bit.
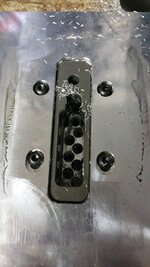
Here is a shot of after 1 pass with the end mill in my compact porter cable router. That black stuff is wd40 I was spraying on the bit.
Once I made all my main pocket passes, I measured with my calipers and noticed my depth was not the advised 1.249" in the main pocket. So I just kept adjusting the end mill out slightly until I reached that depth. This is something I think the instructions could have better detailed, but to me it was common sense to go until you reach the correct pocket size.
After that you swap on the rear pocket jig. The newer 80% lowers come with the rear pocket nearly milled out so you really don't need to remove the bolt of the jig wall anymore. Just make sure you don't hit it. I removed it anyway just to be safe. But all you are really doing here is connecting the rear pocket to the the main. Not much left to do at this point.
Next, drill out the trigger hole by lining up the template. This is probably the most confusing part as the template is attached slightly offset and upside down from what you would think with two bolts. But if you think about where the trigger hole should be, it makes complete sense when you line it up. Drill that hole with the 19/64 bit and then flip the template over, island up as they say and put on the router surface to mill out that trigger slot.
Take the templates off and drill the 3/8 hole and 5/32 hammer and trigger pins from each side and you're done. Spray it off with brake cleaner. Here are some more pics.
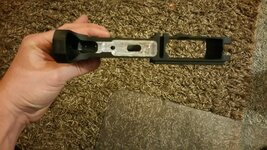
You can see where I drilled the first two holes slightly deeper. Lesson learned. Make sure you have that drill stop tight and lined up correctly on the bit so it secures nicely.
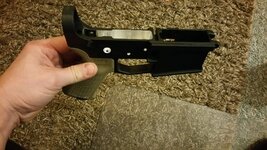
This was my first attempt at completing a lower and I have to say it was quite easy with the 80percentarms kit. Even though I made mistakes, I'm quite happy with the way it turned out. I wanted to share my experience with these tools and what issues I had. I think the next one I do will turn out much better. Thanks for checking out my post.
Last Edited:


