JavaScript is disabled
Our website requires JavaScript to function properly. For a better experience, please enable JavaScript in your browser settings before proceeding.
Messages
12,585
Reactions
28,719
Mods, first off please relocate this if appropriate--I just thought since most 80%s are AR's this was the most logical place.

With the proliferation of 80% lowers on the market and builds of them on the forum, and being a skosh curious about them myself but having limited tools available, I just thought it might be helpful to have either a sticky or sub-section dedicated to reviews and remarks on these "not-guns" where the guys who've worked with various offerings can rate the pros and cons of each.

I'll toss out a question as a starter: Anyone here have any experience with Tennessee Arms's polymer-hybrid lowers? They hype 'em as being able to be done with a hand drill, but I could use a Fact or Crap-check...

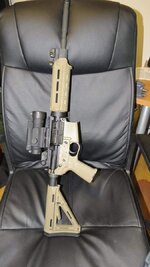
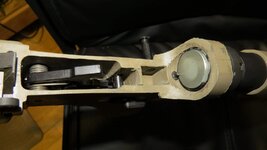
just finished a TA polymer lower. Used a 80% arms jig. I would not try to mill out the rear pocket since it will cut into the rear takedown pin detent hole. So I left it the way it came.

it is very tight on the back of the upper and takes some force to close it. I had to sand it on the back to get it to close. It is still tight and probably needs a little more sanding.

Otherwise they are a nice polymer receiver with the brass thread inserts and lifetime breakage warranty

00wrvTC.jpg
zcPcBHW.jpg

I've done several aluminum receivers with the 80% arms jig. very nice jig and holding up well.

The lowers in my opinion just hold the trigger parts. I dont really see why some completed receivers cost $40 and others cost $300. I think the upper, barrel and bolt are the really important parts of the gun.

otherwise, ask away.
 
OK, Bolus, since you're our PCR Guru... of the brands you've bought, which ones would you classify as Would Buy Again, and which get the dreaded Would NOT? Also, how would you rank various jigs you've used on the scale of "Untrained Idiot vs. Master Machinist" skill and "Cordless Drill vs. Full CNC Mill" for tools?

A lot all at once, but I'll bet if I'm wondering it there are others out there wondering it who haven't found the words to speak up yet. :)
 
The first one I did was a polymer80 kit. It was one with a red plastic one-time use jig and just used a drill press. I did not do a good job, the trigger would not reset so I did not bother shooting it. But it was cheep and a good learning tool. I very much like their 80% glock 17 kit, just not the AR 15 80% kit.

All of my aluminum 80% are from tactical machining. Simple because they were cheep and everyone of them works like a charm. Like I said, I dont see a reason to spend $120 on a 80% receiver unless I want a fancy coating or engraving.

80% Receiver | Tactical Machining (http://www.tacticalmachining.com/80-products.html)

I've only used the 80% arms jig because it works great. You need a router and a drill. The drill press helps with milling the hole for the trigger but that's a non-crucial hole and you can carve it open with a dremel if you wanted, it just should not touch the trigger.

Watch the video and invest in a good router (I have a ~$150 bosch plunge router, not the small one in the video). It helps when milling the pocket to have someone help so you have 2 hands to steady the router and someone else turns it on (I broke a bit when it jumped once and I did not have a good grip on it)

 
oh yeah that looks fine. the only problem is when milling out the hole for the trigger you have to use the spacer otherwise the large base of that type of router runs into the back of the receiver. They just dont mention that in the video since they did it with the much smaller router. But it is simple to add the spacer and use the longer bolts. It makes sense when you get to that part of the video. Let me know if you have questions
 

Upcoming Events

Centralia Gun Show
Centralia, WA
Klamath Falls gun show
Klamath Falls, OR
Oregon Arms Collectors April 2024 Gun Show
Portland, OR
Albany Gun Show
Albany, OR

New Resource Reviews

New Classified Ads

Back Top