JavaScript is disabled
Our website requires JavaScript to function properly. For a better experience, please enable JavaScript in your browser settings before proceeding.
Messages
176
Reactions
0
i want to make a custom target holder for large paper target similar to the ones at gun ranges. Are theyre any blueprints you guys have or can link me to?
what should i use to build one. i dont want a super deluxe dealy, just something that will last me a few trips to my shooting spot.
if you know of any target stands that are really cheap id also appreciate the help. thanks!
 
The best target stand...is nothing more than an oversized cardboard box.

You can break it down to fit it in the trunk of your car. When you get to the range, set it up and tape it together. You can then attach your targets to three sides of it. When you have shot one target up, rotate the box to expose a fresh side, and keep shooting. Cover the used targets up and repeat as necessary.

If it is windy, you can put weight in the bottom of the box to keep it from blowing around.

You can find used boxes in the recycle bin. They dont cost anything, and they are simple and self contained. Best of all....once you are done shooting, they make a handy trash bin to carry your used targets, empty ammo boxes and any other litter away from the range.

If more people would use this method, many of our public land shooting areas would be a lot cleaner.
 
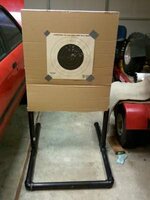
I put one together that I take out in the woods...its about 3 feet wide and about 5 feet tall

1" conduit w/ 2x 90' elbows and 2x "T" joint connectors

2x 12" steel stakes

2x cheap plastic clamps

works great, light weight, dissembles to fit in the vehicle and $15 bucks +/-
 
I used the left over 1" plastic pipe from when I laid the last extension to my irrigation lines. L joints, T joints and no glue. I then glued 1x1 wooden strips to the face and cross bars to take staples. Next time, I'll skip that step and just use masking tape.

Pops
 

Mine is a modified version of this. Differences include:

* The width, from center-to-center is around 28" which makes it ideal for most targets, including full-sized torso targets. Didn't like how the target felt being only about 16" wide in the original design.
* Used 1" furing strips. They're like 75 cents apiece. Took three pieces to make for two target stands because ...
* Created a full wooden frame (added two horizontal pieces from the leftover furing pieces). Makes it a lot more solid!

I should take pics of the stands so I can better illustrate what I mean. Took it out to Brown's Camp this week and it performed admirably when sighting in my CZ-452. Light and sturdy enough to carry as a single unit without worrying about it twisting apart.
 
Just went downstairs and took pictures of the target stand, so no waiting! :D

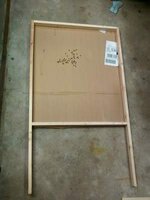
Back of target frame, with cardboard backer already attached (and shot.. lol):
SSPX0013.jpg

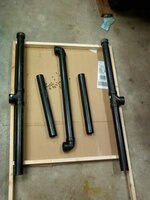
Here's the entire assembly, broken down into an easily transportable package:
SSPX0012.jpg

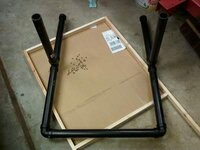
Target stand base assembled:
SSPX0011.jpg

Target stand fully assembled, from the back:
SSPX0009.jpg

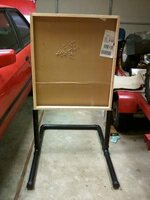
Target stand fully assembled, from the front:
SSPX0010.jpg

If you have any questions, feel free to contact me. I can pull the dimensions of each piece in case you want to duplicate my efforts. I believe each base makes a full usage of a 10' run of PVC pipe (no scraps, so measure twice and cut once!) and the wood frame takes up about two pieces of 1" furing strips (think they're 8' in linear length).
 
Just adding to the thread. If anyone wants a stand out of metal let me know. I own a fab shop and if you pay forthe material I will putit together for you. I have seen a few made out of 1x1 angle or even smaller. Just shoot me a pm and we can go from there:s0155:
 
As a welder/fabricator myself I finally fabbed up a simple stand I have been thinking about for a while. My first thought was portability and the ability to use probably the most common thing we have laying around and find out at our favorite shooting spots - plywood. I cut four sections of 1.5" angle and welded them into a pair of "L's" slightly less that 90 degrees angle. I then cut four tabs of approximately 1" x 3/4" x .250 flat bar and drilled holes, welded some 3/8" nuts over the holes and then welded the tabs on the uprights of the legs on the slightly angled back sections. I made four "wingscrews" with four 3/8" bolts with a "T" bar welded on the head as the "wings" and screwed them into the nuts on the tabs. The result is the ability to slide any size plywood into the angle uprights and a quick twist of the four wingscrews secures the plywood. The slight angle of the uprights keeps the target from falling forward. The upside - any size sheet of plywood can be used and when the legs are removed, throw the plywood on the fire (if too shot up to use again) and the target "legs" store flat and take up little space.
 

Upcoming Events

Centralia Gun Show
Centralia, WA
Klamath Falls gun show
Klamath Falls, OR
Oregon Arms Collectors April 2024 Gun Show
Portland, OR
Albany Gun Show
Albany, OR

New Resource Reviews

New Classified Ads

Back Top