JavaScript is disabled
Our website requires JavaScript to function properly. For a better experience, please enable JavaScript in your browser settings before proceeding.
Messages
8,630
Reactions
12,873
AcraENj.jpg

HgUeMuj.jpg

oLff597.jpg


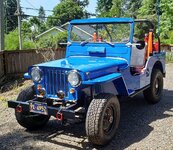
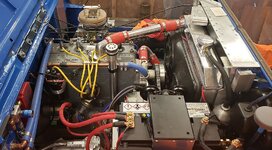
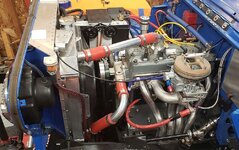
Finally after not being on the road since Sept 19th 1976 this last Memorial Weekend and after 11.5 years of work spread over 17 years I got CHUG back on the road, Virtually ever single piece has been restored upgraded custom built modified or replaced. Parts from 28 different Jeeps from 1946 to 1972. even a few Ford and Chevy parts. The engine has been souped up should be putting out about 80 hp (stock is 60) I did almost all the work myself including paint and body work (which was basically building the body from a few original parts and a lot of flat metal and reproduction panels.

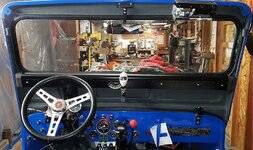
12 forward gear 4 in reverse a 30% OD with 5.38 drive gears and the rear axle a Dana 44 30 spline flanged has an E locker. Saginaw Steering, 11" wagoneer Brakes, 12V electrical, on board air, All SW gauges etc.

Next after I get the teething problems solved (everything leaks the OD pops out of Direct and the valves need adjusting BAD) will be to build the insulated structural aluminum hard top. Then the Off road travel trailer. Then retirement and Interpole won't be able to find me LOL
 
That's quite a bit of work to do that valve adjustment on a flat-head isn't it? All I've done was Briggs & Stratton single many years ago. Excuse me, but I can't seem to find a diagram of how you access the adjustment on that L head?
 
Side cover, pop that off and you can get right to everything!
Well in theory in my case I will have to pull the intake manifold and everything connected to it as well as the Header. Which means I also have to drain the cooling system as the Manifold Studs go into the Cooling jacket and I have 4 of them that also need to be resealed. While it is possible to do a valve adjust on a 134 L or F with the stock manifolds in place with the Tri Y design header I built the 4 separate primary tubes restrict access. And since the Intake is on top of the header flange it has to come off as well.
 
It actually has 2 USB type chargers up to USB3 2) 12Volt outlets 2) 12V screw terminals, And a 12V cigg lighter. its also wired for an Inverter and has on board Air with 2 gallons of storage tanks. As to a cup holder I have a pair made but until I get the Console with the radios in place I am waiting to see if I like them.

Radio gear includes a Cobra 29 NWST and 7ft firestik antenna with a Cobra walkie for remote use, A Midland 40 Watt GMRS and 1/4 wave 6db antenna with a pair of matching walkies, And a Pioneer Digital stereo. Back up radio power is supplied by a 800A 1800mAh jump battery. The main battery is a Series 31 950CCA commercial battery.
 
As you can see the left side is pretty crowded

View attachment 901930
I can really appreciate this kind of thing Mark. Not real familiar with specific motors, but I know you have a lifter of sorts that ride the cam. I presume it's THAT part that has to be removed and ground to get proper clearance? Or is there an actual adjustment. I googled looking for pics but didn't find anything. And wouldn't the valves have got the adjustment when the motor was put together?
 
Last Edited:
Love your rig!
We had a '56 Willys Overland with a Chevy 235. It would go anywhere we would conceivably want to go. There's a lot to be said for the simplicity of old technology.
That said our current simplicity vehicle is a '49 Burb with a Clifford Research 292 & Getrag 5-speed trans and disc brakes in front. It would live thru an EMP event.
 
I can really appreciate this kind of thing Mark. Not real familiar with specific motors, but I know you have a lifter of sorts that ride the cam. I presume it's THAT part that has to be removed and ground to get proper clearance? Or is there an actual adjustment. I googled looking for pics but didn't find anything. And wouldn't the valves have got the adjustment when the motor was put together?
Mike the Valve rides on a Tappet that then rides on the Cam Lobes. When an engine is assembled with this type of construction the valves are adjusted cold in this case to have a gap of .014" between the top of the Tappet and the bottom of the valve stem. There is a little threaded adjustment at this joint.

In my case with all the parts in the Valve train being BRAND NEW including the Cam. I takes about 30min of run time to get the parts worn in. This then results in the gap opening up as the various parts seat themselves to each other. It is also possible one of the valve stems is a little tight in its guide which will cause the valve to hang up (reallt hoping this is not the case). This I won't know until I can remove the side cover and take a good look.

follow this link and it will give you a blown up drawing of the Valve train showing the various parts

Got it. "threaded adjustment". Should have figured.
 

Upcoming Events

Centralia Gun Show
Centralia, WA
Klamath Falls gun show
Klamath Falls, OR
Oregon Arms Collectors April 2024 Gun Show
Portland, OR
Albany Gun Show
Albany, OR

New Resource Reviews

New Classified Ads

Back Top