JavaScript is disabled
Our website requires JavaScript to function properly. For a better experience, please enable JavaScript in your browser settings before proceeding.
Messages
2,627
Reactions
3,997
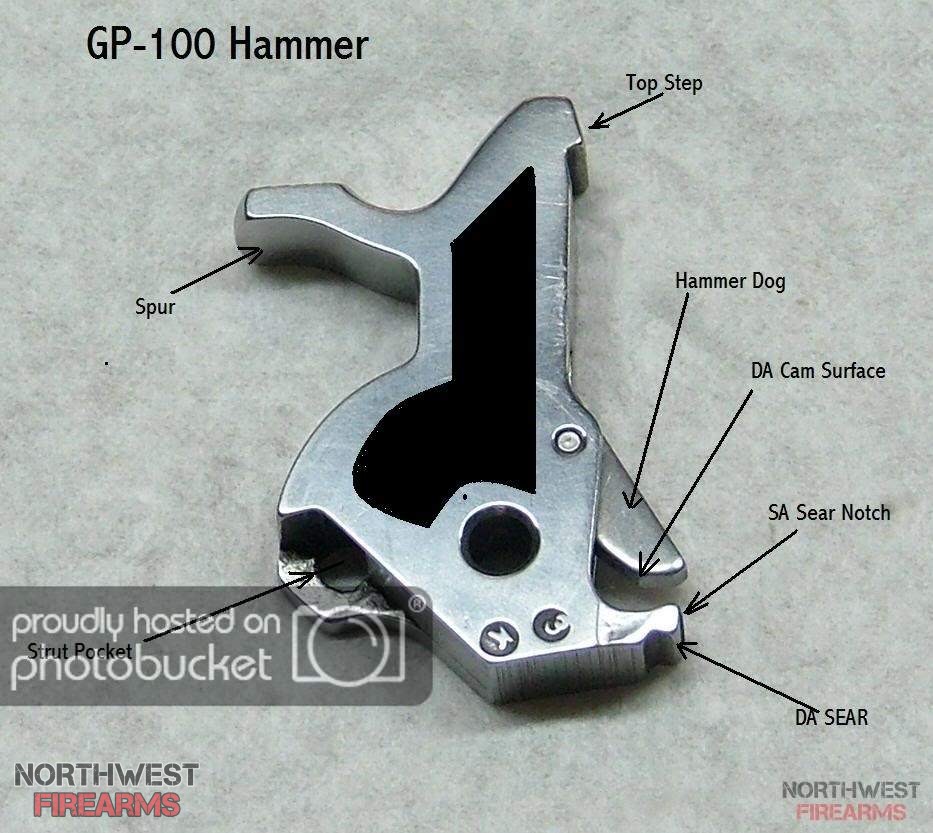
1) I'm about to do a shim, spring and polish on my GP100 and have a question about the sear engagement.

When shooting double action does the hammer trip from the hammer dog or does the dog release the hammer to another sear prior to release. I can't really see what's going on in the gun and can't find anything on this out in the cloud.

If is does release to a secondary sear where on the hammer is this surface?

2) Sometime after my GP100's manufacture date the factory started drilling an elongated hole in the backstrap of the grip stud to allow easier access and manipulation of the trigger guard latch. Does anybody have any recommendations of a Vancouver area machine shop that can drill this hole for me, and not charge a huge amount of money. I get set up time etc. but a couple of quotes I've received were over $200 and that is far more than I can stomach paying for a non-cosmetic hole.

Thanks folks!
 
How old is your unit? Mine is less than 6 years and most of the polishing work was already done, i improved a lot of stuff with the springs and some basic polishing, but a lot wasn't required, their factory work seems to have improved considerably. I can't remember anything about that hole though, i'd have to check.

As for stuff to look for on teh intarwebz, search for the Ruger GP100 book of knowledge, you can download it and it gives a whole tune up guide.
 
Thank F2CMaDMaXX,

My revolver was manufactured and purchased in 1988. I've never done anything to it as I purchased it for my wife and she never really took to shooting anything other than .22LR semi-autos. A couple of weeks ago I pulled it out and my boys and I have put about 1500 rounds through it. We decided to try last Saturday's ICORE revolver match at the Wolverton Mountain club. Well we had a blast and want to do it again but we do not want to fight the 15 pound double action pull!

So the gun is already totally stripped down and the stoning and polishing is well under way. I've measured for and ordered the shims which should be here by the end of the week, and I have a Wolff reduced spring kit that I've had since about the time I purchased the gun, but never bothered installing.

There are a lot of rough areas on the interior, including many where the parts touch. I don't think there is a single engagement area that I can't see machining marks with the exception of the single action sear notch. I know I can drop the 15 pound DA pull probably to 12 or so pounds just by smoothing up these surfaces. The shims and spring kit should, I'm hoping, get it down to 8 or 9 pounds and still have reliable ignition.

I've downloaded and read the Book of Knowledge and have seen quite a few YouTube vids on the SP101/GP100/SRH triggers (all are pretty much identical). Nothing I've found clearly shows what happens in the last few micro-inches of movement before the hammer drops in double action. I'm thinking the hammer dog releases and the hammer is caught by a sear surface in the final movement before release but cannot be sure. I don't want to mess up that area if it's the case.

I'll be judicious in the polishing on the hammer if I can't find the info for sure … but would hate to mess this up as the hammer needs to be fit at the factory, you can't just buy a replacement part and try again.
 
You're looking for the long gone "Ruger popper". It was a modified screw driver that fit the angle of the grip frame so you didn't need the hole. I don't have one but I've tried to track one down to no avail. You can make one of the poppers with a screwdriver, some heat, and some time. Quite a lot cheaper than a machine shop. I have a couple GP100s from the early 90s that don't have the access hole and I usually end up using the short end of an allen wrench to depress the plunger.

As for polishing, I generally don't touch the engagement surfaces but taking a small drill bit (that just barely fits) in the trigger spring pocket and turning it backwards by hand will help smooth out some possible rough spots. I also polish that spring until everything is nice and smooth.

GP100s are easy to work on and benefit well from a little tuning. Good luck.

I'll also add that Ruger is very good about fixing any little mistakes you may make. I over polished the "trigger plunger" (the part with the pointy nose looking protrusion) and sent it in to them. They got everything sorted out and shipped it back to me free of charge.
 
Last Edited:
What are you shimming? i only did springs in mine. Any where you see wearing is a good place to polish, i used a dremmel polishing wheel and flitz.

I dropped the hammer spring down to the lowest option in the wolff kit and used the middle option in the trigger return, otherwise my single action was a surprise every time it fired :(

@Velzey can you recall about the sear drop in double action? I know there are two surfaces (IIRC) but i don't think it uses them both in double.
 
I'm shimming the hammer, hammer dog and the trigger. The current gaps are 0.015, 0.018 and 0.007 respectfully, and they all should have about .002 - .003 clearance total. With as much side to side play the hammer and trigger have it allows the parts to cant off axis adding to the force necessary for them to move.

If there are arc shaped scratches on the hammer it's a tell tale sign that the trigger needs to be shimmed on a GP100. This scraping on the frame makes for a heavier DA pull and also imparts a bit of vibration and movement during the firing cycle as the hammer comes back down and drags on the frame. This makes accurate shooting more difficult.

This drag also slows the hammer reducing the force impacting on the firing pin and increases lock time. These issues add to the potential of light primer strikes and a longer lock time increases the difficulty of accurate shooting. Shims are cheap (triggershims.com) and easy to install and really improve function.

Once the hammer / frame drag is removed, you can go with a lighter main spring and still have full energy hits on the firing pin staving off the dreaded light firing pin strike problem that lighter springs can cause.

One of the things the new "Match GP100" is doing differently is having shims installed at the factory.

My hammer pivot pin drifts to the right during firing. This indicates the hammer is not evenly bearing on the pin pushing it over. I'm hoping the shims will stop this too. It's not a big deal, the grip panel holds it in place, but it is a visual annoyance to me and the uneven bearing of the hammer to pin interface has to increase inconsistent drag.

I have so much hammer / frame drag that even with shims (0.006 per side) I probably will need to relieve the hammer channel in the frame on the left side. Just a slight polish should do it if it is necessary. Then, when the hammer drag is proven to be fixed I'll polish the sides of the hammer to remove the arc shaped scratches making the gun "purdy" once again.

I should note that you don't need to shim an equal amount on each side, the hammer being a few thousands off centerline will not matter one whit, but I tend to like balance. That, or I might shim to place the hammer in the exact center of the portion of the frame that flattens toward horizontal behind the hammer. Even a few thousands difference in gap would be noticeable here … so what I end up actually doing is a bit up in the air. Again, this is all cosmetic, and has nothing to do with function.

I'm going to put a tiny radius on the hammer thumbing area. Even though this gun will be shot 95% double action, smoothing the sharp edges of this area on the hammer spur top will make the gun more comfortable to handle.

I'm going to just slightly break the sharp edges on the front trigger fingering area, again to make DA shooting a bit more comfortable. I noticed the trigger edges made my finger a bit uncomfortable during the revolver match. This showed up around the 100th round fired, and did not even approach painful, but why have the distraction when a few careful touches with a buffer will remove the issue completely.

Well, that's my thinking on the issue anyway. Any thoughts, tips or warnings are always welcome!
 
Last Edited:
...
I dropped the hammer spring down to the lowest option in the wolff kit and used the middle option in the trigger return, otherwise my single action was a surprise every time it fired :(

...

I'm thinking of going down just one level with this spring ... I want a pretty robust trigger reset for DA speed competition and I agree, there is a difference in SA between a "surprise" and a "surprise break"!
 
I found this picture that answers my questions regarding the DA sear on the GP100 hammer. The hammer dog does hand off to a sear, which is in the area noted.

This picture was from a discussion on skeletonizing the hammer … the blacked out areas were the areas that the poster stated as safe to remove and still have a the proper relation of mass to pivot point.

I'll keep the pic, if I ever get access to a milling machine I might do this. Higher velocity of the hammer will increase the energy at the firing pin, and shorter lock time will increase accurate shooting.

I'm wondering if it would be best to do a full through skeletonizing or just recess the areas some on each side and leave the center spine area area untouched. One thing if I do this, I will not have the sharp interior angles shown here, they all would be smoothly radiused to prevent stress cracking.

Any thoughts?

So many things we can play with … ain't it great?

 
Last Edited:
You're looking for the long gone "Ruger popper"...

I've never heard of these, but now that I know of them I want one! Thanks for showing me an unobtainium item o_O!

I've been digging around last night and found these were sold by Brownell's years back, and after that a guy with the Internet handle of GP100man was selling his version for $10 shipped. He had a lot of postings especially in the Ruger forum but seems to have gone undercover a few years ago. I've joined the Ruger forum and will get 10 posts in sometime today, after that I can use the PM function and will see if he is still around.

Or, I just may make one myself. My 16 yr-old son built a forge that he uses to make custom knives (if you are thinking of commissioning a knife let me know, his work is pretty amazing, both in quality and price) so heating up an old screwdriver and taking it to the anvil will be pretty easy. Just getting the correct length and angles is the challenge. I wish I had a better picture of the shape of the tip (which was hardened by GP100man on his version).

I'll let you know how my search fares, and if I make one myself. If I do making two would be easy and I'm happy to send one your direction.

GP100man's original and then cheaper version once the cost of screwdrivers climbed to almost the $10 he was charging.


The popper in action. This would be better than even using the elongated hole if you have it in your frame. Far better than the allen wrenches that I also use to press this latch.
 
Last Edited:
Just drill the hole?

Well that would be too simple right? We have to make things more complicated or it's not fun! :rolleyes:

I may just do this, but it's really more of a slot than an elongated hole as I described it earlier. This allows you to use a punch to press the latch and then lever the trigger guard assembly down away from the frame. A single hole would not allow the levering, and then you kinda need three hands to press the latch and pull the two parts apart. (Which is pretty much the same situation using say an Allen wrench without the hole)

With the Popper tool you could hold the revolver in one hand and open her up using the tool in the other hand. Anyway, I have a benchtop drill press and a cheap machinest vise so I could drill it myself, but making it into a cleanly done slot would probably be beyond me ... unless I created a jig and used a router and end mill bit? ... okay stop that type of thinking, I'm going to get into trouble.

Here's what the "slot" looks like:

 
Yup, the Ruger Popper was a cool little tool. I do fine without it, but if you get into making a few, I certainly would be willing to pay for one.

If you look around on the various Ruger forums, you may find some of my posts trying to contact GP100man with no success. I could have made one by now, but I never found the details about the tip and I don't take them apart very often.

Whatever your decision, good luck and enjoy your fine (non-MIM) GP100.
 
So, if anyone is following this ...

I reassembled the revolver last night after polishing and stoning all that I thought was prudent. The pull dropped from just over 15 pounds to 10 lbs. 11 oz.. So not bad for just a few hours with a polishing bob in my Dremel!

The action is soooooo much smoother and the SA has stayed very crisp and is probably right at 3.5 pounds, I didn't weigh this.

There still is a bit of drag / gritty feeling at the very beginning of the DA pull. The trigger is still dragging on the frame a bit so this may be where the problem lies.

I'll wait until I have the shims and check this again before I do the next steps. I'll do the springs last.

I do still have a bit of hammer drag too, but again will wait until I've installed the shims before any more polishing.
 
Last Edited:
I've found this tool works great for releasing the trigger assembly ( just don't tell the Ruger this tool was made for the Smiths :D). I reduced the nose diameter just slightly on a hard scotch brite wheel. No need to putting a hole in the grip frame :). Fits right into the grip frame.

Usually when I'm done working over most Ruger revolvers the DA pull is right around 8.5lbs. There are so many areas to smooth out, but it's totally worth it. Makes for a great feeling action.

C6D77428-5A68-4AC7-8F00-EEF5E3D620FB.jpeg
 
Late answering this … I am two months out of a double knee replacement and am finally getting back to priorities … like NWFA and shooting! But if anybody is still interested ...

Thanks for the tool tip Velzey, I ordered one of these from Brownell's but have yet to use it! I'm sure it will be safer then the Allen wrench or screwdriver I have been using … while these work just fine there is always a chance of slipping and gouging something like the firearm or my flesh!

For those that are interested, after the polish, springs and shims I have the revolver down to a very smooth 8.25 pounds! The SA is right at 1.75. I'm very happy with the results. I have fired perhaps 300 CCI primed rounds with only one light primer strike. I'm thinking that was a fluke for some reason as all the other spent primers show strong impact from the firing pin. All of these were shot DA in quick succession practicing ICORE type of engagements. I did not have any issues with trigger reset even with the very light spring.

My son and I will be shooting an ICORE match this Saturday with the gun. We are really excited to see what cutting the DA trigger pull almost in half will do for our scores. We're also shooting Federal primed loads, since they have a softer primer cup, just to make sure we don't have ignition problems. I would have like to run a few more test rounds through her prior to the match but there is only so much time!
 
Range report ...

My son and I put 340 or so rounds through the GP100 at yesterdays match with no failures whatsoever. The difference in shootablility is hard to describe, but I'm sure most reading this know of this already. The few hours of work I put into the gun was totally worth the effort.

I have a fair sized stock of CCI primed loads that I will use in practice. If the ignition is reliable with these I may go even lighter as I have from the Wolff spring kit both a mainspring and a trigger return spring that are each 1 pound lighter than what is installed. This may make the SA pull too light however … but it's worth a try.

I found there is still a small area of the trigger than rubs during DA so there is still a bit of edge breaking I will be doing on that part, otherwise the fundamentals are done.

Well, not quite. I have a cylinder hone and a cylinder chamfering tool coming from Brownell's so there will be more to play with. The cylinders are actually very smooth and extraction of fired rounds very positive (most fall clear merely tipping the revolver straight up) but putting a high polish on them can't hurt extraction.

Now the question is when I chamfer the cylinder to ease rapid speed loading do I do the extraction star or just the cylinder edges?

The "JUST THE CHAMBER" theory states that chamfering the star increases the possibility that a case will slip under the star during extraction and jam the gun and that that area of the cylinder is not really touching the speed-loader held rounds while you are lining everything up during the reload.

The "DO THE STAR TOO" camp says every little bit helps in shaving off time in a match and it's easier to do a clean job with the star in place. Additionally, if you are doing a proper "manual of arms" during the reload it's highly unlikely you will get a case under the star.

I'm tending toward just the chambers, I can always go back and do the star at a later if I choose. It's not that hard to pull the cylinder apart to get the extractor star out of the way and the cutter's pilot is long enough to enter the cylinder deep enough that the unsupported area of the cutter (with the star removed) should not cause any problems.

Any thoughts would be greatly appreciated.

One a side note, sharing a gun with my son made for interesting reloads. Since we don't have holsters, once the string of fire was completed we needed to case the gun (cold range rules) until the next stage. Man that puppy got hot ... almost too hot to hold the cylinder during reloads! We took to shoving the ice packs from our lunch cooler in the case between strings! That, and the sights were set for him, my groupings were a bit low and right but at least that gave me an excuse for my scores!

So, titsonritz ... you may get your wish. My son was hinting "I really NEED my own revolver to save wear and tear on yours" and that "a S&W Performance Center 929 fits my hand really well!" "After all dad, you can have your sights set to where you want and the gun won't get as dirty … I'm only thinking of your well-being here".

Ahh, the thought processes of a child! <GRIN>
 
Last Edited:

Upcoming Events

Redmond Gun Show
Redmond, OR
Klamath Falls gun show
Klamath Falls, OR
Centralia Gun Show
Centralia, WA

New Resource Reviews

New Classified Ads

Back Top