JavaScript is disabled
Our website requires JavaScript to function properly. For a better experience, please enable JavaScript in your browser settings before proceeding.
@awshoot Can you share those STLs and/or design files?

Yes -- when they are complete -- it will actually be a DXF file because this is just a 2.5D project -- I haven't done any 3D modeling. I have this bad habit of making my tolerances too tight and so I usually have to cut, test, recut a bunch. Still to do are the pushers for primer compound and anvils as well as the anvil grate. In other words, it isn't done yet.

I've decided with the pushers though, to make them single-nub -- I'd rather accidentally set off one primer than eight. Or at least that's my thinking.

This could also be done by hand with a drill press, a wide range of bits and some sort of cutting tool like a scroll saw or band saw. I'll share my hole dimensions too -- that's the only part that's actually important.

EDIT: the pushers could be made with aluminum rod, a power drill, and sand paper.
 
Wondering if the platform with the holes should be made of wood for an anti-static element???

I thought about using wood and plastic (not for static issues but because they are easier to work with) -- I chose aluminum because I want to get the anvil seated to the precise height and I figure wood and plastic are a little more spongy. I don't think aluminum sparks by friction. Plastic definitely brings in the possibility of static (not sure about wood). I am considering adding a lead wire to the base so I can connect to ground. Or working in a metal baking pan with a bit of water and connect the pan to ground.

BTW: I'm not saying my choices are the best ones (or discounting others' ideas) on this topic or the other topics. I welcome ideas and criticism because I'm way out beyond my knowledge here. I'm just outlining my thought processes and it's important to know that I've been wrong a lot in my life, and might be here too! ;-)
 
Last Edited:
I thought about using wood and plastic (not for static issues but because they are easier to work with) -- I chose aluminum because I want to get the anvil seated to the precise height and I figure wood and plastic are a little more spongy. I don't think aluminum sparks by friction. Plastic definitely brings in the possibility of static (not sure about wood). I am considering adding a lead wire to the base so I can connect to ground. Or working in a metal baking pan with a bit of water and connect the pan to ground.

BTW: I'm not saying my choices are the best ones (or discounting others' ideas) on this topic or the other topics. I welcome ideas and criticism because I'm way out beyond my knowledge here. I'm just outlining my thought processes and it's important to know that I've been wrong a lot in my life, and might be here too! ;-)

Sounds like your printer does metal - what about printing the cup and anvil as one unit, the applying the priming compound later?
 
Sounds like your printer does metal - what about printing the cup and anvil as one unit, the applying the priming compound later?

No my printer only does plastic -- 3d printed metal is years away from the consumer.

I should get a lathe though, then I could make dies to punch out cups from sheet metal. My equipment isn't accurate or tough enough to make dies for anvils though.
 
I thought about using wood and plastic (not for static issues but because they are easier to work with) -- I chose aluminum because I want to get the anvil seated to the precise height and I figure wood and plastic are a little more spongy. I don't think aluminum sparks by friction. Plastic definitely brings in the possibility of static (not sure about wood). I am considering adding a lead wire to the base so I can connect to ground. Or working in a metal baking pan with a bit of water and connect the pan to ground.

BTW: I'm not saying my choices are the best ones (or discounting others' ideas) on this topic or the other topics. I welcome ideas and criticism because I'm way out beyond my knowledge here. I'm just outlining my thought processes and it's important to know that I've been wrong a lot in my life, and might be here too! ;-)


I think wood would (!) be the least likely to cause a static spark, but a ground wire should solve the issue, too.
I also think this is one of the most interesting projects I've seen anyone attempting for a long time.:s0090:
 
Last Edited:
Why not print the cup out of plastic?

Size is a problem in my mind. I would think the cup would get pierced by the firing pin. The cup metal thickness is 0.4mm so the amount of plastic would be very minute . You can buy nozzles with this diameter, but that would leave a single walled object. A 0.2mm nozzle would allow double walls but having used very fine nozzles, they're fussy. There would be a lot of finesse in the machine settings to get an accurate print of something so tiny.

I wonder if those plastic caps wouldn't fit as is (the substance used in those is corrosive based on my reading).
 
Last night I dug into the best resource on this topic there is -- a 7 year long thread:


The 22 Reloader stuff is definitely non-mercuric and corrosive.
 
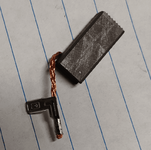
Back in business! Got a set of brushes today (and a backup for when these get worn down). It's funny how this whole pile of technology turns into a pile of nothing for want of a cube of charcoal.

brush.png
 
Last night I dug into the best resource on this topic there is -- a 7 year long thread:


The 22 Reloader stuff is definitely non-mercuric and corrosive.

I dug through that thread and watched a bunch of the videos @Papercidal referenced and I've rethought how I'm going to do this project. Not giving up, but sort of starting over.

I don't know the chemistry of any of this -- there's even a primer compound that is totally inert until you put a drop of water on it, then some chemical reaction occurs, and it becomes volatile. My original plan was to make a paste like Federal does and then pop that into cups through a measuring grate -- except I have no idea what will happen to this stuff if I put water or acetone or denatured alcohol on it. I think it is better to follow the instructions of the people who know a heck of a lot more about this than I do, so that is what I'm going to do.

Apparently, when specific pressure is applied, the 22 reloader (and I presume the stuff I have is the same) compound will compress into a pellet. So I bought a cheap arbor press at Harbor Freight. I figure consistent compression pressures are probably important for performance, and I want to be able to test various compression pressures, so my next step is drill out a hole in the shaft and tap it so I can put a torque wrench on the press, like this: https://concretedog.blogspot.com/2018/03/quick-arbour-press-modification.html Except without a lathe because I don't have one.

After that, I need to make a steel pin that will fit inside a primer cup without much wiggle so the compound won't ride up the sides, and some doohicky to attach that pin to the end of the bar on the press.

Of course, nothing is simple. The first thing I wanted to do was put one of those 6 outlet expanders on the outlet near the press so I could plug in a work light, my dremmel, and a vacuum all at the same time. I did that, and the ground indicator didn't light up -- after some investigation, turns out that socket was wired with reverse polarity, so before I even start, I'm fixing something unrelated. At least that's straightened out and now I have a light and I don't have to swap cords all the time.

Next up, will be making the pin with a file/sandpaper and a drill (man -- I need a lathe), and printing or cutting a piece to fit the end of the press to hold the pin straight. And of course, the aforementioned modification to the press. I'll try printing the connector first I think, but my printer is in dire need of maintenance, so that has to come first. Everything is obstacles right now it seems.

Thanks for all your work and investigation! I look forward to your machine where I can dump old primers in one hopper and fill another with Awshoot's #9 primer compound, press a button and have fresh new primers pop out the other side directly into my Dillon primer feed tube. Will it be ready by Christmas, or will I need to wait until New Year's?
 
so before I even start, I'm fixing something unrelated.
Everything is obstacles right now it seems.
This seems to be the way of making anything, innit? I look back on some of my past projects which produced some physical item, and I'm amazed I ever got it done. Long term, for me, at least, it seems to help if I take a long view, and solve the "unrelated obstacle" issues in ways that allow max flexibility later. Which occasionally means being a lot more patient than I want to be.
 
I got a hole drilled in the end of the drive shaft, however, I can't go over about 35 ft pounds -- already broke two bolt heads off (3/8") just seeing what would happen.

So I have two ideas but I'm outside my skillset here. Need advice.

1) order a 7/16" bolt that is rated for higher torque than a typical home supply 3/8" bolt is rated for. EDIT: I'd like to avoid 1/2" because then I'd have to remove the bolt to remove the shaft -- hmmm, kind of whiny -- OK order a 1/2" bolt rated for higher torque and the tap to match.

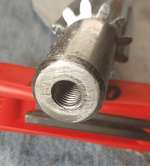
2) get a weldable bolt, bolt it down, and weld it in place. Issues with this -- my welding skills are kindergarten level. The only thing I have access to or know how to use is a wire feed welder. I don't know if this shaft is made of a weldable material (it files very easily and sands very easily). I include a picture here of part with fresh file and sanding marks, and the hole I tapped last night in case freshly exposed metal is informative.

I'm seeking advice on whether I should go for 1 or 2, or do something else entirely.

screwEnd.png

EDIT: magnet sticks strongly
 
Last Edited:
If you started with a Grade 2 bolt, the torque spec on it is around 15 ft lbs. A Grade 5 is spec'd at 26 ft lbs and Grade 8 is 49 ft lbs. Fail strength should be significantly more than torque spec. Plated bolts are a little weaker than un-plated.
 

Upcoming Events

Redmond Gun Show
Redmond, OR
Centralia Gun Show
Centralia, WA
Klamath Falls gun show
Klamath Falls, OR

New Resource Reviews

Back Top