JavaScript is disabled
Our website requires JavaScript to function properly. For a better experience, please enable JavaScript in your browser settings before proceeding.
As far as hardening of the cups, an anneal cycle would remedy that.
I have about 10# of spent primers in a jar. By accident, found they actually work pretty good in a wet tumble. It sure cleans the primers and anvils too!
Buddy did an automation project at a munitions factory, I think in MT. They hand filled artillery shell primers with priming compound in an explosion proof room, kept at 35°F. It was called "The Boom Tomb".
I tried using them to wet tumble. Never would have guessed so many would re-seat themselves so perfectly back into the primer pockets!

Next time (if there IS one), I'll only use small primers for cleaning large primer brass! (Or vice versa).
 
And that's it. Nothing else shows up in my search. It's kind of worrisome that toy caps are disappearing.
What about strike anywhere matches, like mentioned in the homemade primer course?

Ahh.. toy caps. My 6-shooter style paper cap gun was one of my favorite toys growing up. :D


Oh, and as for putting a lip around the edge to hold the anvil.. it shouldn't be too difficult to burnish an edge on the brass cup like is done for a woodworking scraper.. just difficult to do it in the full circle.
 
About ten minutes into futzing with the anvil and trying to take measurements, I realized why Berdan primers exist! Those would be a snap to recharge.

Having reloaded Berdan primed cases in the early 2000's after exhausting all my Berdan primers I promised myself I would never engage in masochism again.. Using a Lachmiller tool to decap the brass works but it is tedious and slow the hydraulic method is slightly easier but you end up getting wet. There is just no easy and clean way to do it. Boxer primers were truly God's gift to shooters and further proof he loves us.
 
Having reloaded Berdan primed cases in the early 2000's after exhausting all my Berdan primers I promised myself I would never engage in masochism again.. Using a Lachmiller tool to decap the brass works but it is tedious and slow the hydraulic method is slightly easier but you end up getting wet. There is just no easy and clean way to do it. Boxer primers were truly God's gift to shooters and further proof he loves us.
Right up until you run out of primers!

Guess I should start scrounging up all of the 303 British Berdan crap I have. :D

Dad, never a reloader, taught me the difference when I was young (he taught me lots of good things. I'm very lucky) I always "knew" the Boxer was better, until it's time to recharge primers. I do have a few rolls of caps left...:)

I actually reloaded Berdan 303 and that will further exacerbate some frustration since there was multiple primer dimension standards in commonwealth produced 303 depending on where it was manufactured.

Much cursing took place on my behalf as I learned this little tidbit of knowledge.
 
...
Oh, and as for putting a lip around the edge to hold the anvil.. it shouldn't be too difficult to burnish an edge on the brass cup like is done for a woodworking scraper.. just difficult to do it in the full circle.
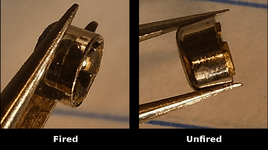
I've done a lot of close up looking at new and spent primers recently and a lot of fiddling with them too. I don't think it is necessary to make a lip on the primer to hold in the anvil. Tension seems to work fine (I've never had an anvil just fall out while reloading) and honestly, it's quite difficult to remove them. I'm running a test right now in my wet tumbler to see how many I can dislodge by agitation (*).

The other thing that is interesting is that new primers have the anvil just impacting the priming compound with a portion of the anvil sticking out beyond the mouth of the cup. In a fired primer, the anvil is driven all the way into the cup. This could happen when seating or by back pressure through the flash hole from firing. I can't say for sure which it is, but I suspect it is from seating because when I try to seat a fired primer deeper, I can't.

anvil.png

* EDIT: not successful. I ran it for an hour with brass that has a large primer pocket and steel pins. Out of approximately 80 spent primers, only five anvils were dislodged, and separating these from the pins was a pain in the butt.
 
Last Edited:
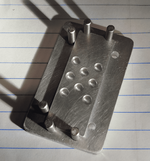
I managed to cut two parts for the primer tool so far. I mentioned earlier I'd changed my mind about making blind pockets in the base because I wasn't sure I'd be able to get finished primers out of them. The base also had a channel in which the upper layers would fit to aid with centering. Anyway, I went with the pin method and cut that piece without issue. Before I went to bed I counted out six pins, double checked myself, put them in the freezer and went to bed. The next morning I look at my base and see the eight holes. Whatever -- as it turns out, I like having the one side free anyway because the next layer fits in tight and it's useful to be able to get under the edge with a razor to start it loose. You can see razor scratches by the pin in the upper right corner in the pic below.

I ended up cutting the next layer -- the grate to hold the primer cups -- three freakin times. First time my tolerances were too tight and so after I filed it a bit to get an idea of what I needed to change, I adjusted the drawing and recut. I made a bonehead move placing the stock on the machine and well -- it was a total loss. Third time was the charm though -- the piece fits perfectly with only a light sanding in the grooves.

Right now, the primer compound grate is on the machine being cut out -- probably finishes around midnight. Slow, but progress.

primerTool-1.png
 
Removing Anvils

Wet tumbling primers with brass and pins failed. Getting the anvils out by holding the primer with tweezers or pliers is very hard. I have the first primer cup plate -- the one that didn't fit the base -- and I thought I'd try using that to hold the spent primers. I filed a glasses screwdriver to fit in the anvil windows -- I already ruined a pair of tweezers using them to pry with. It works OK -- still sort of slow but I suspect that with practice I could get about 100 done in 30 minutes, which isn't the end of the world. One trick when prying the anvils loose, don't aim toward the center of the primer with the prying force -- they often pop and melt into the concrete floor. Applying force parallel to the circle though, tends to cause them to roll, and then they can be picked out easily.

 
Last Edited:
Lame -- the brushes in my router just gave up the ghost midway through a cut and the last time I replaced them I forgot to order more. So I'm down until the weekend considering tomorrow is a holiday -- but I have to make pies anyway. ;-)
 
Last Edited:
Lame -- the brushes in my router just gave up the ghost midway through a cut and the last time I replaced them I forgot to order more. So I'm down until the weekend considering tomorrow is a holiday -- but I have to make pies anyway. ;-)

Will my order of 10,000 primers at ten bux per 1,000 still get there by Christmas?
 
1) This is a pretty cool project and I thank you for putting the time into all of this.

2) You have WAY more time on your hands than I do!
 
Are the primer anvils distorted by the previous firing?
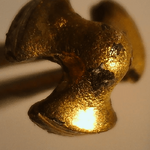
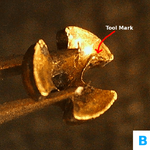
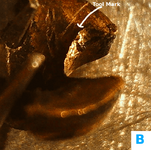
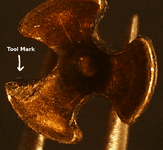
I think there is a slight amount of distortion from extracting them, but not enough to bail out for. Here are a couple of the anvils I extracted in the video above. I'm not sure if it is evident from the video, but it takes a lot of force to remove them. I looked at the anvils for evidence of that force and I believe found it, but it doesn't look like enough to cause a failure.

These anvils have not been washed so there is evidence of soot on them. The two marked "B" are the same anvil. The unmarked ones are -- I think based on the background color -- different anvils (I kept tiddly-winking them with the tweezers at which point they disappear into that universal void of all the dropped small things):

anvil-1.png anvil-2.png anvil-3.png anvil-4.png
 
Last Edited:
Removing Anvils

Wet tumbling primers with brass and pins failed. Getting the anvils out by holding the primer with tweezers or pliers is very hard. I have the first primer cup plate -- the one that didn't fit the base -- and I thought I'd try using that to hold the spent primers. I filed a glasses screwdriver to fit in the anvil windows -- I already ruined a pair of tweezers using them to pry with. It works OK -- still sort of slow but I suspect that with practice I could get about 100 done in 30 minutes, which isn't the end of the world. One trick when prying the anvils loose, don't aim toward the center of the primer with the prying force -- they often pop and melt into the concrete floor. Applying force parallel to the circle though, tends to cause them to roll, and then they can be picked out easily.

Up Next

Breaking Bad - Primer Wars LOL

(Cops bust in...."I'm making primers" "We don't care what you kids call it nowadays. Get in the paddy wagon hippie")

[Unless you are in Portland]
 
Last Edited:

Upcoming Events

Redmond Gun Show
Redmond, OR
Klamath Falls gun show
Klamath Falls, OR
Centralia Gun Show
Centralia, WA

New Resource Reviews

New Classified Ads

Back Top