JavaScript is disabled
Our website requires JavaScript to function properly. For a better experience, please enable JavaScript in your browser settings before proceeding.
Messages
6,824
Reactions
17,613
Not much here yet -- I'm just ending my thread hijack.

Previous posts:

How Federal charges primers:

Estimated thickness of priming compound layer: https://www.northwestfirearms.com/t...here-is-a-shortage.345280/page-5#post-2746998

Next steps: design loading plate, primer compound measuring grate, anvil aligner, anvil press

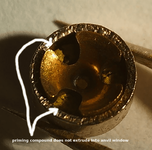
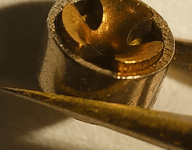
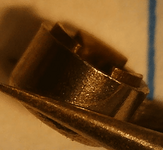
And some close up pictures of a Federal GM100M:


primer1.png primer2.png primer3.png


---------
just recreating the text of the OT post in the other thread in case it gets deleted -- one other such post with measurements got deleted. :(

A Federal small pistol primer assembly is 3.05 mm tall. The cup alone is 2.78 mm tall with the metal thickness being 0.4mm thick. That leaves a 2.38 mm space inside the cup to the brim.

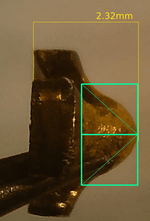
Total anvil height is 2.32 mm but 0.27 mm of it extends beyond the rim of the cup (height of assembly minus height of cup) so the anvil extends 2.05 mm into the cup as measured from the rim. The tip of the anvil penetrates the priming compound but the three windows in the anvil do not have primer material extruding into them. There is a 0.27 mm gap from the tip of the anvil to the bottom inside of the cup, but there is more priming compound than.

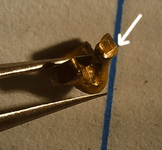
The hard part is figuring out exactly how thick the priming compound. Based on this picture of an anvil with some priming compound residue on it, the green line is 54% as wide as the yellow line, and if the yellow line is total anvil height (2.32 mm), then the anvil penetrates 1.26 mm of priming compound. Adding this to the 0.27 mm untouched by the anvil, I'm guessing the priming compound layer is 1.53 mm.

If however I cut a plate to a 1.53mm thickness as the screen for measuring priming compund, I will over fill because of the volume of the cone shaped part of the anvil. Anyway, after doing some estimations on a closeup picture of the anvil, I estimate it takes up 18% of the volume of the primer compound space leaving me a primer compound thickness of 1.25 mm.

The inside diameter of the primer cup is 3.42 mm.

estimate.png
 
Last Edited:
What size hammer do you use to seat the anvil? Looks like it needs a pretty good whack to keep it in place.

I was playing around with an anvil in an empty cup yesterday and it is pretty hard to get it to go straight in. It took me a number of tries though I didn't use a hammer -- I just pressed it in the tip of some wire strippers that have a flat narrow side at the tip.

In that video above of how they do it at Federal, they have a grate into which collated anvils fit and then get pressed into the filled primer cups sort of like closing a waffle iron. I'm not going to build anything hinged, but my plan is to cut some blind holes in aluminum plate to hold the cups with alignment pins at the ends of the plate. I'll make a grate out of aluminum on which I'll spread wet priming compound with a scraper, then (hoping the compound sticks in the grate holes), place that on top of the plate with the cups using the alignment pins to keep everything together. Then I'll have another plate with nubs that protrude into the priming compound grate, also aligned with the pins, and use that to press the compound into the cups. Hopefully the compound won't stick to the pusher plate. If it does, I might have to cut paper disks. Then remove those two plates and put on a plate that holds anvils, then press them into the cups the correct distance with a different plate with nubs cut to a height that won't leave the anvil too high or two low.

That's the current plan anyway. We'll see how reality treats it.

I'm not doing 1000 at once like they do at Federal -- I'm going to start small with an eight hole grate (rows of 3, 2, 3) to see if this even works at all. If it does, I'll probably go to a 25 hole grate -- I don't want to be handling a lot of compound at once. I don't mind getting burned, cut, or bruised -- but I don't want to blow off a finger. I guess I better start working on my excuse story in the event that does happen. Suggestions appreciated.
 
Last Edited:
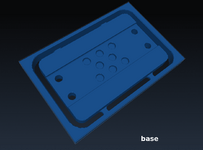
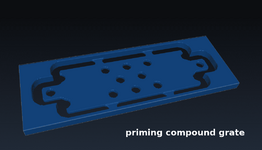
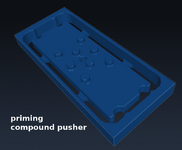
Some renderings of the base, the compound grate, and the pusher plate to push the compound into the cups. These renders show the stock material -- the parts get cut out with a hacksaw where the holding tabs are. The four holes at the ends of the base are for alignment pins. The compound grate has two holes at the ends -- I'll attach knobs to hold it there (didn't want a hole in the middle that would collect primer compound or a screw that stuck out too far and prevented it from laying flat, so just moved the knobs to the ends). The last is the plate that will push the compound through the grate into the cups -- in that one I have centered hole to screw in a knob.

Still to do, the anvil grate and anvil pusher.

base.png compoundGrate.png compoundPusher.png
 
With a single primer, a single stage press using a 'thinner' decapping pin and a primer seating arm. You could build a blast shield using a section of pipe. I know with Lee, you can adjust the decapping pin depth.

As an aside, I wonder if redesigning of the primer could be made to make it easier to build. I'm thinking creating a small lip on the cup bent inwards. Then making the anvil metal less pliable, ie. 'springy' so that once pressed into the cup, will spring back and lock up against the lip.
 
Do you have a CNC or 3D printer? This is a way cool idea

Yes -- both. But my CNC is a desktop CNC router -- the spindle is literally a Dewalt Trim Router. The software estimates those three parts (out of five) will take a combined 14.5 hours to cut. LOL -- I wish I had a real mill.

EDIT: on wood it cuts plenty fast -- it's just kind of at its limits when doing aluminum.
 
Are you thinking about using a reloading press to seat the anvils?

No -- it won't take much pressure to seat them based on my tests doing it by hand. I'm going to make a different part that looks like the priming compound pusher above that will push them into the cups, but only to factory depth (or close to it) -- in other words, the nubs will be a certain height I still have to calculate, but long enough to push the anvil into factory depth, but not long enough to push it in all the way.

In this closeup, it is pretty easy to see the depth Federal seats them based on the scoring marks -- I'm going to try to get some good measurements of that so I can copy it.

anvilLine.png
 
...
As an aside, I wonder if redesigning of the primer could be made to make it easier to build.
...

About ten minutes into futzing with the anvil and trying to take measurements, I realized why Berdan primers exist! Those would be a snap to recharge.

EDIT: also when looking at the anvil in closeup, I see that the fire has to go through the anvil windows then bend inward to center flash hole. A berdan primer leaves a straight path down the flash holes (at least for a decent portion of the primer).

EDIT2: of course, I've never used Berdan primed anything. Maybe there are good reasons we use Boxers.
 
Holy crap! I didn't think you were serious. You were serious I can now see. I don't even have time to load ammo let alone primers. Wear your face shield and FR clothes. The surplus flight suits are cheap and made of Nomex FYI.
 
Perhaps more research is needed in the compound. Possibility in the formulation or a non-flammable coating and sell them as individual pellet.

It may sound silly as you can purchase it whole but primers vary (Large, small, pistol, rifle, match.) Those long range shooter may want to customize all aspect of their ammo (cup thickness, ignition rate, etc.) Plus, the more complicated, the more appeal.
 
In all seriousness, I think you'd need to measure the thickness of the cups. Might be able to tell the brand by the anvil design and sometimes the cup color.

I'm really not meaning to denigrate the work of the OP, I looked into the idea of reloading primers, too. Decided my chemistry skills weren't up to the task of producing non corrosive priming mixture. If you can make it work, at least you'll have primers!
 

Upcoming Events

Centralia Gun Show
Centralia, WA
Klamath Falls gun show
Klamath Falls, OR
Oregon Arms Collectors April 2024 Gun Show
Portland, OR
Albany Gun Show
Albany, OR

New Resource Reviews

New Classified Ads

Back Top