JavaScript is disabled
Our website requires JavaScript to function properly. For a better experience, please enable JavaScript in your browser settings before proceeding.
Forged out some gun hooks. A piece of leather keeps the scratches at bay. I like to have my .22 near the door as I have a target out the back. CB shorts keep the noise levels down. It's nice to get a few rounds in every day :s0048:
0DNR07A.jpg
 
Wow! There is some amazingly talented individuals and families here that's for sure! Simply beautiful projects and families, plus some delicious looking pastries and canned goods!

I trap and tan my own furs, make stuff with 'em and am a student of brain tanning.
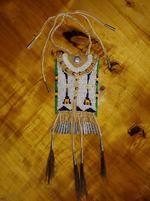
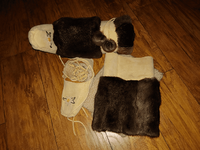
Made and beaded this strike-a-light bag recently and in the middle of finishing up a pair of Mukluks for Mrs.JimmieD!

Strike a lite.png Mukluks.png
 
0226191359.jpg

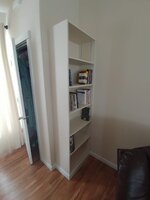
Made this book case with adjustable shelves, painted it to match, and trimmed out the base to make it look somewhat like it was built with the house. I wanted to bring out flush with the closet front, but that corner is radiused and the wall is textured, and I figured I'd never get it to match if I tried to fill in the gap and texture it.
 
How about a video?
A friend always asks me to video any of the Asian dish's either I or my mom makes (she loves Asian food), so I had fried rice for lunch the other day.....


...and yes, I am fat and my mother still yells at me about it. ;)


Dean
 
I toiled with whether I should post this here, because I don't want to advertise to the whole internet what I've done, but I figure (hope) I'm safe here. I got tired of having holsters, cases, boxes, magazines, etc., strewn all over the place, so I drew up some plans a week or two ago to build a cabinet that is designed to go around my safe. The intent is to provide some level of protection to non-firearm items, and serve as another layer of protection someone would have to breech to get to my safe. I realize it isn't Fort Knox, but I think it increases the overall security of my system. Anyway, on to pictures.

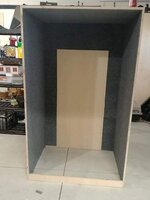
Carcass.jpg
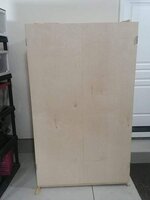
This is the carcass. It is made with 3/4 inch birch plywood, and is lined with carpet everywhere except where the safe will be. The inner dimensions are 72"H x 42"W x 30"D.


Closed.jpg
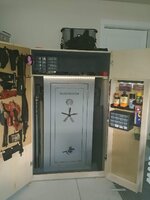
This is it with the doors hung. I will be adding handles and some sort of locking mechanism(s). I haven't entirely decided what route I'm going to take with those yet.


Open.jpg
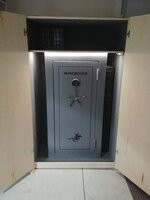
This is it assembled with the safe in place. There is 6" clearance on each side and the front, and 12" on top. I made a floorplate that has a cutout for the footprint of the safe and makes a floor for the surround. The shelf is dark in this pic, but it will allow for storage of magazines, empty pistol boxes, knives, binoculars, etc., that I want locked up but don't want to have to put in the safe.


Hinge 2.jpg Hinge 3.jpg
Hinge 1.jpg
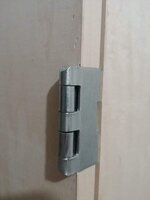
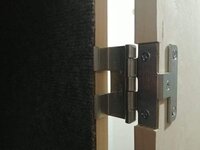
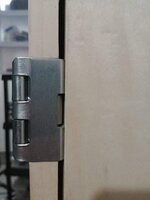
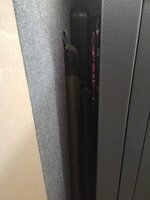
The hinges open 270 degrees, so they allow plenty of clearance to open the safe door and pull things in and out. They are mortised into the doors. By the time I realized I wanted/needed to mortise them into the doors, I had already drilled holes for the screws attaching the hinge to the carcass, so there is that gap between the door and carcass. It drives me crazy. I figure I'll end up taking the doors off, filling in the holes with epoxy, and mortising the hinges into the carcass as well. It will be a much cleaner look if I do.


Cubby1.jpg
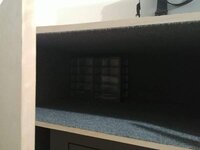
A shot of one cubby with a couple gun cases stored in it. My Pelican case fits perfectly in the other side. I misjudged the thickness of my girlfriend's hard-sided case, and it's about 1/2" too thick to fit in this one.


Shelf2.jpg
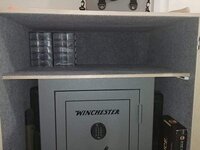
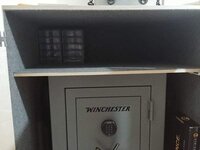
The top shelf and a view of cases/boxes in both cubbies. The little white thing under the right side of the shelf is the battery pack and motion sensor for the LED strip that is mounted under the shelf. I figure I will eventually put doors with another lock to close in the shelf for another layer of security since there will be stuff in there I don't want anyone making off with.


Finished edges.jpg
I even finished the cut edges of the plywood with iron-on birch veneer edging. Makes it look SO much better.

This is the first cabinet I've ever built of any size. I learned a ton while building it, and plan to build more cabinets for storage in the near future. The little errors and imperfections on this one make it hard to not just sell this one and build another one. Future improvements include a pegboard panel on the inside of one door to hang holsters, one piece cleaning rods, and other accessories on. The inside of the other door with have small shelves to store all my cleaners, oils, etc. I have some more lighting to install.

Let me know if you're interested in seeing the progress and I'll make sure to post updates as it evolves. Shelf.jpg
 
Last Edited:
I toiled with whether I should post this here, because I don't want to advertise to the whole internet what I've done, but I figure (hope) I'm safe here. I got tired of having holsters, cases, boxes, magazines, etc., strewn all over the place, so I drew up some plans a week or two ago to build a cabinet that is designed to go around my safe. The intent is to provide some level of protection to non-firearm items, and serve as another layer of protection someone would have to breech to get to my safe. I realize it isn't Fort Knox, but I think it increases the overall security of my system. Anyway, on to pictures.

View attachment 557846
This is the carcass. It is made with 3/4 inch birch plywood, and is lined with carpet everywhere except where the safe will be. The inner dimensions are 72"H x 42"W x 30"D.


View attachment 557847
This is it with the doors hung. I will be adding handles and some sort of locking mechanism(s). I haven't entirely decided what route I'm going to take with those yet.


View attachment 557853
This is it assembled with the safe in place. There is 6" clearance on each side and the front, and 12" on top. I made a floorplate that has a cutout for the footprint of the safe and makes a floor for the surround. The shelf is dark in this pic, but it will allow for storage of magazines, empty pistol boxes, knives, binoculars, etc., that I want locked up but don't want to have to put in the safe.


View attachment 557851 View attachment 557852
View attachment 557850
The hinges open 270 degrees, so they allow plenty of clearance to open the safe door and pull things in and out. They are mortised into the doors. By the time I realized I wanted/needed to mortise them into the doors, I had already drilled holes for the screws attaching the hinge to the carcass, so there is that gap between the door and carcass. It drives me crazy. I figure I'll end up taking the doors off, filling in the holes with epoxy, and mortising the hinges into the carcass as well. It will be a much cleaner look if I do.


View attachment 557848
A shot of one cubby with a couple gun cases stored in it. My Pelican case fits perfectly in the other side. I misjudged the thickness of my girlfriend's hard-sided case, and it's about 1/2" too thick to fit in this one.


View attachment 557855
The top shelf and a view of cases/boxes in both cubbies. The little white thing under the right side of the shelf is the battery pack and motion sensor for the LED strip that is mounted under the shelf. I figure I will eventually put doors with another lock to close in the shelf for another layer of security since there will be stuff in there I don't want anyone making off with.


View attachment 557849
I even finished the cut edges of the plywood with iron-on birch veneer edging. Makes it look SO much better.

This is the first cabinet I've ever built of any size. I learned a ton while building it, and plan to build more cabinets for storage in the near future. The little errors and imperfections on this one make it hard to not just sell this one and build another one. Future improvements include a pegboard panel on the inside of one door to hang holsters, one piece cleaning rods, and other accessories on. The inside of the other door with have small shelves to store all my cleaners, oils, etc. I have some more lighting to install.

Let me know if you're interested in seeing the progress and I'll make sure to post updates as it evolves. View attachment 557854
Nice cabinet!
Is that shelf attached to the cabinet, or does it just sit on top of the safe?
I like the rope light idea. Genius. -b
If you extended it to the top of the shelf space, it could illuminate that entire cubby hole.


Dean
 
Nice cabinet!
Is that shelf attached to the cabinet, or does it just sit on top of the safe?
I like the rope light idea. Genius. -b
If you extended it to the top of the shelf space, it could illuminate that entire cubby hole.


Dean

The shelf currently is sitting on the safe, but I have some brackets to install to make it,an actual shelf.

I have some more lighting I intend to mount that will improve the overall visibility in the cabinet.

Thanks for the remarks! I'll have some updates in a day or two.

0312191741.jpg
 
WasrNWarpaint,

Will you be bringing that boat to Silverdale this summer for the Whaling Days boat races?


Dean
Dean
Yes I may, I havent yet really decided what state Im going to race ......
where ever there is the most c class drivers, bigger field is more exciting!
Ill know in a month or so where Im going to race primarily

here is another close race if your interested....show up at the Silver lake races and if Im there you can take my hydro for a couple laps ..we have a "new folks in boats" program where spectators that may want to get into racing can run a hydro
 
Last Edited:

Upcoming Events

Centralia Gun Show
Centralia, WA
Klamath Falls gun show
Klamath Falls, OR
Oregon Arms Collectors April 2024 Gun Show
Portland, OR
Albany Gun Show
Albany, OR

New Resource Reviews

New Classified Ads

Back Top