Join the #1 community for gun owners of the Northwest
We believe the 2nd Amendment is best defended through grass-roots organization, education, and advocacy centered around individual gun owners. It is our mission to encourage, organize, and support these efforts throughout Oregon, Washington, Idaho, Montana, and Wyoming.
Lasers,
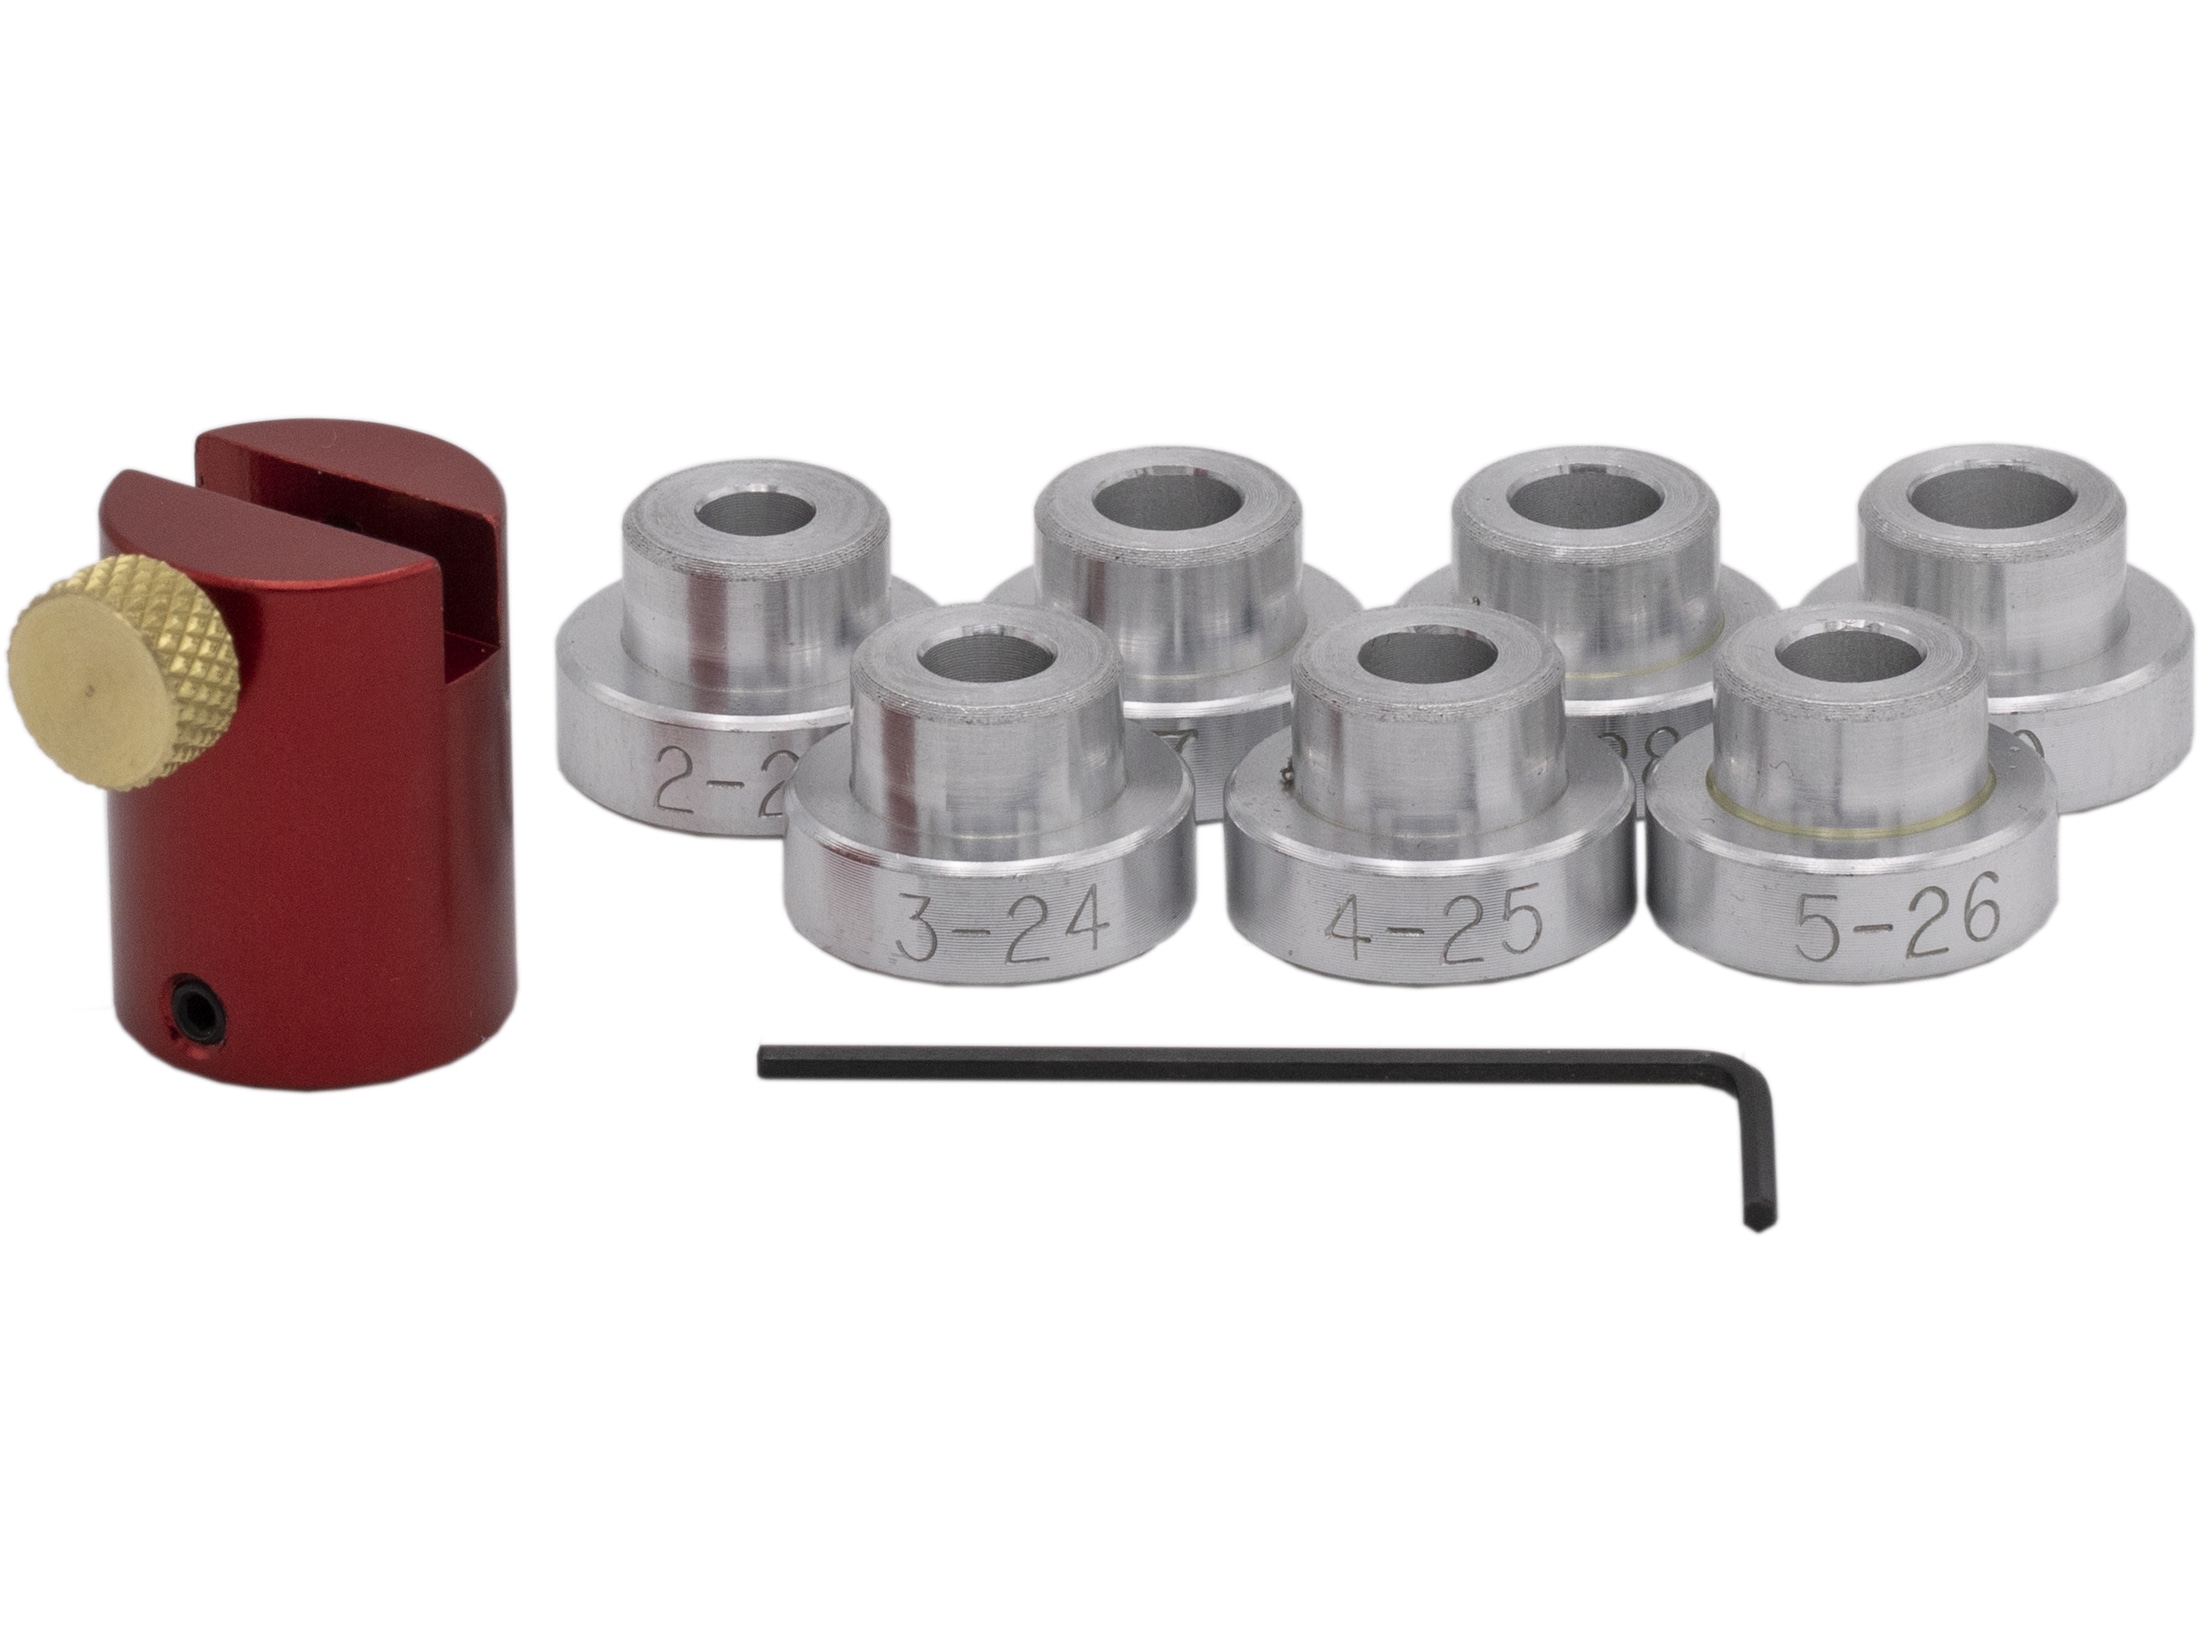
I'd highly recommend getting the Hornady headspace and comparator gauge set up. It attaches to your calipers and allows you to measure from the datum on the shoulder (angle) to the base of the case. If this dimension is too long, the cartridge won't chamber. If it's sized too far back, it'll have excessive headspace and can cause other issues. This gauge is pretty important in order to ensure the brass is being sized appropriately.
The Hornady Lock-N-Load Bullet Comparator is perfect for the reloader looking to quickly and precisely measure seating depth of loaded ammunition from...
www.midwayusa.com
Also good on ya for asking ahead of time and doing it correctly. It'll save you less headache and frustration down the road.
... I loaded a few of them up and shot them for accuracy. They all went off and accuracy was normal. I'm not recommending it or even saying I would do it again, just that it worked for me. ...
Interesting experiment and I'm glad you got those results. I always poke out the bits as I mentioned before but if I somehow forget sometime, that makes me feel better.
I don't know what type of rifle you have. If it's a repeater or semiautomatic, feeding empties through the mechanism might prove problematic so you'd drop the case or loaded round directly into the chamber and then close the bolt.
If it's a single shot there's only one way to chamber a round so we don't have to explain that I think.
in terms of head space, you can try to chamber unloaded brass and determine if the bolt closes and you can pull the trigger. Much easier with a bolt but certainly viable to a point with a semi auto. Your rifle's chamber is like a go/no go chamber gauge where an actual chamber gauge will give some size info.
@CLT65 makes a great point regarding decapping live primers. For my single stage I have a primer catcher from Inline that is amazing. It catches 99.9% of primers and sends them down a tube to, in my case an empty milk jug for collection. If I were decapping live primers this setup would be perfect. Just fill the jug with water, that way there is no way you would have a sympathetic detonation.
I'll post a link later … since we are liberally spending the OP's money I'll say get one of these too!
So @Lasers, just how much money so you think these free cases have "saved" you?
Regarding things other than powder in the case, I get it, I really do. We are dealing with a potentially deadly hobby when we shoot and reload. Unknowns are to be avoided pretty much always.
But... on thinking on all the different things people have placed in the cartridge case over the years, like foil disks, paper, Dacron tufts, Cream of Wheat, cardboard wads etc. I really don't think a speck of media in the flash hole exit will amount to anything at all.
@Certaindeaf has a very valid point, you ultimately need to check your reloads in the firearms chamber but there are some limitations that need to be addressed.
To really use the chamber as a headspace gauge you need to remove from the bolt the ejector and possibly the extractor . Anything that places tension on the case or keeps it from moving will interfere with your measurements. With a stripped bolt you can resize bit by bit until you get no resistance to the locking lugs engaging with very light finger pressure. It works great and is very accurate. But it's a chore to strip and reassemble the bolt and on self-feeders like the AR can be very difficult to gently put the bolt home without jogging something causing an inaccurate measurement.
So a dedicate gauge is worth the $14 bucks or so in my mind. You can quickly and safely gauge both cases and loaded rounds with one, and do it will sitting on your behind watching TV.
The Hornady gauges are very good to have as well. These allow you to choose more closely the shoulder set back you desire because you measure it directly rather than trying to use the depth rod on a caliper when using a dedicated case gauge. They also are useful for setting bullet jump and measuring throat erosion.
So once again … as I spend OP's money … get them both!
@Certaindeaf has a very valid point, you ultimately need to check your reloads in the firearms chamber but there are some limitations that need to be addressed.
To really use the chamber as a headspace gauge you need to remove the ejector and possible the extractor from the bolt. Anything that places tension on the case or keeps it from moving will interfere with your measurements. With a stripped bolt you can resize bit by bit until you get no resistance to the locking lugs engaging with very light finger pressure. It works great and is very accurate. But it's a chore to strip and reassemble the bolt and on self-feeders like the AR can be very difficult to gently put the bolt home without jogging something causing an inaccurate measurement.
So a dedicate gauge is worth the $14 bucks or so in my mind. You can quickly and safely gauge both cases and loaded rounds with one, and do it will sitting on your behind watching TV.
The Hornady gauges are very good to have as well. These allow you to choose more closely the shoulder set back you desire because you measure it directly rather than trying to use the depth rod on a caliper when using a dedicated case gauge. They also are useful for setting bullet jump and measuring throat erosion.
So once again … as I spend OP's money … get them both!
For a target rifle, and that rifle only, I agree.
In most cases however, one wants ammunition to chamber in all rifles.. like factory loads do generally. And that is not achieved by doing as you describe.
Go/No-go gauges assure one is within spec but really will not tell you if the ammo will actually chamber in your particular rifle.
I've had to deprime hundreds of live primers. At first it freaked me out, but plenty of people advised it was fine so I did it. They do have to be wacked to go bang....
Never had one go off and I've even had them inserted upside down..
I don't worry about depriming a live primer anymore. Done it hundreds of times. Also had to pull hundreds of bullets..
When I think about all the mistakes I've done in the past I'm surprised I've never had a KB but, one mistake I haven't made yet is a double charge or under charge. (Or a C.O.L super short). I know where to pay attention and when to toss a scary round in the dud bin to deal with later.
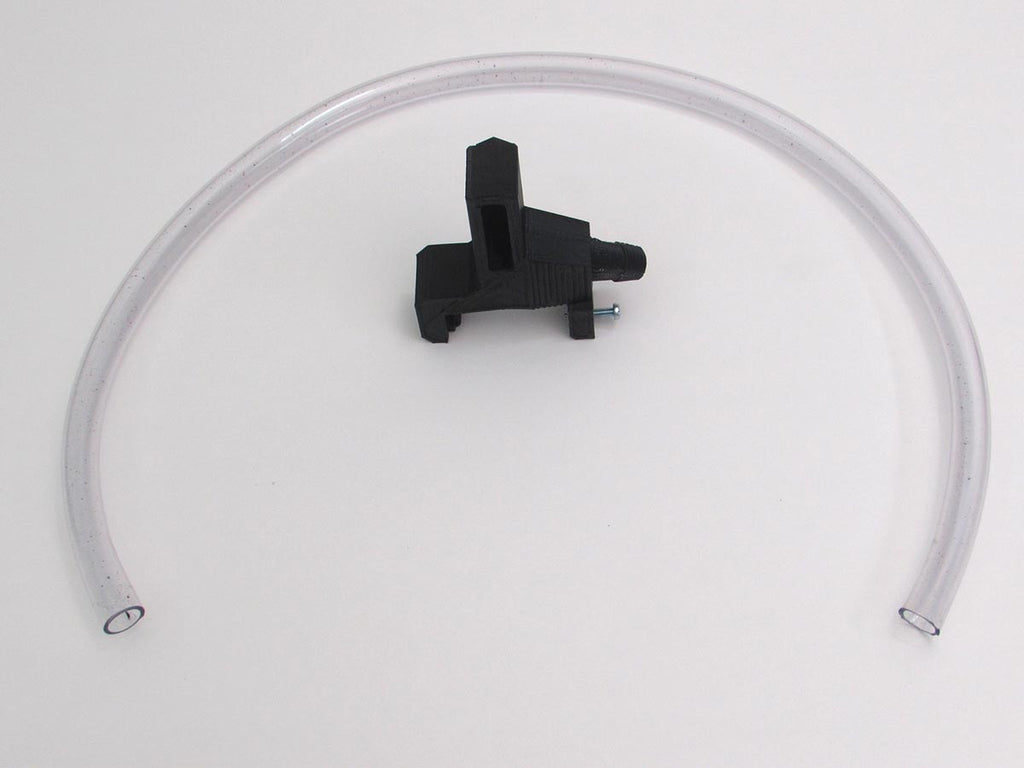
Here's the link to the spent primer catching system I mentioned earlier. This is for the Rock Chucker Supreme. I have an RC II so the device is a bit different, but I can't imagine it does not work as well, especially when reading the reviews. It consists of a 3-D printed plastic part that attaches behind the ram and a tube. Bone head simple. You need to turn your ram around to the rear so the primer arm slot faces backward. The spent primer drops down that slot and into the catcher / deflector device and then down the tube to wherever you direct it to go.
On my press, this misses maybe two or three per THOUSAND decapped primers … it's that good! For years I have jury-rigged many different methods to keep from spilling primers all over the floor and bench, with little success except for a big box system that got in the way and stuck out all over the place. This is an elegant solution and anybody who has a single stage press used for de-priming should take a look at Inline's offerings. (no I don't work there!)
The only down-side is you can not use the on press priming system … but who does that with the many inexpensive priming tools available that do a far better job?
The factory primer catch tray for the Rockchucker Supreme can be hit and miss with catching the decapped primers with them...
inlinefabrication.com
I'd look at the case ejector they sell as well. I have an original RCBS Case Kicker (no longer in production) and it saves a ton of time on a single stage press, an the Inline version would work even better as it's out of the way while you are putting cases into the shell holder.
Oh yes, this is a local guy as well if that matters to you … he's out of Eugene.
On the RCBS presses there is a large snap ring or m-clip holding the ram through pin in place. Pull that clip and push out the through pin, rotate the ram 180 degrees and then reinsert the pin and clip. It takes about as long to type this as to do the change.
The catcher portion straddles the press rear support and is held in place by a lightly snugged screw. That's it.
I actually use a small bar clamp to hold the catcher in place since the RCBS Case Kicker I have installed makes getting to the catcher screw a bit difficult and I store these clamps right on the end of the workbench within a few inches of the press. It's easier for me to grab the clamp than to fish a screwdriver from my roll away.
I do remove the catcher when not depriming. I wear XXL sized gloves, so my large hands brush against it when I'm trying to do other operations quickly and I prefer to have the extra room. It's not imperative however, so it sometimes stays in place if I'm going to use it again in the near future. It really only takes about 10 seconds to remove or reinstall.
The thing I like about this solution is that it catches darn near every primer, well above 99%. Instead of using the 2-foot long discharge tube provided I grabbed a 4-foot section from the hardware store. This way I can set a milk jug under my bench and back from the front so I don't kick it with my feet when moving around the bench. The jug sits there nice and happy and out of the way.
If doing marathon deprime sessions make sure there are not a lot of primers backed up in the tube when moving the jug. I once reached under the bench to grab the jug without looking. The tube was flush against the bottom of the container so the primers had backed up to about 18 inches above the jugs mouth instead of flowing into the jug itself. When grabbing the jug the tube slipped from the mouth and all those primers dumped onto the floor in about a nanosecond . I won't be making that mistake again … and this was operator error, not the devices problem.
I wish I had found this solution years prior when all I had was a single stage press. I now have a progressive, but I still decap rifle brass separately and use the single sage with case kicker to do this step.
If our Supporting Vendors don't have what you're looking for, use these links before making a purchase and we will receive a small percentage of the sale


")