Silver Supporter
- Messages
- 6,072
- Reactions
- 15,023


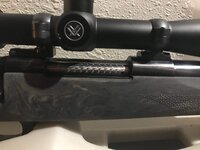
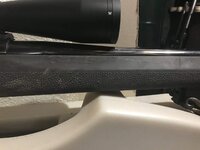
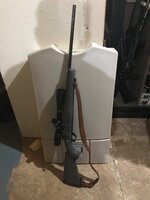
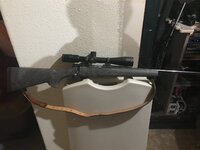
I got a little ambition today, so I hit a project that I've been accumulating parts and tools for. My .30-06 S&W 1500 had a botched bed and free-float job from Allison & Carey, making it shoot all over the paper last Fall. I bought a new Vortex Viper for it, and a full bed and pillar, aluminum backbone Hogue stock for it in the intervening months.
The first thing I noticed as I put it on the work stand was the buggered trigger guard screws holding the action and the walnut stock together. I hated reusing them, but new ones aren't readily available and I'm still looking for replacements. I may have to make some. Anyway, I got the new stock installed and torqued the action screws to 50 inch-pounds. Checking for a free float, I now have about .015" clearance all the way to the receiver.
I had to replace my one piece Leupold STD mount with a two piece version so that the bottom of the scope would clear the mount with a "Low" ring set. I needed the low ring set to get the scope axis low enough to be comfortable and natural to look through. I had to drop back to a 44mm objective from a 50mm to get clearance on the barrel. Even with the 44mm I only have about 0.100" clearance there, but it's enough.
After mounting the two piece mount and torquing the screws I used a Wheeler scope gauge and lapping tool to fit the rings to the scope. The gauge showed that the front ring was canted slightly downward. So I used some 200 grit lapping compound and the Wheeler lapping tool with my DeWalt cordless screw driver and got about 80% contact, while the scope alignment gauge now showed perfect alignment. A word of caution about using a drill to do the lapping: Don't go too fast. If things heat up enough to dry out the lapping compound you can damage the rings and the lapping tool. I stopped several times to check the contact patterns on the rings. I wanted at least a 75% contact area on each ring.
Once the rings were lapped I leveled the rifle in the work stand by using a spirit level across the lower ring halves. Then I set the scope into the bottom half of the rings gently and adjusted for proper eye relief. I used a colored pencil to make a witness mark where the eye relief was perfect.
I then hung a plumb bob in a tree about 20 yards out, re-leveled the rifle one more time, gently set the scope into the bottom half of the rings and lined up my witness mark for proper eye relief. I then gently adjusted the axis of the scope so that the vertical crosshair matched the string on the plumb bob. I then added the top half of each ring and torqued the ring screws to 18 inch-pounds in stages. When that was done I checked the vertical crosshair one more time. It hadn't moved.
The next step will be going to the range. Hopefully, this solves the issue of being all over the paper as the barrel heats up. I'll report back as soon as I get a chance to shoot the rifle and see the results.
Last Edited:


