- Thread Starter
- #41
Navigation
Install the NWFA app
How to install the app on iOS
Follow along with the video below to see how to install our site as a web app on your home screen.
Note: This feature may not be available in some browsers.
More Options
You are using an outdated browser
The browser you are using is likely incompatible with our website. We recommend upgrading your current browser or installing an alternative.
JavaScript is disabled
Our website requires JavaScript to function properly. For a better experience, please enable JavaScript in your browser settings before proceeding.
-
Join the #1 community for gun owners of the Northwest
We believe the 2nd Amendment is best defended through grass-roots organization, education, and advocacy centered around individual gun owners. It is our mission to encourage, organize, and support these efforts throughout Oregon, Washington, Idaho, Montana, and Wyoming.Free Membership Benefits
- Fewer banner ads
- Buy, sell, and trade in our classified section
- Discuss firearms and all aspects of firearm ownership
- Join others in organizing against anti-gun legislation
- Find nearby gun shops, ranges, training, and other resources
- Discover free outdoor shooting areas
- Stay up to date on firearm-related events
- Share photos and video with other members
- ...and much more!
I did not have relations with that lathe
- Thread Starter kopcicle
- Start date
- Thread Starter
- #42
Who in their right mind would design even a hobby mill around radial ball bearings? The bean counters at Sears Craftsman, that's who. May they rot in eternal _____.
And then on to the high tech bearing instillation.

And the finished headstock.
bubblegum/Schaeffler 7205-B-XL-2RS-TVP Angular Contact Ball Bearing Sealed
And then on to the high tech bearing instillation.
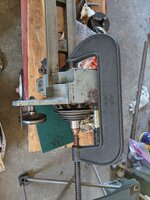
And the finished headstock.
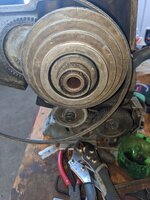
Last Edited:
- Thread Starter
- #43
So in no particular order ...
The mid process struggle to remove the spindle back gear. This could be it's own chapter in frustration and eventual success. The metal around the woodruff key was swagged up from the shaft diameter and had a death grip on the Zamak gear. I series of hard wood wedges, dead blow hammers, sweat, swearing, 1/4" at a time ...
At some point the bearings that initially felt like a box-o-rocks freed up and ran smooth. My guess is that something in the back gear stack was missing, or interfering with the casting.
I did get it all the way apart without damaging anything but the circlips.
The forward/reverse lever tumbler gears offered another surprise. One gear had seized to the shaft and spun the riveted/swagged pin the gear rides on. The detent pin on the lever is rust welded in place as well.
The carriage traverse gear assembly is missing a few teeth. I knew this prior to purchase and along the way found that the gear and rack are 20DP 14 1/2PA. This is actually a common gear for hobby RC cars. Daryl gifted for the ride along with some other parts but I'm going to turn the remaining teeth off and swag/solder/braze the pinion on for a repair.
I series of phone calls to Joel resulted in a sufficient honorarium sent his way and a care package sent my way.
Shameless plug for Joel. If you don't know Joel and own a Craftsman/Atlas/Clausing lathe, you need to.
I'll steal minutes as I can to lightly stone the ways with my newly acquired , dollar store, sharpening stone pairs.
If you don't understand why they're acquired in pairs find an Elmer, mentor, two years older than dirt manual machinist and buy him a cup of coffee
Only the more aggressive bits of oxide death will be attacked by my favorite chemical brew, OsPho (Phosphoric acid concentrate with a wetting agent) You can find it at Most Ace Hardware stores.
So far the community has been a godsend. I was nearly gifted a 4 jaw chuck. A bunch of 1/4" and 5/16 HSS 5% and 8% cobalt showed up in the mail (I know who you are and thanx). A live center and 2MT test bar arrived from a long time partner in crime. A Welsh expat put me in touch with his brother on the Isle and the bearings arrived Friday. The Armature chucks came from a conversation that began with "what the heck are these for?" and ended with me leveling his lathe over the phone in a little less than an hour when He'd been fighting it for weeks.
A Starrett Dial, test, and back plunger set showed up with instructions to pay as I can and continue to pay it forward (Morrie, I'm humbled) . I'll have the lathe side four step pulley available as all I needed was the motor side and a conversation I'd forgotten about produced both. A local that heard I was starting over dropped off an assortment of drops in Steel , cast, bronze, aluminum, and other weirdness.
I'll finish with a Thank You to those I may have over looked and anyone that actually reads my drivel.
- Thread Starter
- #44
I'm waiting on a few parts from Joel and some monkey repellent from the publishers of the Satanic Bible.
I doubt I'll ever do the tapered roller bearing conversion unless I have to do a bunch of fine facing operations.
Believe me, it is possible to the point of certainty that you can set up a high frequency resonance in the axial plane of the spindle simply by banging the roller bearings back and forth. The noise is rich in harmonics which distinguishes it from ordinary high frequency tool chatter.
Meanwhile , back to the flying monkeys with hammers.
The list of damage
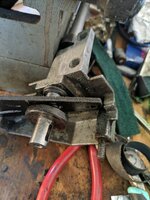
Someone pounded on the headstock end of the lead screw thinking that it came out of the support casting that direction. Seems reading the parts breakdown wasn't an option. That or monkeys can't read.
While pounding on the lead screw end the end was so severely peened over that removal of the spacer behind the spindle drive gear was impossible. This resulted in hours of careful file and stone to restore the spindle diameter so the spacer would go off and on. Of course the 1/4 - 20 threads were buggered and had to be chased.
Then the casting had been tweaked just enough so that when the attaching screws were tightened the lead screw bound up. No small wonder as the spindle bore was pointing back at the bed. Looking back at the bore the years of neglect had left the natural bearing surface black with baked on goo and smooge. This all had to be carefully removed while not taking so much that the spindle fit became a hotdog down a hallway.
When we last visited the 141-023 Coupler, Direct Drive, it was resting in its as molested by flying monkeys with hammers state.
I didn't get pics of the process because getting the sweaty hands in and out of gloves was just a mess. Okay , I'm lazy. It just means I'll have to type more.
- Thread Starter
- #45
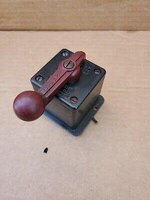
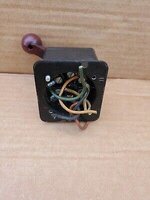
The next job is a reversing switch. ChinaBay doesn't thrill me. Furnas (the original part)eludes me. The cost of the stock Clausing part depresses me. It will probably be Dayton by way of Hobson's choice.
Update found the switch
I'm also on the lookout for a steady and follow rest.(FOUND!) I'm not looking for a hand out but refuse to pay inflated EvilBay prices. I'm always on the lookout for original 1" -10 TPI chucks, 3 & 4 jaw.
Any curious MT2 (headstock) or MT1 (tailstock) tooling is also on the list.
- Thread Starter
- #46
I'm already looking ahead. The follow on to the 6" lathe you see here is either a DSM 59 Hardinge or it's bigger brother the HLV-H. An alternative to the DSM is the nearly direct copy the Feeler.
These are referred to as "second operation lathes". The machines provide the tooling and CNC programmed meat operates them.
The point is I don't have the room for a CNC turning or milling center and honestly couldn't keep one busy. In fact I probably couldn't keep an old Brown & Sharpe auto screw machine busy.
I don't see runs of much more than several hundred in my future.
The one job that may turn into a 3 shift 24/7 nightmare will be a slow ramp up and will eventually have to compete for market share anyway. I hesitate to elaborate mainly because I don't want to bore anyone more than I already have.
- Thread Starter
- #47
Okay , buckle up , short sharp rant.
So in no particular order I have
purchased and shipped a lathe 1/3 of the way across the country
I have struggled with the deterioration due to years of neglect.
I have exorcised the wanton destruction of flying monkeys with hammers.
I sourced obsolete and discontinued parts from the likes of mymachineshop.net and littlemachineshop.com
Someone left the side door open at practical machinist and was able to post WTB .
An ebay seller I've known for years says "does this look familiar?" and I had new half nuts.
Clausing. If you ever speak with Brian or Tom about old inventory thank them for being there.
Help has arrived in the form of anonymous packages containing everything from HSS to bearings, to random pieces of stock. I'll just say Thank You and quit wondering who you are
I have limited tools
I'm starting over, at 65. with an eons old 6" metal lathe.
And all this one facebook keyboard warrior can say is
"I was taught to never place anything on the ways"
Then proceeds to school me on care and feeding of machinery in general, lathes specifically and my lathe in particular.
The reply went like this.
It's not your lathe. It's my lathe.
If it were your lathe you could happily restore it to museum quality non functional beauty.
I intend to use the hell out of this lathe once it's functional and quite possibly never pretty.
If your intent is to demean, denigrate, deride and "mansplain" care and feeding of a lathe to a retired millwright then have at it , somewhere else, to someone else, some other time.
The technical division of the mad Irish army made the next week of internet connectivity exceedingly difficult for this mutt. I have some very interesting family and friends.
Look , I have never, ever, demeaned or derided anyone's work. If I can't stand to look at it I just don't.
I can see potential beauty where someone else sees scrap.
I possibly didn't respond well to criticism in this case.
I didn't enjoy being taken to school by a 30 something keyboard warrior.
But he's right.
Good shop practices are good shop practices, then, now, and always.
If he had stopped there without a near copy and paste from NavPubDoc, MM & MR 3-2 intro to machine practices I wouldn't be typing this wall of text.
In conclusion, don't leave ANYTHING on the ways or gawd almighty will kill a kitten.
And the next time you're confronted by some invasive species of keyboard warrior, let it go. Your time is far better spent working on or with your machines.
:EOR
- Thread Starter
- #48
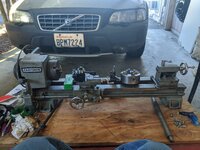
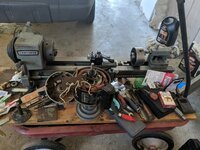
Okay , it runs. but wait there's more.
Gary , thanks for part of the solution.
The belt is crap or has a couple of flat spots on it. Back off the tension so far you can't put a tool into aluminum and it runs fine. give it any tension at all and it's a bucking bronco.
Interlude for some good news. The time I spent on the gears paid off. There was so much crud in the root that there was no way to get close to a mesh. Razor blade, caustic chemicals, miniature files, multiple teeth breech, wash, rinse, repeat.
The gear train is nearly silent.
More good news. No detectable axial or radial slop, none, and very little heating.
Okay back to the flying monkeys with hammers.
The spindle may have near zero detectable run out between the bearing surfaces but the register for the chuck is messed up. Not only that the 2MT taper in the spindle is corroded.
A super sharp piece of 5% cobalt HSS reestablished the face but there is little that can be done for the 1.375 outer diameter. Neither of the chucks I have make use of the specified 1.000" dia register so I have to make do with the face . I'll include the pdf.
It appears I have a ways to go before I have a tool I can use. For those of you that might suggest...
No, I could turn between centers right now if I took the taper out but that gets old real fast.
I'll suss out the damaged 2MT in the spindle bore this weekend. The reamers are on the way.
Then I have to decide which center to go with, the register (and which chuck, 4 jaw , duh) or the spindle ID .
it's 11:45 pip emma out here on the left coast. I've done enough damage for one day.
Now where was the flying monkey repellent ?
- Thread Starter
- #49
The reamer set I received from the AmaZombies. looks good.
I tied the roughing an finish back to back with each other and , parallel.
I did the same with a known good 2MT taper and, parallel.
So far so good.
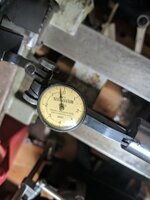
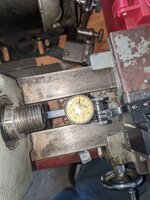
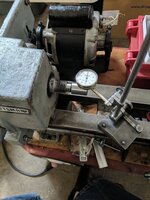
Now to dial the face register and the 2MT taper and record the run out. The face should be zero after a skim of the face. The 2MT taper will have to be cleaned up prior to indicating.
Then the options.
Move the 2MT taper. This is actually the easiest as the reamers both have a rear center.
Simply offset a center held in the tool holder or offset the tail stock the amount of radial run out , lock the spindle and advance the reamer.
Move the face. This sucks as anything done to the face other than perfectly perpendicular to the axis is just brain dead and would work only with that specific accessory.
Face to face chucks. Where you install a chuck on the spindle and true a shaft to it no mater what else is going on.
Place the other chuck on the shaft with its jaws facing the installed chuck.
Reproduce its angular misalignment on the shaft and verify by indicating on it's register.
if the misalignment between the OD of the chuck, the registration face and to a lesser degree, the "natural" center in the case of the scroll chuck agree, The spindle is bent.
If the register does not agree with the OD or the "natural" center in a scroll chuck but the "natural" center do agree then straighten the register. (what a bunch of words)
The four jaw is easier once the three jaw is close. Get the run out and angular distortion out of the shaft. resort to the cigarette paper trick for out of round, tap to center for the live end.
Install the 4 jaw on the shaft exposing the register. True up the OD for run out. indicate the register. True up the register if necessary.
Wash , rinse , repeat, until this becomes a repeatable operation. If it doesn't , run around in circles (isn't that what we've been doing?) screaming "Murphy!!! WHHHHHHY Me !!!!"
Then it's back to the internal taper and making it agree to the total indicated run out ( hopefully near nil at this point)
If not then it's easy enough to move the taper a "few" thousands.
and so it goes
- Thread Starter
- #50
Once I counter bored a register in the chuck
The rest was easy, The damage was beyond abrasives and a careful dial in of the register allowed for a .002" skim cut on the diameter and face.
The brief vid of the machine reveals the work on the gear train was well worth it. Just imagine inspection of every tooth and root of every gear in inventory. Imagine "blueprinting" of every spacer, bushing and keyed spacer. Imagine spending hours sorting out a banjo bracket that had been attacked by the flying monkeys with hammers. Then it was the lead screw alignment including centering on new half nuts to the point where there was full engagement without deflecting the lead screw and full disengagement.
It was worth the effort.
- Thread Starter
- #51
I'll keep it short. I just had to share a thought.
"lil" John Buttera, "When you make each part, each sub assembly, each assembly, to the very best of you time, tools, talent, and ability, only then will the sum total of the parts be greater than the whole."
For those of you that don't recognize the name, it's worth a deep dive.
For all the deburring every tooth. For all the not accepting anything but perfect alignment. For not accepting good enough. The results are worth it.
As the non restoration title states it's near time for this machine to start earning its keep. Its reward will be an eventual complete restoration because it will be made all the more easier since it will be completely functional.
The previous clip is short but it's not so much the image, it's the sound. This is what happens when there is no compromise, when there is decades of experience applied, when the expected result depends on completing the details.
The result is worth the effort.
- Messages
- 1,075
- Reactions
- 1,444
Tagged!
Joe
Joe
Share This Discussion
Similar threads
- Replies
- 13
- Views
- 1K
Upcoming Events
New Classified Ads
-
-
-
-
-
-
-
-
2000 Harley Davidson Sportster 1200 great runner!!
- Started by OregonSig
- Replies: 0
-
-
Support Our Community
If our Supporting Vendors don't have what you're looking for, use these links before making a purchase and we will receive a small percentage of the sale


