JavaScript is disabled
Our website requires JavaScript to function properly. For a better experience, please enable JavaScript in your browser settings before proceeding.
I bought the Wheeler Ultra Kit using Jet.com's "15% off up to $300 on first three orders" coupon code. Not suitable for full-scale assembly-line manufacturing, but just about everything except an Allen wrench and a vise you need to complete your first few AR's or set up a light udse home workbench in a small mini-duffel.
 
When it's all done you will have almost the same amount of money in tools .that it would have cost to just buy a gun LOL


But you will have the tools to build another, and another , and another etc.

I love my Brownells barrel extension torque tool and use it for all sorts of stuff Brownells never intended.

FWIW you don't need to toque the barrel nut down to 300 lb/ft like PSA does.
 
FWIW you don't need to toque the barrel nut down to 300 lb/ft like PSA does.
Officially (from the M16/M4 Tech Manual) it is 30-80 ft lbs (not 35)
I try to stay around 40(+/-) ft lbs
And that is wet torque (AeroShell 33MS) with the torque wrench inline and not offset on a 90° angle.
All of that is straight from the TM.
 
This must be one that someone got carried away with...

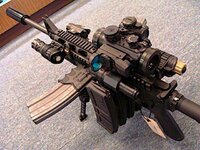
AR Build.jpg
 
Officially (from the M16/M4 Tech Manual) it is 30-80 ft lbs (not 35)
I try to stay around 40(+/-) ft lbs
And that is wet torque (AeroShell 33MS) with the torque wrench inline and not offset on a 90° angle.
All of that is straight from the TM.
Yes I do mine at 35 then go little more itidepends on the forend you have to line up the bolt pattern there is no way to get to 80 I think it would strip before you got to 80
 
I don't know how they get it so tight when I took a part my one that I bought to change barrel it was on there too .but I just feel like 40 is tight


Yeah, I hardly ever do much more than 30-40. No need to unless its just to get the hole lined up. Ive broken dogs on barrel wrenches and stripped out barrel nuts to the point the only way they were coming off was with a pipe wrench. Been building engines and guns since I was in my teens and I know what 120 lb/ft feels like and somewhere they have a gorilla with a cheaper bar putting that stuff together.
 
I haven't used it yet, but it has been suggested by "pros" that a clevis pin (The one with all the holes) in 1/4" to use on the takedown pin detention and spring.Put it in from the back side,insert spring then detention,depress rotate,insert takedown pin,,,,pushing out the clevis pin(replacing it).
Sounded easy. Finding that pin and spring on the floor is not.Assemble in a bag is another good tip. Good luck
 
When it's all done you will have almost the same amount of money in tools .that it would have cost to just buy a gun LOL
EPS, you are forgetting that building your own rifle negates Uncle Sam from having that registered serial number so they can take it away from you someday. If we keep letting Liberal/Socialist chip away on our gun rights I truly believe they will make criminals of us all! Fight them head to head, damn snowflakes!
 
I haven't used it yet, but it has been suggested by "pros" that a clevis pin (The one with all the holes) in 1/4" to use on the takedown pin detention and spring.Put it in from the back side,insert spring then detention,depress rotate,insert takedown pin,,,,pushing out the clevis pin(replacing it).
Sounded easy. Finding that pin and spring on the floor is not.Assemble in a bag is another good tip. Good luck

The clevis pin works great. I already had several so no need to even leave the house.

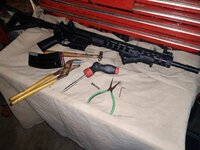
This is all I used to assemble the lower. Forgot to add brass punch and center punch for rear plate.
IMG_20180512_193943386.jpg

My next one will be a ground up build. I'll spring for the blocks, barrel nut wrench and barel face lapper for that one.
 
Most respectfully respectfully and stuff ...

Oh boy. This will fetch the AR15 home builders out. Some of the old USGI build manuals are WRONG. Lots of the current AR15 build videos are WRONG. There is the new way which MAY work and the old school building technique that ALWAYS WORKS.

No point continuing. PEM if you are serious. No short answers. Try the Semi Auto Rifle sub section and scroll way down to the many AR15 build threads. Some of them are mine. Helpful hints ... needed tools. BARREL TORQUING. BARREL INDEXING.

Most respectfully and respectfully and stuff. HB of CJ.

Hundreds of AR15 builds. Uncounted M16 rebuilds. Long ago, far away. Old School.
 
Respectfully ...

I can not help it. Here we go. That pesky trigger guard roll pin gets PRESSED in using that necessary HD 5" bench vise. You need a larger hammer. What are the channel locks for? Where are the locking medical forceps? Where are the roll pin punch pins? Where are the necessary aluminimuminum barrel lock down jaws?

The carpet hunk barrel protectors? The barrel gets locked down very tight. The upper receiver floats. 40-42 pounds adjusted torque dry. Perfect gas tube alignment. The key goes on last. No staking anywhere. Blue and Red Locktite. It took me sometimes all day to do a perfect precision build. Seven head space gages. Bolt lapping.

Respectfully .... do not take this too seriously. This Forums function is to teach. Passing it forward.
 
I always take interest in your postings.
Thanks for taking the time to post your experience .

The upper was already assembled.
The next build will require more tools .

I've been using channel locks to press in roll pins for quite a while
Not just on ARs. Works for me.
Small needle nose and 2oz hammer to start, then just push it in .
 

Upcoming Events

Centralia Gun Show
Centralia, WA
Klamath Falls gun show
Klamath Falls, OR
Oregon Arms Collectors April 2024 Gun Show
Portland, OR
Albany Gun Show
Albany, OR

New Resource Reviews

New Classified Ads

Back Top