Navigation
Install the NWFA app
How to install the app on iOS
Follow along with the video below to see how to install our site as a web app on your home screen.
Note: This feature may not be available in some browsers.
More Options
You are using an outdated browser
The browser you are using is likely incompatible with our website. We recommend upgrading your current browser or installing an alternative.
JavaScript is disabled
Our website requires JavaScript to function properly. For a better experience, please enable JavaScript in your browser settings before proceeding.
-
Join the #1 community for gun owners of the Northwest
We believe the 2nd Amendment is best defended through grass-roots organization, education, and advocacy centered around individual gun owners. It is our mission to encourage, organize, and support these efforts throughout Oregon, Washington, Idaho, Montana, and Wyoming.Free Membership Benefits
- Fewer banner ads
- Buy, sell, and trade in our classified section
- Discuss firearms and all aspects of firearm ownership
- Join others in organizing against anti-gun legislation
- Find nearby gun shops, ranges, training, and other resources
- Discover free outdoor shooting areas
- Stay up to date on firearm-related events
- Share photos and video with other members
- ...and much more!
Any axle experts (forklift)?
- Thread Starter Ownerus
- Start date
Kinda hard to see but it looks you have tapered cones to remove from around the studs before the hub will come off.
Take a few more pics close up of the studs and I can tell if it has them.
Most drive hubs have them, could be solid or split.
Take a few more pics close up of the studs and I can tell if it has them.
Most drive hubs have them, could be solid or split.
Kinda hard to see but it looks you have tapered cones to remove from around the studs before the hub will come off.
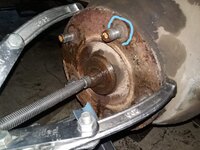
If you look close at the second pick, the studs are in the heavy ring and not through the drum. The claws of the puller are hooked behind that ring. I'ma thinking some heat on that ring the studs are in and a 5# sledge on the outside of the ring while you turn it. Several times apart if need be so the metal can cool (expand/contract) in between.
Definitely show some more pics up close when you DO get that drum off.
- Messages
- 841
- Reactions
- 2,185
- Thread Starter
- #25
I haven't had time to work on this for several days. I don't think it has the cone washers like on your example but I'll look and take some more pictures if I can get time. Thanks for the input guys.
- Messages
- 841
- Reactions
- 2,185
- Thread Starter
- #27
I think that's just surface fretting where the wheel was clamped by the lug nuts. But I'll look again, the light where I've been working isn't the best. I've done so much odd machinery work over the years that I'm sometimes getting bad at hasty assumptions when I *think* I've seen this before 
Some are solid and some are split as in the example.
Solid ones are a nightmare to get out if they are rusted on.
But since you used the puller it may have broken them loose.
Use a hammer and punch to pound on the flange around the cone till it pops loose.
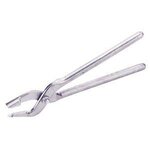
OTC makes cone pliers to grab and remove them.

Solid ones are a nightmare to get out if they are rusted on.
But since you used the puller it may have broken them loose.
Use a hammer and punch to pound on the flange around the cone till it pops loose.
OTC makes cone pliers to grab and remove them.
- Messages
- 841
- Reactions
- 2,185
- Thread Starter
- #29
Nope, no cone washers.

This may be part of the problem. I don't know what happened to break the axle but I presume it was ugly. The key is wedged askew in the key way which will put everything in a bind and there's probably other hidden galling and spalling contributing.

I'm guessing the studs have a splined head inside the drum and go thru the hub, all locked together by the lugnuts.

I'll need to upsize the holes in my heavy puller (thx lilhigbee for prodding me to rethink that) and make special smaller nuts to fit in the puller wings. My left hand tap arrived Thurs. Then I can try still more brute force plus heat.
The saga continues ...at a snail's pace.
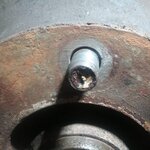
This may be part of the problem. I don't know what happened to break the axle but I presume it was ugly. The key is wedged askew in the key way which will put everything in a bind and there's probably other hidden galling and spalling contributing.
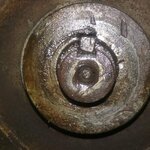
I'm guessing the studs have a splined head inside the drum and go thru the hub, all locked together by the lugnuts.
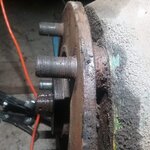
I'll need to upsize the holes in my heavy puller (thx lilhigbee for prodding me to rethink that) and make special smaller nuts to fit in the puller wings. My left hand tap arrived Thurs. Then I can try still more brute force plus heat.
The saga continues ...at a snail's pace.
That's ugly.
That key isn't helping if it's twisted.
Any way to weld some square stock to that one? Looks to be pretty good size.
Rig up a slide hammer and see if you can snatch it out.
Or drill and tap it for a slide hammer if it isn't hardened steel. If the threads pull out just drill it out.
That key isn't helping if it's twisted.
Any way to weld some square stock to that one? Looks to be pretty good size.
Rig up a slide hammer and see if you can snatch it out.
Or drill and tap it for a slide hammer if it isn't hardened steel. If the threads pull out just drill it out.
- Messages
- 841
- Reactions
- 2,185
- Thread Starter
- #31
Yeah, drilling the center out til there's nothing left but foil is probably a good idea.
Sometimes you can just drill a decent hole through it and then try to force it off.
The removed material will allow the key some room to shrink so to speak, especially if you take a carbide cutter and hog out one side all the way through. It'll fold in on itself when forced off.
The removed material will allow the key some room to shrink so to speak, especially if you take a carbide cutter and hog out one side all the way through. It'll fold in on itself when forced off.
- Messages
- 884
- Reactions
- 395
Torch...if it's just rust or metal distortion holding it on heat the drum up around the shaft while adding tension on the puller. Get that shot glowing it will go
- Messages
- 884
- Reactions
- 395
Gotta ask though, is that threaded on the driveshaft? Like maybe you have to pull the keystock out and unthread the spindle off the axle?
Gotta ask though, is that threaded on the driveshaft? Like maybe you have to pull the keystock out and unthread the spindle off the axle?
No, I'd say not.
The key is made of softer metal to be sacrificial so it will shear, rather than breaking the axle should the tire stop turning while the heavy machine continues movement. That is generally the purpose of the Woodruff key. I say, why would they use the key when they could use, much stronger teeth or splines? I still think it's just rust. Soak, heat, pull while banging(without breaking anything). If it doesn't come off, "rinse and repeat" a few times. The fact the key is slightly deformed tells you it's the softer of the shaft and stud ring.
In any case I'm looking forward to the end of this story. And I want see good pictures!
- Messages
- 841
- Reactions
- 2,185
- Thread Starter
- #36
Not much time to work on this today due to entertaining elderly in-laws on Father's Day but I finally got back to it and Progress!! Over the last couple of days I scrounged time to modify my heavy puller so that the wings would fit the 3/4" studs.

And make new nuts. The 1-1/2"hex lug nuts were way too big to fit inside the puller wings so I made some 1" hex nuts. Left hand thread so I bought a tap to cut the threads.
Tonight I finished up the nuts and got it all together and tightened up. Really tightened!
Then switched to the hammer wing accessory to the puller and coaxed it a bit with a 4lb hammer.

And after a few licks with the hammer, it finally broke free. No heat necessary (though that was going to be the next option)
 Thankfully, no mystery items under there, just a very wedged and mildly corroded tapered shaft end. Underneath is a big castle nut which I presume is a bearing retainer that I may have to create a spanner wrench for. Lots more to do but at least I'm moving forward. On the bright side, the brake shoes are oily enough they should last a long time
It's a relief to get past this part. On a side note, Dealing with the left hand threads on the studs has been interesting. Even though I KNOW they're left hand, the righty-tighty, lefty loosey is so heavily ingrained I found myself repeatedly turning things the wrong way LOL.
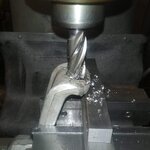
And make new nuts. The 1-1/2"hex lug nuts were way too big to fit inside the puller wings so I made some 1" hex nuts. Left hand thread so I bought a tap to cut the threads.
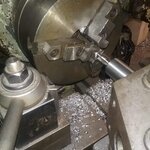
Tonight I finished up the nuts and got it all together and tightened up. Really tightened!
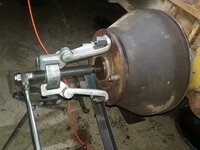
Then switched to the hammer wing accessory to the puller and coaxed it a bit with a 4lb hammer.
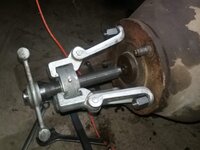
And after a few licks with the hammer, it finally broke free. No heat necessary (though that was going to be the next option)
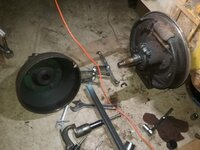 Thankfully, no mystery items under there, just a very wedged and mildly corroded tapered shaft end. Underneath is a big castle nut which I presume is a bearing retainer that I may have to create a spanner wrench for. Lots more to do but at least I'm moving forward. On the bright side, the brake shoes are oily enough they should last a long time
 It's a relief to get past this part. On a side note, Dealing with the left hand threads on the studs has been interesting. Even though I KNOW they're left hand, the righty-tighty, lefty loosey is so heavily ingrained I found myself repeatedly turning things the wrong way LOL.
Not much time to work on this today due to entertaining elderly in-laws on Father's Day but I finally got back to it and Progress!! Over the last couple of days I scrounged time to modify my heavy puller so that the wings would fit the 3/4" studs.
View attachment 470434
And make new nuts. The 1-1/2"hex lug nuts were way too big to fit inside the puller wings so I made some 1" hex nuts. Left hand thread so I bought a tap to cut the threads.View attachment 470436
Tonight I finished up the nuts and got it all together and tightened up. Really tightened!View attachment 470437
Then switched to the hammer wing accessory to the puller and coaxed it a bit with a 4lb hammer.
View attachment 470438
And after a few licks with the hammer, it finally broke free. No heat necessary (though that was going to be the next option)
View attachment 470439 Thankfully, no mystery items under there, just a very wedged and mildly corroded tapered shaft end. Underneath is a big castle nut which I presume is a bearing retainer that I may have to create a spanner wrench for. Lots more to do but at least I'm moving forward. On the bright side, the brake shoes are oily enough they should last a long time
It's a relief to get past this part. On a side note, Dealing with the left hand threads on the studs has been interesting. Even though I KNOW they're left hand, the righty-tighty, lefty loosey is so heavily ingrained I found myself repeatedly turning things the wrong way LOL.
Excellent! Great to have proper tools to do this stuff huh? It's hard to believe that a tapered shaft was that stuck, unless you've been careful and nice to it with the hammer up to this point? There's been times I've not been able to get something like this un-stuck and got help and was surprised the amount of BANG it took and didn't break anything.
RE left hand threads. One of the first lessons I learned at my first job at 17, in a full service gas station around 1972, was MOPAR put left hand threads on lug nuts, on the LEFT side of the car. The owner, Bob, kept lugs on hand though. and they were easy to replace.
- Messages
- 841
- Reactions
- 2,185
- Thread Starter
- #39
Now to get the axle out (in two pieces I fear). THEN the challenge of figuring out how to repair or replace. Finding a replacement is likely to be a needle in a haystack proposition. I don't suppose there's some master database of axles that could be searched based on size, length, splines, ends, etc. Depending on the nature of the break, welding *might* be a possibility though welding alloy steel successfully is a bit dicey. There's the option of making one from scratch but that's in the "Just because you can, doesn't mean you should" category.
It's all conjecture until I get further in. Hopefully I'll get somewhere on this before the end of summer. I have things I could use it for
It's all conjecture until I get further in. Hopefully I'll get somewhere on this before the end of summer. I have things I could use it for
Now to get the axle out (in two pieces I fear). THEN the challenge of figuring out how to repair or replace. Finding a replacement is likely to be a needle in a haystack proposition. I don't suppose there's some master database of axles that could be searched based on size, length, splines, ends, etc. Depending on the nature of the break, welding *might* be a possibility though welding alloy steel successfully is a bit dicey. There's the option of making one from scratch but that's in the "Just because you can, doesn't mean you should" category.
It's all conjecture until I get further in. Hopefully I'll get somewhere on this before the end of summer. I have things I could use it for
Is that the differential I see in the first pics? Maybe the piece the axle splines go in is cracked/broken? Is/was there noise of any kind when you turned the drum? Maybe you'll get lucky? Hope so.
Share This Discussion
Similar threads
- Replies
- 5
- Views
- 393
Upcoming Events
New Classified Ads
-
-
-
WTS/WTT Midwest 30MM QD SCOPE MOUNT for Midwest 34MM QD SCOPE MOUNT
- Started by Rixotic
- Replies: 0
-
-
16" complete AR upper with quad rail
- Started by whutdidyousay
- Replies: 0
-
-
-
Leupold vari-x II 3-9x40 gloss
- Started by urbanimports02
- Replies: 0
-
-
Support Our Community
If our Supporting Vendors don't have what you're looking for, use these links before making a purchase and we will receive a small percentage of the sale


