Bronze Vendor
Bronze Supporter
- Messages
- 2,978
- Reactions
- 8,276
One size does not fit all. Improperly fit rifles are unbalanced, do not recoil consistently and prevent proper sight alignment. Good marksmanship requires a properly fit rifle.
Length of Pull (LOP) can be summed up by the distance between the center of the trigger and the center of recoil pad/buttplate. A quick way to get in the ball-park of proper LOP is to make a 90* bend in your trigger side arm with your palm facing up. Place the buttplate in the crux of your elbow. Keeping your wrist straight and your trigger finger a nice 'C' shaped, bring your forearm into contact with the stock and see where your trigger finger naturally lands.
My google-fu is weak today so this is the best picture I can find. For some reason he's doing this with rulers instead of just using his rifle.

If your trigger finger lands in front of the trigger guard, your stock is too short. If your trigger finger is behind the trigger guard or into the wrist/pistol grip, your stock is too long. Modify your stock until your trigger finger lands perfectly on the trigger.
Once you have proper LOP, next you need to work on sight alignment. On a scale of 1-10, sight alignment is a 9 for scopes and a 12 for iron sights.
Sight alignment is putting your front sight, rear sight and your dominate eye in line with each other. Sight alignment has NOTHING to do with your target. There is only one sight alignment. You either have it - or you do not.
To set your sight alignment, get into the shooting position you will shoot the most. Close your eyes. Put your finger on the trigger (rifle is unloaded and pointed in a safe direction - right?). Firmly pull the buttplate of the rifle into your shoulder pocket. Put your chin on the comb of the stock (top edge) and bring your chin straight down until you have a roll of cheek over the top of the comb. This is called Cheek Weld.
Your dominate eye should be directly over the top of the stock. Your ears should be level. Equal amounts of pressure pulling the buttplate into the shoulder pocket and pressing the stock into the cheek.
Don't move your head - open your eyes - Don't move your head!
This is what your should see:
Peep sights

Notch & Post

(I'll touch base on scopes in a minute.)
If you do not see one of the above, you need to modify the stock until you do.
If you have to lift your head to achieve proper sight alignment, you need to build the stock up.
Pipe insulation and vet wrap are the poor mans way to fix comb height.
My personal favorite is: http://www.amazon.com/Adjustable-Ch...F8&qid=1429811874&sr=8-5&keywords=cheek+riser
The least expensive one I've found is: http://www.amazon.com/Advanced-Tech...F8&qid=1429811874&sr=8-8&keywords=cheek+riser
If you have to press into the stock more to achieve proper sight alignment, you have a much more difficult problem to fix. Consider a new stock all together or replacing your sights with a taller ones.
Scope sight alignment

On a scope, you are aligning the front of the tube, the rear of the tube and your dominate eye. To illustrate - grab a paper towel tube and hold it at arms length from your eye. You know it's in alignment when you can hardly see the inside of the tube.
There should be no shadows and you should have a full field of view through a properly aligned scope.
Scopes can be more difficult to achieve sight alignment with because not only do you have to align top to bottom, left and right but also, the scope must be the proper distance from your eye. This is called eye relief.
The best way to set the eye relief is with a friend. Loosen the scope rings until the scope can be slid forward and back. Get into the shooting position you will be shooting from the most. Set up your cheek weld just as above. Don't move your head.
Have your friend move the scope closer to your eye or further away until you find the optimum distance. 3-4" is 'normal'. Once your eye relief is set, make sure your reticle is level and snug down your scope rings.
A tip for leveling your reticle: typically there is a flat spot on the bottom of the scope under the adjustment turrets. Use playing cards or business cards as shims until that flat spot is level with the top of the barrel.
For the prone position, it's not unusual for the rear of the scope to be lined up with the rear of the trigger guard.

The last thing to adjust for a properly fit rifle is your front sling stud.
Get into the prone position (your support hand is extended the furthest in prone). Ensure that your support elbow is directly under the rifle. There should be approximately a 30 degrees between the ground (B), your elbow (A) and your support hand (C).

Pull your support hand back an additional 1/2" and have a friend use a sharpie to mark the center of the fore stock where the web of your thumb and pointer finger is. If you shoot with a shooting glove, make sure you are wearing it when you mark this point.
This is the proper place to install your sling stud. It will allow you to completely relax into the sling, pushing your support hand into the stud.
A properly fit rifle is essential to good marksmanship.
Length of Pull (LOP) can be summed up by the distance between the center of the trigger and the center of recoil pad/buttplate. A quick way to get in the ball-park of proper LOP is to make a 90* bend in your trigger side arm with your palm facing up. Place the buttplate in the crux of your elbow. Keeping your wrist straight and your trigger finger a nice 'C' shaped, bring your forearm into contact with the stock and see where your trigger finger naturally lands.
My google-fu is weak today so this is the best picture I can find. For some reason he's doing this with rulers instead of just using his rifle.
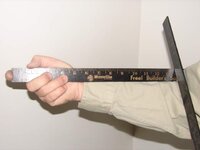
If your trigger finger lands in front of the trigger guard, your stock is too short. If your trigger finger is behind the trigger guard or into the wrist/pistol grip, your stock is too long. Modify your stock until your trigger finger lands perfectly on the trigger.
Once you have proper LOP, next you need to work on sight alignment. On a scale of 1-10, sight alignment is a 9 for scopes and a 12 for iron sights.
Sight alignment is putting your front sight, rear sight and your dominate eye in line with each other. Sight alignment has NOTHING to do with your target. There is only one sight alignment. You either have it - or you do not.
To set your sight alignment, get into the shooting position you will shoot the most. Close your eyes. Put your finger on the trigger (rifle is unloaded and pointed in a safe direction - right?). Firmly pull the buttplate of the rifle into your shoulder pocket. Put your chin on the comb of the stock (top edge) and bring your chin straight down until you have a roll of cheek over the top of the comb. This is called Cheek Weld.
Your dominate eye should be directly over the top of the stock. Your ears should be level. Equal amounts of pressure pulling the buttplate into the shoulder pocket and pressing the stock into the cheek.
Don't move your head - open your eyes - Don't move your head!
This is what your should see:
Peep sights
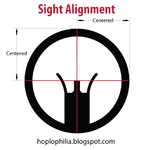
Notch & Post
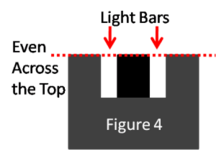
(I'll touch base on scopes in a minute.)
If you do not see one of the above, you need to modify the stock until you do.
If you have to lift your head to achieve proper sight alignment, you need to build the stock up.
Pipe insulation and vet wrap are the poor mans way to fix comb height.
My personal favorite is: http://www.amazon.com/Adjustable-Ch...F8&qid=1429811874&sr=8-5&keywords=cheek+riser
The least expensive one I've found is: http://www.amazon.com/Advanced-Tech...F8&qid=1429811874&sr=8-8&keywords=cheek+riser
If you have to press into the stock more to achieve proper sight alignment, you have a much more difficult problem to fix. Consider a new stock all together or replacing your sights with a taller ones.
Scope sight alignment
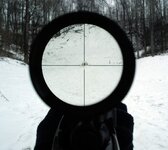
On a scope, you are aligning the front of the tube, the rear of the tube and your dominate eye. To illustrate - grab a paper towel tube and hold it at arms length from your eye. You know it's in alignment when you can hardly see the inside of the tube.
There should be no shadows and you should have a full field of view through a properly aligned scope.
Scopes can be more difficult to achieve sight alignment with because not only do you have to align top to bottom, left and right but also, the scope must be the proper distance from your eye. This is called eye relief.
The best way to set the eye relief is with a friend. Loosen the scope rings until the scope can be slid forward and back. Get into the shooting position you will be shooting from the most. Set up your cheek weld just as above. Don't move your head.
Have your friend move the scope closer to your eye or further away until you find the optimum distance. 3-4" is 'normal'. Once your eye relief is set, make sure your reticle is level and snug down your scope rings.
A tip for leveling your reticle: typically there is a flat spot on the bottom of the scope under the adjustment turrets. Use playing cards or business cards as shims until that flat spot is level with the top of the barrel.
For the prone position, it's not unusual for the rear of the scope to be lined up with the rear of the trigger guard.
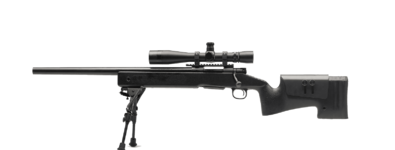
The last thing to adjust for a properly fit rifle is your front sling stud.
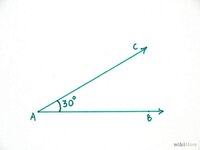
Get into the prone position (your support hand is extended the furthest in prone). Ensure that your support elbow is directly under the rifle. There should be approximately a 30 degrees between the ground (B), your elbow (A) and your support hand (C).
Pull your support hand back an additional 1/2" and have a friend use a sharpie to mark the center of the fore stock where the web of your thumb and pointer finger is. If you shoot with a shooting glove, make sure you are wearing it when you mark this point.
This is the proper place to install your sling stud. It will allow you to completely relax into the sling, pushing your support hand into the stud.
A properly fit rifle is essential to good marksmanship.


