JavaScript is disabled
Our website requires JavaScript to function properly. For a better experience, please enable JavaScript in your browser settings before proceeding.
Just curious, how are you shaping those? Do you have a jig of some kind? What tools are you using? I really like the different grips you've been making and I may want to try and tackle that myself. I've got some zebrawood, purpleheart and some nice maple I'd like to try.

Nothing fancy. I have some crap GI grips that I have been using to trace on wood using a sharpie
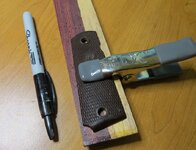
iIN6XcI.jpg

Then cut out with the band saw. I clamp on the GI grips back on and use the holes to guide the drill press

Then I sand the rounded grip side using a 1x30 belt sander. Just doing it by eye. 80 grit to get the bulk of it sanded round and then finish with 400 grit
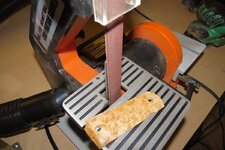
q8v8r9Y.jpg

I finish the grip screw holes by using a step drill bit I had that works really well, I drill down through the 1/4" step and create the little ledge for the screw with the 9/32" step
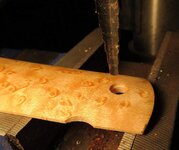
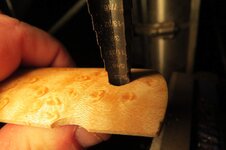
w4ckMRb.jpg
9bx9tws.jpg

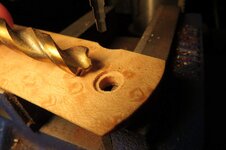
I create the space on the back with a 3/8th bit with a starter point like this one
SrEKQ1T.jpg

I then finish with a dremel sanding drum to get the space for the thumb safety and mag ejector finished

then Im experimenting with finishing techniques like the sand filling technique in this video (just remember boiled linseed oil oxidizes so may set rags soaked with it on fire if left in a pile)

Im also trying tru-oil. Though I got a recipe for linseed oil + turpentine + minwax polyurethane from the guy at Gilmer to try as well
 
Nothing fancy. I have some crap GI grips that I have been using to trace on wood using a sharpie
View attachment 281403

Then cut out with the band saw. I clamp on the GI grips back on and use the holes to guide the drill press

Then I sand the rounded grip side using a 1x30 belt sander. Just doing it by eye. 80 grit to get the bulk of it sanded round and then finish with 400 grit
View attachment 281404

I finish the grip screw holes by using a step drill bit I had that works really well, I drill down through the 1/4" step and create the little ledge for the screw with the 9/32" step

View attachment 281405
View attachment 281406

I create the space on the back with a 3/8th bit with a starter point like this one
View attachment 281407

I then finish with a dremel sanding drum to get the space for the thumb safety and mag ejector finished

then Im experimenting with finishing techniques like the sand filling technique in this video (just remember boiled linseed oil oxidizes so may set rags soaked with it on fire if left in a pile)

Im also trying tru-oil. Though I got a recipe for linseed oil + turpentine + minwax polyurethane from the guy at Gilmer to try as well

That doesn't look too bad, it's nice to have a step by step to help guide the process - thanks for the photos :)

As for finishes, I've used straight BLO on the slingshots I've built in the past, though I've found I've become more of a fan of blends like Tru Oil and Tung Oil. What I really try to avoid is wood 'stain' as I've found it inconsistent and uneven. There are several great oils that really bring out the color and the grain that is naturally present, much better, in my opinion, than stain. If I decide to do a sealant/finish, I'll use a hand-rubbed poly, usually with a satin finish rather than glossy.
Try one of the minwax Spar Urathane spray finishes! I have used these for a wile now and really like who it turns out. I especially like the satin finish, as I really like how it shows the grain!
 
I went by Gilmer yesterday. that will be a fun place to visit. First thing that caught my eye was some snakewood. Then found out it was a $145 piece of snakewood. so it went back on the shelf
https://www.gilmerwood.com/items.php?CID=36

But they have a bin for cut off bits of wood from making fret boards that are perfect thickness for making grips. so I got a variety to try.

African blackwood is pretty amazing. Its dense and waxy so it is more like working with plastic. This is just sanded without any finish. from the $5 bin

View attachment 281392
Forgot to warn ya about the Snake wood! haha. I did the same when I found it! I wanted some for an inlay I was doing on a muzzle loader! I ended up with nice curly maple instead!
 
Try one of the minwax Spar Urathane spray finishes! I have used these for a wile now and really like who it turns out. I especially like the satin finish, as I really like how it shows the grain!

I've heard of the Spar finish, but haven't had any reason to buy some for a project yet. I'll definitely mark that down for future use though :)
 
Forgot to warn ya about the Snake wood! haha. I did the same when I found it! I wanted some for an inlay I was doing on a muzzle loader! I ended up with nice curly maple instead!

Speaking of maple, one of my favorites is maple burl wood, man, you can get some amazing grain patterns in that stuff.
 
Dreams do come true!
must...stop...building...1911's...

Here is there 'coming soon' list

-30 LPI Front-Strap Checkering Option on ALL Frame Models.
-Bobtail frame/Mainspring Housing Combo on ALL Frame Models
-Ramped Barrel Cut Frame on ALL Frame Models.
-Black Nitride Coated Slide Option on ALL Slide Models
-Black Oxide Coated Frame Option on ALL Frame Models
-Completed Frame Option (FFL Shipment Required)
-9mm/.38 Super/ 40 S&W/ and 10mm Build Kits/Slides/Barrels
It's a sickness! I may need therapy! Seriously, How many have you built? I'm on # 12 right now and have another in the works, just waiting on the rest of my parts orders ( Brownells is super slow) Even worse, I discovered the 2011 STI frame kit's and have all ready built 4 of them. I'm tellin ya, a man could go broke!
 
It's a sickness! I may need therapy! Seriously, How many have you built? I'm on # 12 right now and have another in the works, just waiting on the rest of my parts orders ( Brownells is super slow) Even worse, I discovered the 2011 STI frame kit's and have all ready built 4 of them. I'm tellin ya, a man could go broke!
cool!
I've not done that many, perhaps 7 80% kits, 3 of them 1911's. I like the variety.

I wish there were more types of easy 80% kits. There is a FAL 80% receiver but from what I'd heard it is very difficult to do even with a full machine shop
<broken link removed>

There is a 10/22 80% receiver that also looks a bit tricky
http://www.ruger1022receiver.com/
 
I did a FAL 80% kit! I didn't find it that bad honestly. It has plenty of room to work with and doesn't really require any tools you probably do not all ready have! machining the outside is about the hardest part of the build! I have not tryed a 10/22 yet or one of the M-1 Carbine kits yet, but I can see some areas that might give some troubles! at least your having fun and learning a useful skill set plus I thinks it's just too cool! Training your hands in this art is a lot of fun!
 
I did a FAL 80% kit! I didn't find it that bad honestly. It has plenty of room to work with and doesn't really require any tools you probably do not all ready have! machining the outside is about the hardest part of the build! I have not tryed a 10/22 yet or one of the M-1 Carbine kits yet, but I can see some areas that might give some troubles! at least your having fun and learning a useful skill set plus I thinks it's just too cool! Training your hands in this art is a lot of fun!

are there instructions anywhere? I looked and just heard stories of how it was not worth it. $44 for a receiver isnt bad
 
are there instructions anywhere? I looked and just heard stories of how it was not worth it. $44 for a receiver isnt bad
I never found any instructions but I did have a fully machined receiver to go from. I made my own jig using the two cross pin holes to lock it down for machine work! Drilling out the barrel and then threading the receiver might be a bit of a challenge if you don't have machine tools. I did mine on a lathe Its a pretty easy build except for cutting the outside for one of the different versions of cut that the FAL used! If you have a vertical mill, this is easy! If not, I could see some issues! For the "home builder" A good solid heavy vice, a good set of drill bits big enough to drill the barrel ring, and the correct tap for threading should get you a working FAL, but not a very pretty one! Probably not a good project if you don't have access to a mill at least!
 

Upcoming Events

Redmond Gun Show
Redmond, OR
Klamath Falls gun show
Klamath Falls, OR
Centralia Gun Show
Centralia, WA

New Resource Reviews

New Classified Ads

Back Top