- Messages
- 285
- Reactions
- 315
This is my second review of the 5D tactical (sorry this took some time getting up).
The first review was pulled due to multiple issues I had. After speaking with Andy the owner, I gave it a second go around. An additional note: I know nothing of metal working. I know there was discussion of helix angles, and depth, etc. etc...this was all latin to me. I'm a guy who wants to mill a lower, and wanted an easy do it yourself setup.
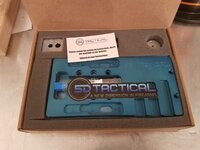
So upon initial unpacking comes with everything in a nice small box about the size of a small flat ship rating box everything has its proper place. Looking at the side plates they're small but man are they meaty; definitely have a sturdy look to them. I've noticed that there's no instructions included which means you have to watch videos or print them off the website. **IMPORTANT NOTE: EITHER GO PRINT THEM OFF OR SAVE THEM IN A PDF; I promise it will save you headaches later** I also noticed looking at the End Mill that I bought that I can see how they claim better heat dissipation with how fat the body is but yet how small the shank is. I'm very curious to see how this plays out as I actually know.

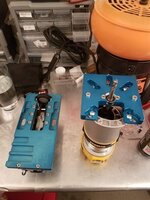
Setting up is pretty easy if you follow the directions step by step. While I had a 5D tactical lower, I ordered a lower from Daytona Tactical. I wanted to make sure this setup was universal, and I have used their lowers in the past for different projects. Something to note, as I was installing the rear safety takedown pin I noticed that because I was using it on an off name brand I had a bit of trouble pushing it through. So be advised that you might run into the issue of something being over anodized or not cleaned up properly. So make sure before you start installing anything, to run the takedown pins through the holes and anything else that requires you to set something up so you do not scratch the finish of your lower. When installing the 4 screws into the top plate that says 2/3 make sure you do not make them snug. The reason why is if your receiver is not pushed up and you tighten down you will tighten down the blocks into your receiver and possibly causing some damage. One thing I must note, on a previous milling, my lower wiggled a bit while in the jig. This was part of the issue with the previous build. This can be corrected by taking the Thread Buffer Adapter (the circle piece that screws into the buffer slot) and twisting it it in another half turn. Assembly of the block and the plate on the router took me about 15 minutes (Yes I know the photo reflects the finished product, but I forgot to snap a picture at the beginning).

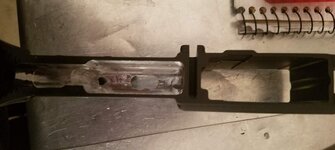
I had used the Makita router that suggested on the website, and this time around I used the Dewalt DWP611. I must say, that even though the makita is rated a 9/10 to use, get the Dewalt. It was probably the smartest purchase I did (the light alone makes a world of difference). As I began milling the lower, I was impressed at how smooth I was going through the circular motion. About a minute and a half later, I was ready for the next pass. About a 40 minutes later (I pause between each pass and vacuum out the lower), I was installing the third guide pins to mill out the pocket. another 30 seconds and I was done (and like a kid who was to eager, in my own error, I did what you are not suppose to and pulled the mill up before it stopped spinning...luckily, all it did was widened the pocket a little).

I spent another 5 minutes cleaning up the area, and the lower, and decided to slap in an extra trigger set along with safety that I had sitting in my tool box.

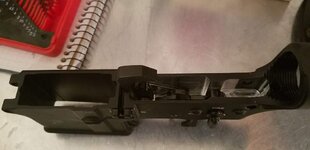
Everything fit perfectly; trigger along with safety responded without issue.
Final thoughts: I've milled a lower using a drill press setup which took hours and was tedious. I milled a few lowers using 80% arms jig setup, which took about 2 to 3 hours each; while easier then a drill press, there was still a lot of steps that needed to be done before getting to the milling. The 5D impressed me the most. It requires minimum steps on drilling and its design makes the milling flow effortlessly. I also really appreciate that I can jump right into the next project quickly since the jig is already setup. Cost wise, the 5D is the priciest of the bunch, and if you have multiple lowers you plan to mill out, this is the way you want to go. Even if you only want to build one, I would still favor this one over the others due to the time saved. The last point, and this one really sells it for me, is the customer service. Andy is a stand up guy who stands by his product, and when issues arose he was readily available to go over everything, point out all the possible problems, and gave the proper solutions. Now a days most people just throw things at people to get them to shut up, but this guy genuinely wanted to make sure I was satisfied and multiple phone calls later; and I am.
Ultimately, I look at this jig as a great addition to my tool box, and plan to build another rifle or 3 (hopefully I don't get divorced in the process). Very much looking forward to slapping this lower fully together, and taking it out.
The first review was pulled due to multiple issues I had. After speaking with Andy the owner, I gave it a second go around. An additional note: I know nothing of metal working. I know there was discussion of helix angles, and depth, etc. etc...this was all latin to me. I'm a guy who wants to mill a lower, and wanted an easy do it yourself setup.
So upon initial unpacking comes with everything in a nice small box about the size of a small flat ship rating box everything has its proper place. Looking at the side plates they're small but man are they meaty; definitely have a sturdy look to them. I've noticed that there's no instructions included which means you have to watch videos or print them off the website. **IMPORTANT NOTE: EITHER GO PRINT THEM OFF OR SAVE THEM IN A PDF; I promise it will save you headaches later** I also noticed looking at the End Mill that I bought that I can see how they claim better heat dissipation with how fat the body is but yet how small the shank is. I'm very curious to see how this plays out as I actually know.

Setting up is pretty easy if you follow the directions step by step. While I had a 5D tactical lower, I ordered a lower from Daytona Tactical. I wanted to make sure this setup was universal, and I have used their lowers in the past for different projects. Something to note, as I was installing the rear safety takedown pin I noticed that because I was using it on an off name brand I had a bit of trouble pushing it through. So be advised that you might run into the issue of something being over anodized or not cleaned up properly. So make sure before you start installing anything, to run the takedown pins through the holes and anything else that requires you to set something up so you do not scratch the finish of your lower. When installing the 4 screws into the top plate that says 2/3 make sure you do not make them snug. The reason why is if your receiver is not pushed up and you tighten down you will tighten down the blocks into your receiver and possibly causing some damage. One thing I must note, on a previous milling, my lower wiggled a bit while in the jig. This was part of the issue with the previous build. This can be corrected by taking the Thread Buffer Adapter (the circle piece that screws into the buffer slot) and twisting it it in another half turn. Assembly of the block and the plate on the router took me about 15 minutes (Yes I know the photo reflects the finished product, but I forgot to snap a picture at the beginning).

I had used the Makita router that suggested on the website, and this time around I used the Dewalt DWP611. I must say, that even though the makita is rated a 9/10 to use, get the Dewalt. It was probably the smartest purchase I did (the light alone makes a world of difference). As I began milling the lower, I was impressed at how smooth I was going through the circular motion. About a minute and a half later, I was ready for the next pass. About a 40 minutes later (I pause between each pass and vacuum out the lower), I was installing the third guide pins to mill out the pocket. another 30 seconds and I was done (and like a kid who was to eager, in my own error, I did what you are not suppose to and pulled the mill up before it stopped spinning...luckily, all it did was widened the pocket a little).

I spent another 5 minutes cleaning up the area, and the lower, and decided to slap in an extra trigger set along with safety that I had sitting in my tool box.

Everything fit perfectly; trigger along with safety responded without issue.
Final thoughts: I've milled a lower using a drill press setup which took hours and was tedious. I milled a few lowers using 80% arms jig setup, which took about 2 to 3 hours each; while easier then a drill press, there was still a lot of steps that needed to be done before getting to the milling. The 5D impressed me the most. It requires minimum steps on drilling and its design makes the milling flow effortlessly. I also really appreciate that I can jump right into the next project quickly since the jig is already setup. Cost wise, the 5D is the priciest of the bunch, and if you have multiple lowers you plan to mill out, this is the way you want to go. Even if you only want to build one, I would still favor this one over the others due to the time saved. The last point, and this one really sells it for me, is the customer service. Andy is a stand up guy who stands by his product, and when issues arose he was readily available to go over everything, point out all the possible problems, and gave the proper solutions. Now a days most people just throw things at people to get them to shut up, but this guy genuinely wanted to make sure I was satisfied and multiple phone calls later; and I am.
Ultimately, I look at this jig as a great addition to my tool box, and plan to build another rifle or 3 (hopefully I don't get divorced in the process). Very much looking forward to slapping this lower fully together, and taking it out.
Last Edited:


